
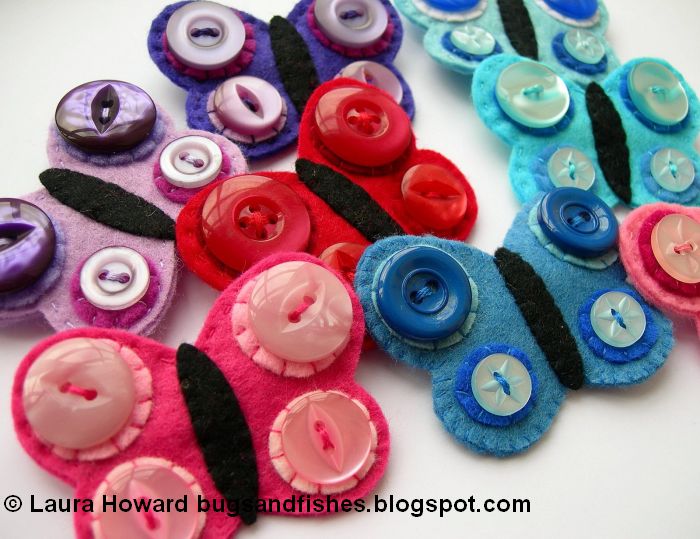
Lovely for springtime, or as a sweet gift all year round! You will need:
- two pairs of buttons, one pair slightly larger than the other
- some colourful felt. Any felt will do for the decorative detail but thicker/stiffer felt is better for the main butterfly shape - eg acrylic felt available from most craft shops or thick wool felt. I've used acrylic felt for mine. If you're worried about your felt not being sturdy enough, just add an extra layer between the front and back piece.
- matching sewing thread
- a brooch back or safety pin
First cut out your pattern pieces - if you print the pattern sheet (see end of this post) at 100% your brooches will be the same as mine, approx 6cms across, just print it larger to get larger butterflies and to be able to use bigger buttons. You need one body piece in black or brown, and two colourful wing shapes. All the pieces I've cut out for my "in progress" shots are brown as I decided to use the pattern to make some moths.

Next choose your buttons to match - again, mine are brown to suit my moth but you can have lots of fun playing around with colours.

Use your buttons as a template to cut small circles of contrasting felt. Hold the button against the felt and cut round it leaving a narrow border which will "frame" your button. Once you've cut one circle this way you can use it as the template to cut a matching one for the other button. Repeat for the second pair of buttons. Lay all your pieces onto the wing shape to check you're happy with your design.

Using matching thread, sew on the narrow body shape and the felt circles (using contrasting thread for the circles can work quite nicely in adding an extra bit of decorative detail).

One by one, position each button as close to the centre of its felt circle as possible and sew it on securely (this is much quicker if you use a double thickness of thread).

Now take your second wing shape, and sew on your brooch back or safety pin. To attach a safety pin neatly just cut a small rectangle of felt to match your brooch, place it over the pin (make sure the part which you use for pinning remains free!) and sew it securely in place. I used to do this all the time when I first started making brooches, the one pictured is one of my early felt flower brooches.

Finally, put the front and back pieces together and sew them together with matching thread - either with plain stitches or whip stitching around the edges. This is easiest if you start at the side of one wing instead of near the middle. And that's it! Easy, huh? Why not make lots and have a whole group of butterflies fluttering across your sweater...

Of course, I do love a good design variation ... so here's a way to use this pattern even if you don't have any buttons. Instead of a button with a framing circle of felt, cut lots of little circles of felt and layer them - cut the smallest circle first and use this as a template as described above for cutting "framing" circles.

Sew on the narrow body piece and then use contrasting thread to attach the circles. I held each trio of circles in place and stitched through all three at once starting in the middle and moving outwards like a spiral.

You can play around with the stitches a little if you like to add some more detail, as I did with the second set of circles.

For extra variations on this design you could try sewing sequins or small beads in the centre of the circles for a bit of sparkle. Then just attach a brooch back or safety pin as before and sew the front and back together and wear your creation with pride!

Double click on the pattern sheet to view it full size and print:

This tutorial is for non commercial use only: you can use it for as many brooches as you like for yourself or as gifts for friends but please don't make any for sale. Please feel free to borrow photos if you want to blog about this project, but remember to credit me and link back to the original source, and do not reproduce my tutorial on your site. Thanks!
Enjoyed this free tutorial? Buy me a "coffee" and help support my blog!

Subscribe to my newsletter for a monthly free pattern and visit my crafty tutorial archive for lots more free projects.
Visit my shop to buy my printable PDF sewing patterns:
33 comments:
These brooches are beautiful! Thank you so much for the tutorial :) perfect for my friend's birthday that is coming up in two weeks! :D Thanks again!
x
*gasps* These are so pretty!
Now I just need to find some felt
x
great tutorial!
These butterflies are darling! Thanks for sharing your creativity with us. I have all the materials at home so this looks like a fun project for today!!
Hugs to you and have a great day!
Oh my God, they are so cute. I think I'll have to make a few for my daughter, she would love them. Especially if I used shiny sequins instead of buttons.
Thanks for the great tutorial!
How fun! I love making cute little things with felt!
Very Nice!....:)
Wow - loving these-so cute and so easy too!
Now where did I put my mini felt squares...?
Hiya! Thanks for such a clear tutorial! The butterflies are so pretty. I must find some time to make some because I've got a lot of felt and buttons lying around.
Mary
These would look great as hair clips for my little girl. Great tutorial!
Aww these are so sweet! I love this project, I'll be linking.
Cute! I love both the button and the non-button versions. Great tutorial. :)
cute little brooches! i want them in every colour.
thanks for the tutorial.
i set a link to your blog in my latest posting. i hope you agree. if not, please leave a short comment.
doro.
These are so cute!! I am going to try making them this weekend ;O)Thanks!
These are so cute - I think they would make super cute barrettes also. Thanks!
These are sooo cute! Now, let's say that you're not very good at sewing... is there a way to do this with fabric glue? Do you have a strong fabric glue you could recommend? Thanks!
I'm going to try these and instead put alligator clips for hairbows. Thanks for the great tutorial.
Thanks for the sweet comments everyone! Sorry Ellen but I don't know what glue to recommend as I just sew everything, but I'm sure there are some good strong fabric glues out there that would do the job :)
Great idea!! Thanks for the cute tips.
How beautiful! Thanks for sharing your tutorial.
Hello again! I made one with slight changes :) as a birthday present for my dear friend Sonia. It was posted all the way to Co. Durham as a surprise and she loved it! thanks again for the lovely tutorial.
I have posted photos on my blog :)
x
Great to hear that Lorenza, do post a link to your blog! :)
Very cute idea for buttons.
These are so adorable!!! Thank you very much for the pattern and tutorial, I think I will have to make a bunch for my daughter and her little friends.
Hi Lupin..your tutorial just make me fall in love with felt craft!such a lovely creation!
Great job! I featured this today on my blog - Today's Top 20! Feel free to stop by and grab a button!
Amanda
todaystoptwenty.blogspot.com
Thank you for the butterfly tutorial,
they are so pretty!
I took your idea and made kits for my brownies to make brooches for Mother's day. It might have been a little too ambitious, but the girls had fun!
if you would like to check out our version, here it is:
http://beardollyandmoi.blogspot.com/2012/05/butterfly-brooches-for-mothers-day.html
thanks again
Ohhhhh I Love This! One of the craft members of our group at CafeMom - Holiday and Party Crafts - shared this and I just had to come look at the tutorial and the other items. I'm glad I did, felt is such a cool material to work with. Thanks for sharing this! ~ Yolanda ~
Thanks for the comments & links everyone! xx
Thanks Laura, these look lovely & I can't wait to make them =)
I hope you'll enjou making them :)
Six years and a week since you posted this tutorial, and the butterfly brooches/hair clips are *still* adorable!! Thank you for sharing this super-sweet idea.: ) xoxo
Aw, thanks for the sweet comment, Pat! :)
Post a Comment