Tuesday 31 May 2016

You are STRONGER than You Know: Free Embroidery Pattern

UPDATE: my "You are STRONGER than You Know" embroidery pattern is now available as a printable PDF pattern over on my Patreon. 

Subscribe to get instant access to a growing library of PDF embroidery patterns and craft tutorials, and updates when I add something new!

---

Time for the final pattern in my positive embroidery series!


Life can throw a lot of difficult stuff at us sometimes. You might be facing a scary challenge - a big mountain to climb or a dark tunnel to walk through before you reach lighter, happier times - but you are stronger than you know.


Like the other three patterns in this series (remember to be kind to yourself, don't compare your inside to someone else's outside and be the best version of you)  this design fits nicely in a five inch embroidery hoop for framing. If you like, you can use a six inch hoop when stitching it to give yourself more room to work and get those scallop edges nice and neat.


I chose Cotton & Steel's XOXO in Ghost as my backing fabric, which looks grey in some lights and almost brown in others. The design is stitched in pink and teal, with turquoise blue stars.


The pattern is mostly stitched with backstitch, using three strands of six-strand embroidery thread (floss) and slowly sewing small stitches along all the curves. The small teal lines radiating from the circle are each sewn with one stitch.


If you're using a pale backing fabric (like the one I've used) take care not to carry your threads across the back of the work.

When you sew the final radiating single stitches, stitch into/under the pink circle of stitching so the thread follows the circle round between the single stitches instead of stretching in straight lines from stitch to stitch.


You could frame the finished pattern in the hoop as a bit of embroidered art, use it to make something small like a zip purse or add it to a patchwork project.


Subscribe to my newsletter for creative updates and visit my crafty tutorial archive for lots of free projects.

Visit my shop to buy my printable PDF sewing patterns:

Wednesday 25 May 2016

Be the Best Version of YOU: Free Embroidery Pattern

Today I'm sharing the third free pattern in my positive embroidery series.

This one is a reminder to Be the Best Version of YOU.


Don't get lost comparing yourself to other people or squashing yourself into a mould cast by others, focus on your own life and how best to make your own spirit bloom!


This design fits nicely in a five inch embroidery hoop for framing, but if you want you can use a six inch hoop when stitching it to give yourself more room to work. I actually used a seven inch hoop when stitching this pattern as I'd managed to misplace my smaller hoops at the time and wanted to start sewing immediately, not faff about finding exactly the right size hoop.


The fabric I used is Cotton & Steel's XOXO in Ghost, which looks grey in some lights and almost brown in others (not ideal when you're taking photos of it, but it looks really lovely in real life!). For the stranded embroidery thread (floss) I used the same shades of pink and teal as I'd used in the earlier patterns, and added some turquoise blue for the stars.


The pattern is mostly stitched with backstitch, using three strands of six-strand embroidery thread (floss) and slowly sewing small stitches along all the curves. The small teal lines radiating from the circle are each sewn with one stitch.


Because my chosen backing fabric is rather pale, I was careful  not to carry my threads across the back of the work, giving a neat (ish!) finish. When sewing those final radiating single stitches, I stitched into/under the pink circle of stitching so the thread follows the circle round between the single stitches instead of stretching in straight lines from stitch to stitch.


You could frame the finished pattern in the hoop as a bit of embroidered art, use it to make something small like a zip purse or add it to a patchwork project. 

Click here to open the pattern sheet in another tab or window. Make sure you're viewing it full size then print it at 100%.


This embroidery pattern is for non commercial use only: you can stitch it as many times as you like for yourself or as gifts, but please don't use it make anything for sale. You may borrow a photo or two if you want to blog about this project, but remember to credit me and link back to the original source, and do not reproduce my entire post or share the pattern itself on your site. Thanks!

P.S. Let's not talk about how long it's been since I said I'd be sharing these "over the next few weeks"! Life, man, it gets in the way sometimes...

You'll find the first pattern here: Remember to be KIND to yourself.

And the second pattern here: Don't compare your INSIDE to someone else's OUTSIDE.

Enjoyed this free pattern? Buy me a "coffee" and help support my blog!

Buy Me a Coffee at ko-fi.com

Subscribe to my newsletter for a monthly free pattern and visit my crafty tutorial archive for lots more free projects.

Visit my shop to buy my printable PDF sewing patterns:

Monday 23 May 2016

Leeds: Magnificent Victorian Shopping Arcades

This spring I spent a week in Yorkshire, visiting Leeds and then York - exploring both cities and visiting lots of museums and other interesting historic bits and pieces along the way.

One of the highlights of my trip to Leeds was the Victoria Quarter, which is home to three Victorian shopping arcades.


There's Thornton's Arcade, which was built in 1877 and was the first of Leeds' arcades (at one time there were eight!).


If you look closely at that photo, you might be able to just make out the clock at the far end of the arcade - it's decorated with four figures from the book Ivanhoe (including Robin Hood and Friar Tuck) who strike the bells every quarter of an hour. Sadly, I didn't time my visit quite right and missed this!

Next there's Queen's Arcade, which was built in 1889.


Both arcades have some lovely decorative ironwork, and are filled with a mix of independent shops and well-known chains.

And last but by no means least is the County Arcade. Built between 1898 and 1900, this is a large and very splendid arcade!


There are some lovely and very smart arcades in London but I've never seen one quite like this before. I mean, just look at it! Isn't it fabulous?

 
 There are glazed domes...


... colourful ironwork, decorative tiles, symbolic mosaics...


... golden shop signage, balconies, marble columns...


... and sunlight streaming in through pane after pane of glass.


Even the floor is gorgeous.


The shops themselves are all pretty fancy as well, with a whole host of luxury brands to choose from.

This is somewhere that's definitely worth a visit, even if you're just planning on window-shopping!

Want to read more about my trip to Leeds? Click here to read about my walk along Leeds' waterside.

Saturday 21 May 2016

April in Pictures: Fabric Shopping, Neglected Cups of Tea, a Sleepy Assistant and Crazy British Weather.

It's been a hectic few weeks here! I've been busy with tight deadlines and exciting travels and boring paperwork and all sorts of other stuff that has collectively got in the way of blogging!

Though I've not had time to sit down and put together a proper blog post for ages (as those of you who are bloggers yourselves will know, this stuff takes time! Take the photos, edit them, resize them, label them, upload them, write something interesting, proofread it, etc...) I have been sharing some snaps over on my new Instagram account.

I thought it would be nice to do a monthly round-up of the photos I shared on Instagram that didn't make it onto my blog. This way those of you who don't follow me on Instagram won't miss out, and I can waffle to my heart's content about what I've been up to instead of having to confine myself to a short and snappy caption that I've slooooowly typed on my smartphone keyboard (it's taking me a while to get used to that thing!!).

So, what did I get up to at the end of April?

I can rarely resist a nice bit of stationery and fell head over heels with this "Enchanting Forest" letter-writing set designed by Helen Dardik for Roger la Borde. Isn't it lush? As well as using it to write letters (of course) I've also been using the stickers to decorate other bits of post. So much prettiness.


Walking to the postbox a few days later, floral-sticker-covered-post in hand, it was lovely to spot these wildflowers growing along a fence. All those little specks of blue! Delightful.


Talking of flowers... I finally stitched the last few flowers onto this cushion which has been a work in progress for a while now. Have I found the time to take photos of the finished cushion? I have not. I must remember to actually do that because I am really rather chuffed with how this turned out. Although - I have to confess - I'm actually thinking about maybe adding some embroidery to this as well. I might leave it for a few months and see how I feel as that will be yet another time-consuming project to add to my To Make list!


When I'm sewing or doing other non-writing work, I listen to the same albums over and over. In late April I was listening to this one on repeat. I've had this tape for 25 years and still love it!


Escaping from my studio/office for a morning, I took a trip to Fabric Land to buy supplies for a couple of work projects. Fabric Land is not (sadly) a magical Narnia-esque world of fabric and enchanted haberdashery creatures but is actually a really great chain of sewing shops. They're an absolute treasure trove of stitch-y supplies and have helpful staff and a legendary website that's straight out of 1998. While I was in town I also popped into the knitting shop next door to buy some white yarn for my mini patchwork squares blanket. Online shopping is super convenient but nothing beats being able to buy what you need in a local shop.


I do a lot of working on things behind the scenes that I can't talk about, so it's always a joy when I get to finally spill the beans on a project. The six projects I contributed to Banners, Buntings, Garlands & Pennants were so much fun to make!


I gave one of these copies to my mum (she has a whole collection of books featuring my work) and the other now sits on what I half-jokingly refer to as "my ego shelf". The shelf is an ego-boosting collection of books by me, books featuring my projects, plus other nice things like the first magazine to ever feature my work in print and the photo book I made filled with six years of crafty photos.


I was completely obsessed with books when I was a kid, I spent so much time reading and dreamt of a day when I would have a house of my own with its own library (a whole room! filled with books!). Now I'm a grown up, I may not have the library I hoped for when I was a kid but a shelf of books I've been involved in creating is possibly even better.

My inner book nerd was also thrilled to spot myself (and the other contributors) listed in the index of Banners, Buntings, Garlands & Pennants. I've never been in an index before!


I work from the sofa a lot when I've got a large amount of sewing to do - it's so comfy, and my assistant keeps me company while I sew...


You can tell I was busy with work as I kept making tea and forgetting to drink it! This was the third cup that had gone cold that day as I rushed around drawing and stitching and writing and taking photos.


Part of the reason I was rushing about was to get ready for a trip to Northumberland with my mum. Planning trips in advance is very necessary, but they don't always fit in well around deadlines when the time rolls round!

We had some craaaazy weather on our trip, even for England. It hailed, it snowed, it rained, it was sunny, it hailed again! All the weather, all crammed into a few days. This was the view from our hotel room one afternoon...


... and this was the view on the coast just a couple of days later! Chilly, yes, but gorgeously bright and clear.


I will, of course, be blogging about our visit to Northumberland as soon as I've got the photos edited. We were only there for a few days but we visited so many great places, I'm really looking forward to sharing them with you guys.

P.S. Follow me on Instagram for regular, colourful updates!

Thursday 19 May 2016

My Happy Rainbow Blanket: Almost Finished!

Remember my rainbow blanket?


I bought the final ball of yarn last month and finally finished knitting the squares last week.

I had two "halves" of the blanket already knitted and sewn together but it was missing three rows of aqua and green.


So, I got to knitting the final green squares...


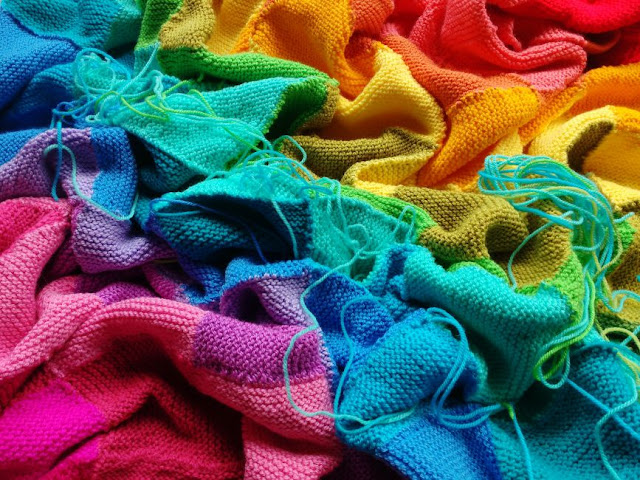
This is quite a hard shade to capture in photos! It's half way between a spring green and a neon green and it looks lovely and zing-y against the other colours in the blanket.


After many evenings spent knitting in front of the TV (I am not a fast knitter) all the squares were finished. Hurrah!

I laid them all out on the living room floor to plan the final arrangement of colours.


This has been a bit of a "make it up as you go along" project (earlier it was going to look like this, and before that it wasn't even originally intended to be a rainbow blanket!) so I'm especially pleased that it's all worked out well in the end.

Once I was happy with the layout of the squares, the final bit of sewing-up began! I added squares to each side of the blanket then joined the two sections together.


I've been sewing the loose yarn ends in gradually over the months I've worked on this blanket, but there are still lots of ends still to sew in!


It's not the most exciting task in the world but I actually find it quite meditative - sometimes a nice simple repetitive task is exactly what you need at the end of a long day. Put your feet up, pop the telly on and stitch stitch stitch...


I'm thrilled with how the colours in this blanket look together and can't stop myself from smiling whenever I work on it, or when I look at these colourful photos. Making stuff is always fun, but making something that fills your heart with joy? Just magical.

I'll be sure to take lots of snaps of the finished blanket to share with you guys sometime soon, and I'll also write about how I made the blanket (needle size, stitch, colours used, etc) so you'll be able to make your own happy rainbow blanket if you fancy one :)