Friday 31 January 2020

A Very Special Set of Felt Ornaments

I'm sharing photos today of an old project that I've realised I never blogged about!


I stitched these ornaments for a special couple about a decade ago. Each decoration featured one of their hobbies or other favourite things: from a stack of beloved books, to a tent to represent their many camping holidays, to a portrait of their cats.

Working on these was quite a challenge but a very fun one and I'm still really proud of the end results.

I loved the camera ornament so much it became part of my shop range for many years and I'll be bringing the design back later this year as a printable pattern.


I'll also be revisiting the books design very soon as I'm planning something book-themed for February. (Make sure you're signed up to my free pattern newsletter if you're interested!)


Here's a closer look at the other ornaments in the set...

A film clapperboard:


An acoustic guitar:


Knitting needles and yarn:


The TARDIS:


 A tent:


A Nick Drake record:


A pink gerbera daisy:


A cup of Tim Hortons coffee:


And those cute kitties!


What themes would you pick if you made a set of ornaments like this for yourself?

Thursday 30 January 2020

Sale This Weekend!

I'm having an Instagram sale this weekend, selling bargain craft supplies and other lovely bits and bobs.

The sale starts at 11am (GMT) this Sunday, February 2nd, and will include...

Vintage atlases and maps:


Lots of bargain craft supplies:


A couple of bird prints I sadly don't have wall space for:


Some felt masks (designed and stitched by me as samples for upcoming tutorials):


15 felt Christmas ornaments I stitched from a kit and don't have room to display:


And more!

Head to lauralupinsells on Sunday morning to see everything available, and leave a comment on anything you want to buy. 

I always charge exact postage for these sales to help make them a bargain. In the UK we can send a shoebox size parcel weighing up to 2kg for just £3 (hurrah!).

Don't have an Instagram but still want to make a purchase on Sunday? No problem! Send me a message via my contact form (be quick though, as it's first come first served).

P.S. Never want to miss a sale? Sign up to my newsletter!

Tuesday 28 January 2020

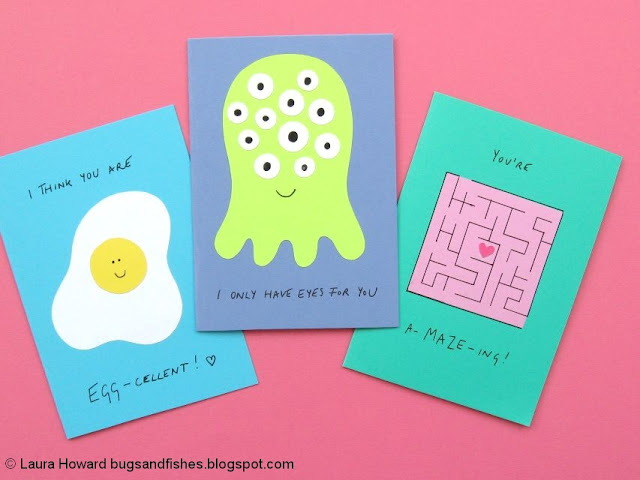
Pun-tastic Valentines: 12 Fun, Easy, & Cute Cards to Make!

UPDATE: this project is now available as part of my Patreon pattern library.

Click here to find the Tic Tac Toe tutorial and to sign up to my Patreon. 

Subscribers get full access to a growing library of PDF patterns and tutorials, and emails whenever new projects are added. You can unsubscribe at any time.

-------

Today I’m sharing templates and quick tutorials for making cute and colourful Valentine’s Day cards inspired by silly puns.


BEE mine, I’m PINE-ing for you, You make me HOPPY - whichever card (or cards) you choose, I hope you’ll have fun making these!


P.S. Visit my crafty tutorial archive for lots more crafty projects.

Visit my shop to buy my printable PDF sewing patterns:


Tuesday 21 January 2020

Felt Hearts & Kisses Tic Tac Toe Set for Valentine’s Day

Instead of Noughts and Crosses, why not play a game of Hearts and Kisses!


Use colourful wool blend felt to make this felt game board and pieces decorated with hearts and X-shaped “kisses”. For even quicker crafting, glue the felt game pieces together with craft glue and make a board from colourful card.


This project is now available as part of my Patreon pattern library.

Click here to find the Tic Tac Toe tutorial and to sign up to my Patreon. 

Subscribers get full access to a growing library of PDF patterns and tutorials, and emails whenever new projects are added. You can unsubscribe at any time.

P.S. Visit my crafty tutorial archive for lots more crafty projects.

Visit my shop to buy my printable PDF sewing patterns:

Tuesday 14 January 2020

Folk Flowers: Embroidery Pattern

Today I've got a pretty embroidery pattern to share with you guys - a trio of flowers, inspired by folk art designs.


This pattern is the first in a mini series of embroidery projects I'll be sharing in the coming months. 

Maybe you remember me stitching these three pieces last year?


Here's how they all turned out!


I'll be sharing the owl embroidery pattern here on my blog next month (February), then posting the lucky pants pattern in March.

All three of these designs are (as regular readers of my blog may already have spotted!) based on felt projects from my tutorial archive. I love creating different versions of my designs, and often include an embroidery pattern in the felt tutorials I sell in my shops. I thought it would be really fun to go back and look at some old designs I've shared here on my blog and give them a new life as embroidery patterns! I hope you'll enjoy stitching them, and maybe discovering some old projects from my archives which you missed the first time round.

Today's flower embroidery pattern is based on my tutorial for sewing a flower brooch - click here for the original tutorial!


As you can see, I've changed the shapes a little and added some extra details... and voila! One pretty little floral pattern to stitch.  

You'll find the flower embroidery pattern over on my Patreon.

Subscribe for a small monthly fee and you'll get access to a growing library of PDF patterns and tutorials, with an email whenever I add a new project. You can cancel any time.   

Click here to check out my Patreon page and sign up!


I stitched my version with half strands of embroidery thread (floss) - using three strands from six-stranded thread.

I used backstitch for most of the design, adding three French knots to each flower and a circle of running stitches around the inside of the border. You don't need to sew the border circle but I think it makes a lovely simple frame for the design if you're planning on framing it in an embroidery hoop.


I used a dark berry red for the flowers, and a light plum for the flower detals. I stitched the stem and leaves with olive green, then added some extra lines to the leaves with a lighter, brighter green. For the border I chose a dark turquoise / teal shade, adding the inner circle of running stitches in light turquoise. You can use my colour choices as a guide when stitching your flower or just choose your own favourite shades!

Printing the pattern at 100% your flowers will fit perfectly inside a 4 inch embroidery hoop. I stitched my flowers in a 5 inch hoop to give myself a bit of extra space to work with when sewing the border.


P.S. Subscribe to my newsletter for a monthly free pattern and visit my crafty tutorial archive for lots of free projects.

Visit my shop to buy my printable PDF sewing patterns:


Tuesday 7 January 2020

How To: Sew Some Easy Letter Bunting!

Today I'm sharing a tutorial for sewing pretty bunting!


I designed this project to re-use the WELCOME lettering templates from my rainbow wreath tutorial. I think some welcome bunting would look lovely in a hallway, but you could easily adapt this tutorial by drawing your own letter templates to spell out any word(s) or name(s) you fancy.

This would be a lovely sewing project for a birthday party, wedding, or other special occasion, or for making a decoration for a child's nursery (make sure to hang the bunting well out of reach of little fingers!).

This tutorial was originally designed for The Village Haberdashery's blog - visit their shop for lots of crafty goodness!

You will need:

* The bunting template from my easy papercrafts post.
* The template sheet from my rainbow wreath tutorial.
* Quilting cotton (I used “Posies in Aqua” from Sugar Pie by Lella Boutique for Moda).
* Felt in two contrasting colours (I used a pretty aqua blue and a candy pink).
* Coordinating ribbon, ricrac or mini pompom trim.
* Sewing thread to match the felt lettering and the ribbon / ricrac / pompom trim.
* Coordinating stranded embroidery thread, to contrast with the inner felt circle.
* Sewing needles and pins.
* Sewing scissors.
* Embroidery scissors (these are ideal for cutting out small or fiddly felt shapes!).

To make the bunting:

1. Use the bunting template to cut out seven triangular “flags” from your chosen fabric (one per letter). If you're adding more than one word to your bunting, remember you'll need an extra flag for the gaps between the words.


2. Use the lettering and circle templates to cut out the felt pieces.


3. Sew each small circle to a backing large circle with whip stitch and your chosen embroidery thread (use half the strands only – so for six-stranded thread just use three strands). I used cream embroidery thread to match my pompom trim.

Then add the letters, sewing them in place with running stitch and matching sewing thread.


4. Position each letter on one of the bunting flags, just below the centre of the flag (remember you’ll be adding the ribbon or trim later!). Sew each letter in place with running stitch in matching (pink) sewing thread, sewing flush with the edge of the smaller circle so your stitching is hidden.


5. Add the bunting flags to your chosen ribbon or trim. Leave a length of ribbon/trim unstitched (so you can tie the bunting in place when you come to display it) then add the flags one by one. Pin or hold the ribbon/trim along the top edge of each flag then sew it in place with running stitch and matching sewing thread.

Leave a length of unstitched ribbon/trim at the other end of the bunting then cut away any excess. If you’re using ribbon, cut the ends at an angle to help prevent fraying.


And you're done! Now you just need to hang the bunting up and go put the kettle on and admire your work.

Enjoyed this free tutorial? Buy me a "coffee" and help support my blog!

Buy Me a Coffee at ko-fi.com

P.S. Subscribe to my newsletter for a monthly free pattern and visit my crafty tutorial archive for lots more free projects.

Visit my shop to buy my printable PDF sewing patterns: