Showing posts with label craft. Show all posts

Monday, 18 May 2020

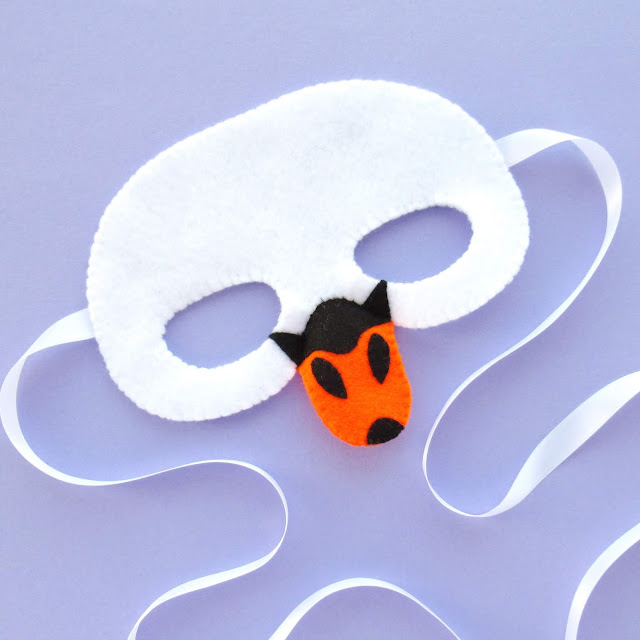
Felt Swan Mask: Sewing Tutorial

UPDATE: my felt swan mask tutorial (originally shared with my newsletter subscribers) is now available as part of my Patreon pattern library.

For a small monthly fee you can get access to my growing library of PDF patterns and tutorials, with an email whenever I add a new project. You can cancel any time. 

Click here to check out my Patreon page and sign up!

---

http://eepurl.com/dvfYO1

The tutorial includes templates and step by step instructions for sewing the mask... which I'd normally say would be great for wearing to costume parties and festivals but we can't really go to those at the moment, can we?

Dressing up can bring a lot of fun to lockdown life, though, I think: why not wear a swan mask on your next Zoom call? or disguise yourself as a swan to do the washing up? Everything's got to be more fun when you're a swan, right?!

http://eepurl.com/dvfYO1

You could also make this mask in grey felt...

http://eepurl.com/dvfYO1

... and there's loads of possibilities if you want to make a pretty swan princess mask. You could add sequins or those little sew-on gems, stitch a bit of embroidery, or even add a little crown to the top of the mask!

Sunday, 3 May 2020

New Paper Packs: Vintage Goodness for Paper Crafting

I've put together some more paper packs from a whole bunch of vintage books, maps, magazines and other bits and bobs!


I may add these items to my Etsy shop later this month but for now I'm sending invoices via Paypal. This is a very secure way to pay, Paypal handles all your payment info and will do any currency conversions, too. Because selling directly saves me money (not having to pay Etsy sales and listing fees) you save money too - I'm only charging exact postage costs and not building the fees or cost of packaging into my pricing.

I'm posting things safely via my local parcel postbox, and managed to get hold of some customs labels so I can post internationally, too. Hurrah! There will likely be delays due to COVID-19 disruption, but if you're happy to wait I'm happy to post stuff.

Get in touch if you'd like to make a purchase. First come first served :)

PAPER PACK A, £5 each + postage.

Includes clippings from bird & nature books, vintage craft books & magazines, maps and atlases, and a 1950s encyclopedia. Plus a piece of a tissue paper sewing pattern, a piece of faux woodgrain sticky back plastic, some shiny paper cake ribbon, and a strip of film negatives.

 
PHOTOS ARE A SAMPLE ONLY, EACH PACK DIFFERS! The largest piece of paper in this pack is approx 16 x 22 cm, each pack weighs approx 78g.
 

There are two sizes of paper packs available - standard ones for a fiver, and bumper ones for a tenner. The bumper packs contain a lot more paper with bigger pages and more full pages, too (vs the small packs which tend to be more clippings). The full pages are fab for cutting out images from, of course, but you can also use them to make homemade envelopes and wrap small gifts.

PAPER PACK B, bumper pack, £10 each + postage.

Includes pages and clippings from vintage craft books & magazines, a children's dictionary, bird books, houseplant and recipe books, maps & atlases, a 90s teen annual, & a 50s book about castles. Plus pieces of brown & metallic paper, a piece of faux woodgrain sticky back plastic, and half a gold doily. 

 
The largest page in this pack is approx 22 x 28.5cm and each pack weighs approx 180g. PHOTOS SHOW A SAMPLE PACK, EACH PACK WILL DIFFER.


These big bumper packs are so tricky to photograph to really show off all the contents, there's just so much paper and I have a limited amount of space on my desk!! For example, you can't really tell from the pics, but this next pack includes two very big pages from a wonderful vintage atlas (these are folded in half to fit in the pack nicely). 

PAPER PACK C, bumper pack, £10 each + postage.  

Includes pages & clippings from vintage children's books, maps & atlases, craft books, wildlife & nature books, and a 1950s encyclopedia. Plus 30 vintage stamps and a postcard featuring a vintage book cover. 

 
The largest page in this pack (excluding those big atlas pages) is approx 22.5 x 29.5 cm, each pack weighs approx 245g. THE PHOTOS SHOW A SAMPLE PACK, EACH PACK IS DIFFERENT.


Here's another of the standard sized packs! Each pack has a different mix of paper-y contents and I've made sure to include some fun extras in each as well, like the measuring tape and fabric scraps in this one. 

PAPER PACK D, £5 each + postage. 

Includes clippings from vintage maps & atlases, craft books, bird & nature books, children's books, a houseplant book, and a 1950s encyclopedia. Plus pieces of squared and floral paper, tiny Liberty fabric scraps, a piece of a measuring tape, a reproduction trading card featuring a train, half a pretty paper doily, and a postcard. 


THE PHOTOS SHOW A SAMPLE PACK, EACH PACK WILL DIFFER. The largest piece of paper in this pack is approx 16 x 22 cm, each pack weighs approx 86g. 


Aaaaand here's another big bumper pack, which also includes a couple of those huge atlas pages! 

PAPER PACK E, bumper pack, £10 each + postage. 

Includes pages & clippings from vintage bird & nature books, craft books & magazines, maps & atlases, children's books, and a 1950s encyclopedia. Plus a handmade wildflower envelope, and 30 vintage postage stamps. 


THE PHOTOS SHOW A SAMPLE PACK, EACH PACK WILL DIFFER. The largest page in this pack (excluding those big atlas pages) is approx 22.5 x 29.5cm, each pack weighs approx 230g.


As well as all these lovingly assembled paper packs, I've put together some bargain bundles of leftover book pages. 

First up: BARGAIN TEXT BUNDLES, £3 each, plus postage.  

Each of these big packs contain LOTS (100+) of text-filled clippings and pages. Introductions, indexes, charts, and more. These neutral pages are so great for origami, collages, etc! The packs in the photo are examples only, each pack differs. The largest page in each of these packs is approx 22 x 29 cm. Each pack weighs approx 455g. 


Then there's some ENCYCLOPEDIA PAGE BUNDLES, soooo many interesting images and bits of text to use in your crafty projects! £3 each + postage. 50 random pages from a lovely 1950s encyclopedia. All black and white (no colour images included). The pages are approx 17 x 25 cm. Each bundle weighs approx 200g.


Finally, I've got a few LUCKY DIP LEFTOVERS BUNDLES available. About as much papery goodness as in a bumper pack but for the price of the standard one because the contents are a magical mystery! 

£5 each + postage. A bargain bundle of assorted colourful clippings and pages left over from assembling all my paper packs. Lots of papery goodness! Photos are examples only, each pack will differ. The largest pages in these packs are approx 22 x 29 cm. Each pack weighs approx 240g. 


Send me a message if you'd like a make a purchase, want a quote for postage, or have any questions about the paper packs and I'll get back to you as soon as possible.

Tuesday, 3 March 2020

Daffodils Headband: Felt Spring Flowers Tutorial

Get crafty with felt flowers with today's free tutorial!


This colourful felt daffodil headband (or hairband, whatever word you prefer!) is fun and easy to make and would make a fab addition to a spring outfit.

The templates are from my felt daffodils wreath tutorial. Even if you don't fancy making the whole wreath, the felt flowers are perfect for using in different spring craft projects like this one.

https://bugsandfishes.blogspot.com/2019/03/march-felt-daffodils-spring-flowers-wreath-tutorial.html

Both of these tutorials originally appeared on The Village Haberdashery's blog - visit their shop for lots of crafty goodness!

To make this cute and colourful felt headband you will need:

* The template sheet from the daffodil wreath tutorial.
* Orange and yellow felt.
* Orange stranded embroidery thread (floss).
* A plastic headband / hairband / Alice band.
* Yellow sewing thread
* Sewing scissors
* Embroidery scissors (these are great for cutting out small or fiddly shapes!)
* Sewing needles and pins
* A glue gun and glue
* A heat-proof mat for the glue gun
* Newspaper to protect your workspace from any glue drips
* Optional: pinking shears 

To make the headband: 

1. Use the Narcissi templates from the daffodil wreath templates to cut out the following felt pieces: ten yellow petal pieces, five orange trumpet pieces and five orange circles.

When you cut each trumpet cut along three sides of the template with sewing scissors and along the remaining (long) side with pinking shears – just above the edge of the paper template. If you don’t have any pinking shears you could use embroidery scissors to cut a zigzagged edge, or just cut a straight edge.

2. Follow steps 3, 4 and 5 from the daffodil wreath tutorial to sew the trumpet and petals together.


3. Use a glue gun to stick the flower pieces to a plastic headband: first the petals, then the trumpets. Start with the central flower and work outwards, adding a small amount of glue to the felt pieces and pressing them in place very carefully.

IMPORTANT: take care when working with the glue gun as the glue gets very hot! Always place it on a heat-proof mat when not in use, and use newspaper or other scrap paper to protect your workspace. Work slowly, squeezing the gun with care to control the amount of glue you’re using and keeping your fingers out of the way of the hot glue.


Cute, huh? Now it's time to go take some daffodil selfies...

Enjoyed this free tutorial? Buy me a "coffee" and help support my blog!

Buy Me a Coffee at ko-fi.com

This tutorial is for non commercial use only: you can use it to make as many headbands as you want for yourself or as gifts, but please don't make any for sale. You may borrow a couple of photos if you want to blog about this project, but remember to credit me and link back to this page on my blog, and do not reproduce my entire tutorial / share my templates on your site. Thanks!

P.S. Subscribe to my newsletter for a monthly free pattern and visit my crafty tutorial archive for lots more free projects.

Visit my shop to buy my printable PDF sewing patterns:

Saturday, 29 February 2020

A Wonderful Vintage Cross Stitch Booklet

Talking of my recent Instagram sales, last weekend I sold an utterly wonderful vintage cross stitch pattern booklet.


It got snapped up super quickly but it was so lovely I feel like it needs to be immortalised here on my blog so you can a) "ooooh" over its gorgeousness and b) know to buy it for yourself IMMEDIATELY if you ever come across a copy!!!

 
"Points de Croix Scandinaves" was published by the thread company DMC and OH MY GOSH IT IS SO BEAUTIFUL. It's got some lovely Christmas and Easter designs, some nice borders and useful alphabets, and pages of fruit and toys plus some charming ships and buildings... but it's the wildlife pages that just slay me.

Those mushrooms alone!! Just magnificent.

I also adore these birds and butterflies...


... and these lovely wildflowers (can you spot the cricket?)


I'd be hard pressed to pick a favourite design, but I have a lot of love in my heart for the floral wreath with the little bee. So delightful!


Which one's your fave?

Tuesday, 21 January 2020

Felt Hearts & Kisses Tic Tac Toe Set for Valentine’s Day

Instead of Noughts and Crosses, why not play a game of Hearts and Kisses!


Use colourful wool blend felt to make this felt game board and pieces decorated with hearts and X-shaped “kisses”. For even quicker crafting, glue the felt game pieces together with craft glue and make a board from colourful card.


This project is now available as part of my Patreon pattern library.

Click here to find the Tic Tac Toe tutorial and to sign up to my Patreon. 

Subscribers get full access to a growing library of PDF patterns and tutorials, and emails whenever new projects are added. You can unsubscribe at any time.

P.S. Visit my crafty tutorial archive for lots more crafty projects.

Visit my shop to buy my printable PDF sewing patterns:
Tuesday, 12 November 2019

How To: Sew Felt Mushrooms & Toadstools!

This week I'm sharing some fun autumnal crafting projects: tutorials for sewing felt mushrooms and toadstools then using them to create an awesome autumn wreath.

-----

UPDATE: my felt autumn wreath tutorial (including templates and instructions for making these fun felt fungi) can now be found as a printable PDF pattern over on my Patreon. 

Subscribe to get instant access to a growing library of PDF embroidery patterns and craft tutorials, and updates when I add something new!

----- 


These felt mushrooms and toadstools are so easy to make! You can use them to decorate larger autumn craft projects, or add brooch clasps or ribbon loops to turn them into brooches or Christmas ornaments.

 
If you're making Christmas decorations why not give them some extra sparkle by adding beads or sequins to the toadstools, or using metallic embroidery thread for the mushrooms. You could also decorate the backs of your toadstools as well as the fronts, or use the space on the back to embroider the year you stitched them.
 
 
Subscribe to my newsletter for a creative updates, and visit my crafty tutorial archive for lots of free projects.

Visit my shop to buy my printable PDF sewing patterns:

Wednesday, 21 August 2019

Faux Leather Crafts: Star Headband Tutorial

Today's vegan leather craft project? Making a star headband from gorgeous metallic leather!

vegan leather star headband tutorial
 
Add lots of stars to make a super star crown, or just add a couple of stars for a bit of subtle glamour. I think this headband would also be fab made from glitter felt.

This tutorial originally appeared on the Village Haberdashery's blog and was created using synthetic leather and other craft supplies from their shop.

vegan leather star headband tutorial

You will need:

- The star templates (follow the link to view and download the PDF)
- Some synthetic leather
- Coordinating felt (I used black to match the headband) 
- A plastic headband
- Craft glue
- Sewing scissors
- An air-erasable fabric marker pen or an ordinary felt tip pen
- A glue gun and glue
- A heatproof mat for the glue gun
- Newspaper or scrap paper to protect your workspace

To make the headband: 

Use the templates provided to cut out as many stars as you want – I cut one large star and four small stars. Trace the star shapes onto the back of the leather using a pen then cut them out with sewing scissors.

vegan leather star headband tutorial: cutting out the stars

Cut pieces of felt slightly bigger than each star. Turn the stars over and place them on some newspaper or scrap paper. One by one, cover the back of each star with a layer of craft glue and then firmly press a piece of felt on top covering the star completely. Turn the felt and attached stars over and set them aside to dry.

vegan leather star headband tutorial: add the felt backing

Once the glue has completely dried cut away the excess felt, leaving stars which are leather on one side and felt on the other.

vegan leather star headband tutorial: glue the stars together

Use a glue gun to stick the stars to a headband. Add a line of glue down the centre of one of the stars, on the felt side. Carefully press the star into position on the headband, holding it in place until the glue has dried enough to stick it firmly. Repeat to add the rest of the stars

IMPORTANT: take care when working with the glue gun as the glue gets very hot! Always place it on a heat-proof mat when not in use, and use newspaper or other scrap paper to protect your workspace. Work slowly, squeezing the gun with care to control the amount of glue you’re using and keeping your fingers out of the way of the hot glue.

vegan leather star headband tutorial

Want to make more fun things from faux leather? Try my tutorials for making a lightning bolt brooch, a mini covered notebook, and a geometric necklace.


This tutorial is for non commercial use only: you can use it to make as many headbands as you want for yourself or as gifts, but please don't make any for sale. You may borrow a couple of photos if you want to blog about this project, but remember to credit me and link back to this page on my blog, and do not reproduce my entire tutorial / share my templates on your site. Thanks!

Enjoyed this free tutorial? Buy me a "coffee" and help support my blog!

Buy Me a Coffee at ko-fi.com

P.S. Subscribe to my newsletter for a monthly free pattern and visit my crafty tutorial archive for lots more free projects.

Visit my shop to buy my printable PDF sewing patterns: