

Tuesday, 29 March 2011
Friday, 25 March 2011
DIY Royal Wedding Cross Stitch Sampler
Thanks so much for all your sweet comments about my book news! You guys are awesome xxx
As promised, now you can make your own Will + Kate sampler...

If you've never done cross stitch before, don't be scared! It's very easy, and a lovely relaxing way to spend an evening. This isn't a full "how to" post, but I'm sure there are lots of cross stitch tutorials online to help you get started.

To make this design you will need...
White 14 count aida fabric
A 5 inch embroidery hoop (the pattern is designed so it can be displayed in the hoop once you've finished)
Assorted colours of stranded embroidery thread (floss) - I used purple, bright pink, candyfloss pink, light turquoise and gold for the rings and crown. I used half the number of strands (e.g. 3 strands of 6 strand thread).
A needle and scissors
.... plus the chart:

(Click once on the image to view it, and click again to view it full size - it's quite large so you can print it out at the size that suits you best)
I've drawn the chart in colour but you can of course print it out in black and white if you prefer. Just colour the design in with coloured pencils if you want to mark your chosen colours on your copy.
This pattern is for non commercial use only: you can use it for as many samplers as you like for yourself or as gifts for friends but please don't make any for sale. Please feel free to borrow photos if you want to blog about this project, but remember to credit me and link back to the original source. Thanks!
 Enjoyed this free pattern? Buy me a "coffee" and help support my blog!

Subscribe to my newsletter for a monthly free pattern and visit my crafty tutorial archive for lots more free projects.
Visit my shop to buy my printable PDF sewing patterns:
As promised, now you can make your own Will + Kate sampler...
If you've never done cross stitch before, don't be scared! It's very easy, and a lovely relaxing way to spend an evening. This isn't a full "how to" post, but I'm sure there are lots of cross stitch tutorials online to help you get started.
To make this design you will need...
White 14 count aida fabric
A 5 inch embroidery hoop (the pattern is designed so it can be displayed in the hoop once you've finished)
Assorted colours of stranded embroidery thread (floss) - I used purple, bright pink, candyfloss pink, light turquoise and gold for the rings and crown. I used half the number of strands (e.g. 3 strands of 6 strand thread).
A needle and scissors
.... plus the chart:

(Click once on the image to view it, and click again to view it full size - it's quite large so you can print it out at the size that suits you best)
I've drawn the chart in colour but you can of course print it out in black and white if you prefer. Just colour the design in with coloured pencils if you want to mark your chosen colours on your copy.
This pattern is for non commercial use only: you can use it for as many samplers as you like for yourself or as gifts for friends but please don't make any for sale. Please feel free to borrow photos if you want to blog about this project, but remember to credit me and link back to the original source. Thanks!
Subscribe to my newsletter for a monthly free pattern and visit my crafty tutorial archive for lots more free projects.
Visit my shop to buy my printable PDF sewing patterns:
Wednesday, 23 March 2011
A Very Big Secret
I've got something exciting to tell you: a secret I've been bursting to share for months...
I've written a book!
A whole book, with 35 fun felt projects designed and stitched and written by me! (Eek!)
It's called Super Cute Felting , and it'll be published this autumn (8th September 2011) by the lovely people at Cico Books. This is the draft version of the cover:

I've been working on it since the end of last year - regular readers may remember a few secret things popping up on the blog in recent months! It's been pretty hectic juggling book stuff with all my other crafty business stuff,and I've had a few slightly panicky "omigod! what if no-one likes it!" moments, but it's been lots of fun too.
I will of course be blogging about this again over the next few months as the autumn draws nearer... I can't wait! :)
I've written a book!
A whole book, with 35 fun felt projects designed and stitched and written by me! (Eek!)
It's called Super Cute Felting

I've been working on it since the end of last year - regular readers may remember a few secret things popping up on the blog in recent months! It's been pretty hectic juggling book stuff with all my other crafty business stuff,and I've had a few slightly panicky "omigod! what if no-one likes it!" moments, but it's been lots of fun too.
I will of course be blogging about this again over the next few months as the autumn draws nearer... I can't wait! :)
Tuesday, 22 March 2011
Stitching
I love all the kitsch surrounding the royal wedding, so how could I resist crafting something with a royal wedding theme??
I'm stitching a small cross stitch sampler:

Red, white and blue just wasn't working for me as a colour scheme so I went for pink/purple, white and turquoise instead. Plus gold for the crown and the rings, of course!
It's almost finished - I'll write up the pattern neatly on a chart later this week and post it so you can make your own if you want one :)
I'm stitching a small cross stitch sampler:
Red, white and blue just wasn't working for me as a colour scheme so I went for pink/purple, white and turquoise instead. Plus gold for the crown and the rings, of course!
It's almost finished - I'll write up the pattern neatly on a chart later this week and post it so you can make your own if you want one :)
Monday, 21 March 2011
DIY Colour Charts
From this week I'll be adding a little extra item to all my felt orders: a blank colour chart so my customers can keep a record of the colours of wool blend felt they've ordered from me.

Filled with all 65 colours the chart would look something like this:

I always like to keep a record of the colours I've ordered from other suppliers, so I hope my customers will find this useful!
If you've ordered felt from me before and want your own blank chart, you can download it and print it yourself - just click on the image below to view it, then click again to view full size and print.

Sunday, 20 March 2011
A few leftovers
I've discontinued the acrylic felt rainbows, but I've got a few of the acrylic colours left...
I'm selling my remaining stock at the bargain price of 20p per square (plus postage - if you're outside the UK please bear in mind this felt is quite heavy in large quantities!).

UPDATED: all the colours are now sold out, thanks everyone!
I'm selling my remaining stock at the bargain price of 20p per square (plus postage - if you're outside the UK please bear in mind this felt is quite heavy in large quantities!).

UPDATED: all the colours are now sold out, thanks everyone!
Saturday, 19 March 2011
A post about nice things
One nice thing - Sew magazine featured my (now discontinued) acrylic felt rainbow in their February issue as part of a feature on supplies to build up your crafty stash.


Always lovely to get a nice bit of press!
I missed the magazine when it was in the newsagents earlier this year which was very annoying... but (here comes the second nice thing) a very lovely Folksy seller, Kryshees, took some photos of her copy and emailed them to me.

A total stranger, taking time out of her day to do something nice for a fellow crafter. So nice!
Kryshees sells "handmade accessories for your littlies and you", please do visit her shop :)
Friday, 18 March 2011
Celebrating a Milestone
I'm approaching 4,000 items sold over in my Etsy shop! Eek!

To celebrate the approach of this lovely round number, I'm offering a special discount on purchases made from my shop. Just enter the code HURRAH at checkout to get 10% off your order. The offer will last until I reach 4,001 items sold.
(P.S. If you order a cherry blossom design and use the discount code I'll still be donating 50% of the original sale price to the Red Cross)
UPDATE: this offer has now finished :)
Sewing Cherry Blossoms
I'm delighted to have sold so many cherry blossom brooches and headbands this week - I've started to run out, so I'm making more :)

50% of the proceeds from sales of my cherry blossom designs will be going to the Japan Tsunami Appeal (British Red Cross) this week (13th-19th March).
(Apologies to anyone who's had repeats of this post in their RSS feed - I accidentally hit the publish button before changing the date I wanted to post it, oops! I think I need more caffeine...)
Thursday, 17 March 2011
How To: Button Love Ring Pillow
Another tutorial! Yay! I should be sensible and space these out a bit more but honestly the moment I get a project written up and ready to go I just can't wait to share it :)
Regular readers may recognise this project from this sneak peek post. It's a felt ring pillow, with a heart in the middle, a ribbon for attaching the rings and (most importantly) lots and lots of colourful buttons!

This ring pillow is super-easy to make, and you can choose felt and buttons in colours to match the colour scheme of your wedding.
You can also add an (optional) strip of felt to the bottom of the pillow, to help little hands carry it more easily:

To make this project you will need:
The templates provided at the bottom of this blog post
Two squares or sheets of felt (enough to cut out two ring pillow shapes and the strap if required)
A small piece of felt in pink or another colour that will contrast with the main felt colour (enough to cut out one heart shape)
Sewing thread to match both felt colours
Approx. 10 inches / 26cms narrow ribbon to match the heart
Lots of buttons in assorted sizes - choose an assortment of buttons in one colour, or a mix of colours. I bought my buttons from Paper Fish.
Toy stuffing to fill the pillow
(Please be kind and forgive my very hastily sketched how-to pictures!)
1. Use the templates provided to cut out one heart and two ring pillow squares. Also cut out the strap if required.
2. Pin the heart in the centre of one of the squares, and use matching thread to sew it in place with a line of running stitch around the edge. Then remove the pins.

3. Sew on lots of buttons around the heart, filling the space as evenly as possible but making sure you leave a small border around the edge of the square to make sewing the ring pillow together easier later.
You may find it helpful to place the heart template in the centre of the other square and arrange your buttons on this first, and then when you're happy with the scheme just transfer them one by one to sew them in place. Start with the buttons around the heart and work outwards.
Use sewing thread to match the felt square, and sew several stitches through each button to sew it on securely.

4. Cut a length of narrow ribbon (approx 10 inches / 26 cms long) and trim the ends at an angle to help prevent fraying. Sew the middle point of the ribbon to the centre of the heart using a few stitches and sewing thread to match.

The top of your ring pillow will now look something like this:

5. If you want to add a strap to the bottom of the pillow, pin the rectangular strap piece in the middle of the second (undecorated) square. Use matching thread to sew it in place with a line of backstitch at each end. Then remove the pins
If you prefer, you can sew a line of running stitch at each end, sewing back along the lines again to fill in the gaps creating two continuous lines of stitching.
 6. Place the two felt squares on top of each other (right sides facing outwards) and pin them together. Use matching thread and blanket stitch to sew the edges together, leaving a gap for stuffing. You can use whip stitch if you prefer, but I think blanket stitch gives a neater finish.
Fill the pillow with fluffy toy stuffing, using a pencil to poke the stuffing into all the corners. Don't overfill the pillow - you want it to have a nice shape and still be slightly squishy.

When you've finished filling the pillow, sew up the hole with blanket stitch (or whip stitch) as before... and you're done!
All you need to do now is tie the rings in place on the big day with a nice bow :)

Here are the templates for this project - click on the image to view it, then click again to view at full size and print out. If you print at 100% your ring pillow will be the same size as mine (6 inches / 15.5cms square). Just change the % to make a smaller or larger pillow (at 100% the template sheet will print out as A4 size).

This tutorial is for non commercial use only: you can use it for as many ring pillows as you like for yourself or as gifts for friends but please don't make any for sale. Please feel free to borrow photos if you want to blog about this project, but remember to credit me and link back to the original source, and do not reproduce my entire tutorial on your site. Thanks!
Enjoyed this free tutorial? Buy me a "coffee" and help support my blog!
Subscribe to my newsletter for a monthly free pattern and visit my crafty tutorial archive for lots more free projects.
Visit my shop to buy my printable PDF sewing patterns:
Regular readers may recognise this project from this sneak peek post. It's a felt ring pillow, with a heart in the middle, a ribbon for attaching the rings and (most importantly) lots and lots of colourful buttons!

This ring pillow is super-easy to make, and you can choose felt and buttons in colours to match the colour scheme of your wedding.
You can also add an (optional) strip of felt to the bottom of the pillow, to help little hands carry it more easily:

To make this project you will need:
The templates provided at the bottom of this blog post
Two squares or sheets of felt (enough to cut out two ring pillow shapes and the strap if required)
A small piece of felt in pink or another colour that will contrast with the main felt colour (enough to cut out one heart shape)
Sewing thread to match both felt colours
Approx. 10 inches / 26cms narrow ribbon to match the heart
Lots of buttons in assorted sizes - choose an assortment of buttons in one colour, or a mix of colours. I bought my buttons from Paper Fish.
Toy stuffing to fill the pillow
(Please be kind and forgive my very hastily sketched how-to pictures!)
1. Use the templates provided to cut out one heart and two ring pillow squares. Also cut out the strap if required.
2. Pin the heart in the centre of one of the squares, and use matching thread to sew it in place with a line of running stitch around the edge. Then remove the pins.

3. Sew on lots of buttons around the heart, filling the space as evenly as possible but making sure you leave a small border around the edge of the square to make sewing the ring pillow together easier later.
You may find it helpful to place the heart template in the centre of the other square and arrange your buttons on this first, and then when you're happy with the scheme just transfer them one by one to sew them in place. Start with the buttons around the heart and work outwards.
Use sewing thread to match the felt square, and sew several stitches through each button to sew it on securely.

4. Cut a length of narrow ribbon (approx 10 inches / 26 cms long) and trim the ends at an angle to help prevent fraying. Sew the middle point of the ribbon to the centre of the heart using a few stitches and sewing thread to match.

The top of your ring pillow will now look something like this:

5. If you want to add a strap to the bottom of the pillow, pin the rectangular strap piece in the middle of the second (undecorated) square. Use matching thread to sew it in place with a line of backstitch at each end. Then remove the pins
If you prefer, you can sew a line of running stitch at each end, sewing back along the lines again to fill in the gaps creating two continuous lines of stitching.

Fill the pillow with fluffy toy stuffing, using a pencil to poke the stuffing into all the corners. Don't overfill the pillow - you want it to have a nice shape and still be slightly squishy.

When you've finished filling the pillow, sew up the hole with blanket stitch (or whip stitch) as before... and you're done!
All you need to do now is tie the rings in place on the big day with a nice bow :)

Here are the templates for this project - click on the image to view it, then click again to view at full size and print out. If you print at 100% your ring pillow will be the same size as mine (6 inches / 15.5cms square). Just change the % to make a smaller or larger pillow (at 100% the template sheet will print out as A4 size).

This tutorial is for non commercial use only: you can use it for as many ring pillows as you like for yourself or as gifts for friends but please don't make any for sale. Please feel free to borrow photos if you want to blog about this project, but remember to credit me and link back to the original source, and do not reproduce my entire tutorial on your site. Thanks!
Enjoyed this free tutorial? Buy me a "coffee" and help support my blog!
Subscribe to my newsletter for a monthly free pattern and visit my crafty tutorial archive for lots more free projects.
Visit my shop to buy my printable PDF sewing patterns:
Tuesday, 15 March 2011
Red Birds
I've been sewing lots of bird brooches recently, doing a bit here and a bit there... until suddenly there's a whole flock of them finished!

Robins, cardinals and bullfinches, all ready to fly off to new homes :)

UPDATE: my robin brooch design is now available as a printable PDF sewing pattern, and it'll soon be joined by more bird designs!
P.S. Subscribe to my newsletter for product updates and/or a monthly free pattern and visit my crafty tutorial archive for lots more free projects.
Visit my shop to buy my printable PDF sewing patterns:
Robins, cardinals and bullfinches, all ready to fly off to new homes :)
UPDATE: my robin brooch design is now available as a printable PDF sewing pattern, and it'll soon be joined by more bird designs!
P.S. Subscribe to my newsletter for product updates and/or a monthly free pattern and visit my crafty tutorial archive for lots more free projects.
Visit my shop to buy my printable PDF sewing patterns:
Sunday, 13 March 2011
Cherry Blossoms for Japan
My thoughts have been with the people of Japan this weekend.
I've decided to donate 50% of sales of my cherry blossom brooches and hairbands this week (13th-19th March) to the Japan Tsunami Appeal.

The cherry blossoms are available from my website, my Etsy shop, my Folksy shop and my DaWanda shop.

For each £10 item I will donate £5, for each £5 sale item I will donate £2.50. For the sake of simplicity I'll also be donating these amounts in £s for cherry blossom items sold via my DaWanda shop where prices are in Euros. (Update: the £5 sale items have now sold out but there are still lots of brooches & hairbands left in stock, and I will make more if they sell out).
I'll post my donation receipt on the blog next week.

I've decided to donate 50% of sales of my cherry blossom brooches and hairbands this week (13th-19th March) to the Japan Tsunami Appeal.
The cherry blossoms are available from my website, my Etsy shop, my Folksy shop and my DaWanda shop.
For each £10 item I will donate £5, for each £5 sale item I will donate £2.50. For the sake of simplicity I'll also be donating these amounts in £s for cherry blossom items sold via my DaWanda shop where prices are in Euros. (Update: the £5 sale items have now sold out but there are still lots of brooches & hairbands left in stock, and I will make more if they sell out).
I'll post my donation receipt on the blog next week.
Friday, 11 March 2011
How To: Embroidered Faux Bois Heart
A fun embroidery project - sew a faux bois (fake wood) picture of a romantic carving of a couple’s initials in the trunk of a tree.

This project would make a special gift for weddings or anniversaries, or for Valentine's day - personalise it with the couple's initials and perhaps also a special date.
You will need:
Templates (at the bottom of this post)
Dark brown felt (approx. 40 x 46cm)
Dark brown embroidery thread (1-2 skeins)
Pale brown embroidery thread
Dark brown sewing thread
White or other light coloured sewing thread.
Thin quilt batting (approx. 23 x 23cm)
Twine or brown cord (approx. 18cm)
Greaseproof paper or thin tracing paper (approx. 12 x 14cm)
Needles, scissors, pins
1. Cut two pieces of dark brown felt each approximately 23cm square, and a piece of quilt batting the same size then make a “sandwich” of the three pieces with the batting in the middle. Pin the picture template provided in the centre of the square, pinning through all three layers.
2. Sew around the outside of the template with white or other light coloured sewing thread, sewing long stitches as close to the edge of the paper as you can to accurately mark out the shape. Finish your stitching loosely so you can easily unpick it later, and remove the pins.
This line of stitching holds the three layers together, and also acts as a guiding “frame” for your embroidery.

3. Trace the heart template provided onto a piece of greaseproof paper or thin tracing paper and add the initials of the couple you’re making the picture for – or draw smaller initials and add a date below them. Remember these letters are supposed to be carved in a tree trunk so draw simple letter forms.
Position the paper in the centre of the stitched “frame” and pin it in place.

4. Using a large needle and pale brown embroidery thread, sew along your traced design using back stitch and small even stitches. Then carefully tear away the paper to remove it, using a pin to remove any small fiddly pieces.
5. Fill the empty space in the picture with freeform faux bois embroidery with dark brown embroidery thread, using half the number of strands. Start by sewing the “knots” in the wood (swirls and rings of ovals) and then add slightly wobbly lines around them to build up a fake wood effect.
Either use backstitch or sew even running stitches and fill in the gaps sewing back in the opposite direction, whichever you prefer. Make sure you leave a gap of a few mms around the pale brown stitching and around the edge of the picture.
The faux bois embroidery is quite time consuming but it’s a very relaxing project you can do while watching TV, and you can speed it up by sewing fewer lines with larger spaces between them.

6. Following the lines of the stitched “frame” cut away the excess felt and wadding to leave a neat square, taking care not to accidentally cut any of the embroidery in the process.
Remove the large stitches and use the embroidered square as a template to cut a backing piece of matching dark brown felt.

7. Cut a length of twine or narrow brown cord about 18cms long. Sew this in place with whip stitches to the back of the embroidery so the ends overlap the felt by a couple of centimetres.
You may want to add a card insert to help stiffen the picture. To make this, draw around the picture template onto some scrap card and trim it by approximately 5mm all the way round the edge to make a square slightly smaller than the template.
8. Pin the back and front pieces together (with the card insert between them if you’re using one) and sew around the edges with neat blanket stitch in matching dark brown sewing thread. Finish your stitches neatly at the back.

If you're giving this picture as a gift, you could even continue the woodland theme with the gift wrapping! (click HERE for the full gift wrap tutorial)

Here are the templates for this project - double click to view full size and print out. If you print at 100% your picture will be the same as mine, just change the % to make a smaller or larger picture (at 100% the template sheet will print out as A4 size).

This tutorial is for non commercial use only: you can use it for as many fun craft projects as you like and to make gifts for friends but not to make anything which you then sell. Please feel free to borrow photos if you want to blog about it but remember to credit me and link back to the original source, and do not reproduce my entire tutorial on your site. Thanks!

Enjoyed this free tutorial? Buy me a "coffee" and help support my blog!
Subscribe to my newsletter for a monthly free pattern and visit my crafty tutorial archive for lots more free projects.
Visit my shop to buy my printable PDF sewing patterns:

This project would make a special gift for weddings or anniversaries, or for Valentine's day - personalise it with the couple's initials and perhaps also a special date.
You will need:
Templates (at the bottom of this post)
Dark brown felt (approx. 40 x 46cm)
Dark brown embroidery thread (1-2 skeins)
Pale brown embroidery thread
Dark brown sewing thread
White or other light coloured sewing thread.
Thin quilt batting (approx. 23 x 23cm)
Twine or brown cord (approx. 18cm)
Greaseproof paper or thin tracing paper (approx. 12 x 14cm)
Needles, scissors, pins
1. Cut two pieces of dark brown felt each approximately 23cm square, and a piece of quilt batting the same size then make a “sandwich” of the three pieces with the batting in the middle. Pin the picture template provided in the centre of the square, pinning through all three layers.
2. Sew around the outside of the template with white or other light coloured sewing thread, sewing long stitches as close to the edge of the paper as you can to accurately mark out the shape. Finish your stitching loosely so you can easily unpick it later, and remove the pins.
This line of stitching holds the three layers together, and also acts as a guiding “frame” for your embroidery.

3. Trace the heart template provided onto a piece of greaseproof paper or thin tracing paper and add the initials of the couple you’re making the picture for – or draw smaller initials and add a date below them. Remember these letters are supposed to be carved in a tree trunk so draw simple letter forms.
Position the paper in the centre of the stitched “frame” and pin it in place.

4. Using a large needle and pale brown embroidery thread, sew along your traced design using back stitch and small even stitches. Then carefully tear away the paper to remove it, using a pin to remove any small fiddly pieces.
5. Fill the empty space in the picture with freeform faux bois embroidery with dark brown embroidery thread, using half the number of strands. Start by sewing the “knots” in the wood (swirls and rings of ovals) and then add slightly wobbly lines around them to build up a fake wood effect.
Either use backstitch or sew even running stitches and fill in the gaps sewing back in the opposite direction, whichever you prefer. Make sure you leave a gap of a few mms around the pale brown stitching and around the edge of the picture.
The faux bois embroidery is quite time consuming but it’s a very relaxing project you can do while watching TV, and you can speed it up by sewing fewer lines with larger spaces between them.

6. Following the lines of the stitched “frame” cut away the excess felt and wadding to leave a neat square, taking care not to accidentally cut any of the embroidery in the process.
Remove the large stitches and use the embroidered square as a template to cut a backing piece of matching dark brown felt.

7. Cut a length of twine or narrow brown cord about 18cms long. Sew this in place with whip stitches to the back of the embroidery so the ends overlap the felt by a couple of centimetres.
You may want to add a card insert to help stiffen the picture. To make this, draw around the picture template onto some scrap card and trim it by approximately 5mm all the way round the edge to make a square slightly smaller than the template.
8. Pin the back and front pieces together (with the card insert between them if you’re using one) and sew around the edges with neat blanket stitch in matching dark brown sewing thread. Finish your stitches neatly at the back.

If you're giving this picture as a gift, you could even continue the woodland theme with the gift wrapping! (click HERE for the full gift wrap tutorial)
Here are the templates for this project - double click to view full size and print out. If you print at 100% your picture will be the same as mine, just change the % to make a smaller or larger picture (at 100% the template sheet will print out as A4 size).

This tutorial is for non commercial use only: you can use it for as many fun craft projects as you like and to make gifts for friends but not to make anything which you then sell. Please feel free to borrow photos if you want to blog about it but remember to credit me and link back to the original source, and do not reproduce my entire tutorial on your site. Thanks!

Enjoyed this free tutorial? Buy me a "coffee" and help support my blog!
Subscribe to my newsletter for a monthly free pattern and visit my crafty tutorial archive for lots more free projects.
Visit my shop to buy my printable PDF sewing patterns:
Thursday, 10 March 2011
Tree-themed Treats
UPDATE: my tree stump brooch is now available as a printable PDF pattern from my shop, or in my Patreon pattern library.
Subscribe to get instant access to a growing library of PDF embroidery patterns and craft tutorials, and updates when I add something new!
-------
I'm retiring my treestump brooch design - I've got a few left in stock, so the remaining ones are now reduced to £5! Hurrah!
They're currently available from my Etsy, Folksy and DaWanda shops and (of course) over on my website.
If you're a fan of all things forest-y you may be interested in the new faux-bois themed tutorial which I'll be sharing tomorrow. Here's a sneak peek: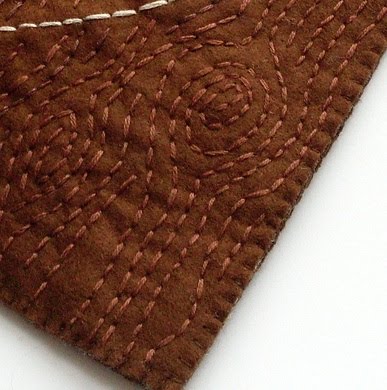
Wednesday, 9 March 2011
Country Living
The April issue of Country Living (UK) is now in the shops...
 ... and look what's on page 14:

Three of my felt bird brooches :)
Country Living is such a gorgeous magazine, it's wonderful to have my birdies featured.
Also wonderful - the flurry of sweet messages from friends, customers, blog readers & Twitter friends over the past few days, saying they'd got their subscriber copies and were delighted to see my birds. People are so nice!
UPDATE: I'm gradually turning my bird designs into sewing patterns! Visit my shop to see all my printable PDF patterns:
 ... and look what's on page 14:
Three of my felt bird brooches :)
Country Living is such a gorgeous magazine, it's wonderful to have my birdies featured.
Also wonderful - the flurry of sweet messages from friends, customers, blog readers & Twitter friends over the past few days, saying they'd got their subscriber copies and were delighted to see my birds. People are so nice!
UPDATE: I'm gradually turning my bird designs into sewing patterns! Visit my shop to see all my printable PDF patterns:
Monday, 7 March 2011
All Taped Up
A quick snap of some of the parcels I packed up over the weekend...

... sealed with pretty Bloomsbury tape from one of my favourite Etsy shops, Summersville:

(Image from the Summersville shop).
Mmm... pretty packaging supplies...
... sealed with pretty Bloomsbury tape from one of my favourite Etsy shops, Summersville:
(Image from the Summersville shop).
Mmm... pretty packaging supplies...
Subscribe to:
Posts (Atom)