Showing posts with label love. Show all posts

Saturday, 11 February 2023

Cute Cat & Bunny Valentine's Day Embroidery Patterns

Stick your favourite romantic film on (or a playlist of classic love songs!) and get stitching this weekend with this pair of cute Valentine's Day projects, now available in my Patreon pattern library.


Choose from "You're Purrrrfect" and "You Make Me Hoppy", or stitch them both for double the fun. 

These patterns were inspired by the pun-tastic Valentines Cards I shared last month.  I just couldn't resist seeing if they'd work as embroidery patterns... and I'm really pleased with how they turned out. 

P.S. This is the first of a couple of posts I'll be sharing today - it's been a busy week here and I'm trying to catch up! xx

Click here to find the Valentine's Day embroidery patterns, and to sign up to my Patreon. 

Subscribers get full access to a growing library of PDF patterns and tutorials, and emails whenever new projects are added. You can unsubscribe at any time.  

P.S. Visit my crafty tutorial archive to find more creative projects.

You'll also find printable PDF sewing patterns over in my shop along with lots of vintage goodness:


Tuesday, 5 February 2019

A Year of Wreaths: February Valentine's Heart Wreath Tutorial

UPDATE: this tutorial is now available as a printable PDF pattern over on my Patreon.

Subscribe for a small monthly fee and you'll get access to a growing library of PDF patterns and tutorials, with an email whenever I add a new project. You can cancel any time.    

Click here to check out my Patreon page and sign up!

-------

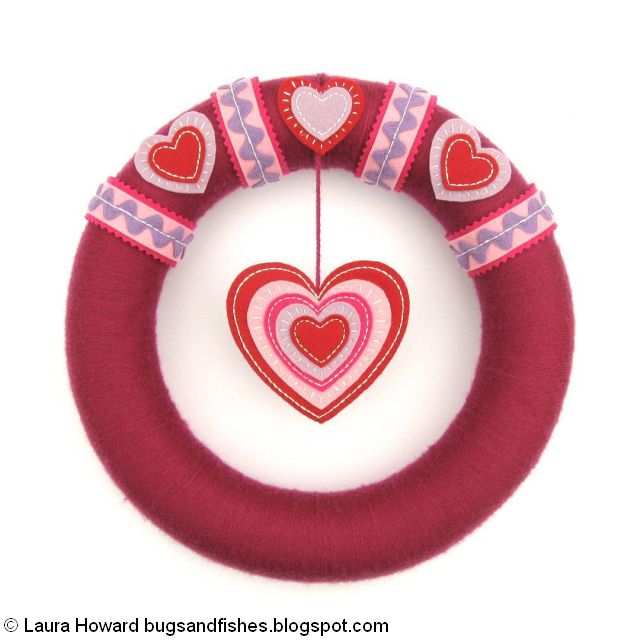
My monthly wreath project continues with a heart-themed wreath to celebrate Valentine’s Day, and to spread a little love and happiness!

Valentine's Day Wreath

This month’s wreath features embroidered felt hearts, pretty ricrac and some gorgeous berry-coloured yarn.

The hanging heart would also make a fab ornament on its own - simple add a coordinating ribbon loop and a matching backing heart (either cut a plain red felt heart or repeat the relevant steps to make two decorated hearts to join together).

Embroidered felt heart for Valentine's Day

finished wreath with all the pieces glued in position


Subscribe to my newsletter for a monthly(ish) free pattern and visit my crafty tutorial archive for lots more free projects.

Visit my shop to buy my printable PDF sewing patterns:

Saturday, 9 February 2013

DIY Valentine's Card: I Love You More Than Tea

As I mentioned the other day, I've been doing a bit of tea-themed crafting. Here it is... an easy DIY Valentine's Card:


These are pretty simple, but lots of fun to make!

You can make your card with the message "I love you more than tea", or cross out the "more than" and write a cheeky "almost as much as" instead. You could also swap "tea" for "coffee" if that's your drink of choice :)


1. First, print your message on a piece of plain card. I used Word and set up an A5 page divided into two columns, with the page margins set to "narrow." I added my text in the right-hand column and centred it and played around with font sizes until I was happy with the arrangement. I printed out some test prints on paper...


... and then when I'd got everything set up how I wanted, I printed two versions on white card.

I printed two copies so I could show you guys two variations, but actually I think it's not a bad idea to print a couple of copies so you can choose the final version that turns out best as the later steps can be a bit messy.

2. Test making tea rings on a scrap piece of paper. I put the piece of paper on a tray, and filled a saucer with black tea. I then dipped the bottom of a small mug into the tea, and used it to make prints on the paper. I found it was a good idea to check underneath the mug for any bubbles that need bursting, and also to hold the mug over the saucer for a second or two to allow any large drips to drip into the saucer and not onto your piece of paper.

4. Now the fun bit: decorate your card(s) with tea rings. I placed my cards on pieces of paper towel (kitchen roll) on a tray, with the saucer on the tray next to it. Try to avoid the printed text if you can, as the tea will make the ink run. As you can see from the second picture, this can't always be helped - I placed my tea rings to avoid the text and still managed to drip a big drop of tea on it! Oops.


If you wanted you could always decorate the card with tea stains first and then add the text - the tea distorts the card so it probably wouldn't print very well, but you could hand-write the text instead.

5. Leave your card to dry and then fold them. My cards ended up looking like this when they'd dried:


6. Add the "almost as much as" text if you want to. I'd recommend writing this on one of your paper test prints first to test the position & size of your handwriting & get the finished result exactly how you want it.


7. Finally write your message inside, pop it in an envelope (a brown one would be nice, to go with the tea theme but it's not essential) and give it to your loved one this Valentine's Day :)


This would also be a sweet card to make for an anniversary!

You may borrow a few photos if you want to blog about this project, but remember to credit me and link back to the original source, and do not reproduce my entire tutorial on your site. Thanks!

Enjoyed this free tutorial? Buy me a "coffee" and help support my blog!

Buy Me a Coffee at ko-fi.com

Subscribe to my newsletter for a monthly free pattern and visit my crafty tutorial archive for lots more free projects.

Visit my shop to buy my printable PDF sewing patterns:

Thursday, 2 February 2012

How To: Cross Stitch Heart Brooch

As promised, here's another Valentine-themed project :)

Today's tutorial is for a cute felt heart brooch decorated with little cross stitches.


These brooches are quite a quick sewing project, and would make sweet Valentine's day gifts for friends (especially ones who like to sew!), or favours for your bridesmaids or flowergirls... or a cute way to say "I love you" to your mum on Mother's day (my mum has already snaffled this one to wear on her jacket).

To make your heart brooch you will need...

White felt and red felt (I used the "ruby red" wool blend felt I sell in my shops)
Matching red and white sewing thread
Red embroidery thread / floss
A brooch clasp (or a safety pin and an extra small rectangle of red felt)
An embroidery hoop
Optional: a piece of greaseproof/baking paper


1) Stretch a piece of white felt in an embroidery hoop to give you a nice flat surface to stitch onto.

2) Use red embroidery thread / floss to stitch the simple design of Xs as pictured. I stitched mine freehand, making small neat crosses and stitching row by row to keep the design as even as possible. The smaller/larger your Xs, the smaller/larger your finished brooch will be. I used the large heart motif from my Will & Kate sampler, but for a different look you could stitch the smaller heart if you prefer.

If you're not confident about stitching freehand, you can draw the heart design neatly onto a piece of semi-transparent baking/greaseproof paper, tack the paper in place on the white felt with large stitches, then follow your drawing as you stitch (stitching through the paper and the felt). When you've finished stitching, remove the tacking threads then carefully tear away the paper, using a pin to remove any small or fiddly pieces.

Make sure that all your Xs are sewn the same way - e.g. on my brooch, the top stitch of each X is the line going from the top left to the bottom right. 


3) Remove the white felt from the hoop, then cut around your stitched heart leaving a border of white felt around the Xs:


4) Place the white heart onto a piece of red felt, and sew it in position using running stitch and white thread. Then trim away the excess red felt to create a red border around the white heart.


5) Use the red heart as a template to cut another matching piece of red felt - this will be the back of your brooch. Turn the backing piece over and sew a brooch clasp or safety pin onto it (or a hairclip if you prefer) using a double thickness of red sewing thread. Visit this tutorial on making felt brooches for tips on how to secure your safety pin neatly.


6) Place the front and back of the brooch together, and sew around the edge with running stitch in more red thread. Sew as flush to the white heart as you can, and then finish your stitching neatly at the back.


I stitched my brooch in "classic" red and white, but I think it would also look very cute in pretty shades of pink and purple, or with a bright colour (maybe turquoise?) instead of the white felt.


This tutorial is for non commercial use only: you can use it to make as many brooches as you like to give as gifts, but please don't make any for sale. You may borrow 1 or 2 photos if you want to blog about this project, but remember to credit me and link back to the original source, and do not reproduce my tutorial on your site. Thanks!

Enjoyed this free tutorial? Buy me a "coffee" and help support my blog!

Buy Me a Coffee at ko-fi.com

Subscribe to my newsletter for a monthly free pattern and visit my crafty tutorial archive for lots more free projects.

Visit my shop to buy my printable PDF sewing patterns:

Friday, 27 January 2012

DIY "Owl Always Love You" Valentine's Day Card

I've been working on a few Valentine-themed projects this week, and will be posting them gradually over the next week or so. I hope you'll enjoy them! :)

First up, a cute card for Valentine's day (or your anniversary), featuring two owls, a heart, and a very silly pun...


You can make this with felt, like I did, or use coloured paper if you prefer. The owls are made using the templates from my owl brooch tutorial, then I just drew a heart the size I needed to fit in the gap, cut it out, and used that as the heart template when cutting out my felt. 

If you're using paper, turn your templates over and draw around them onto the back of your chosen paper with a sharp pencil, then when you turn the cut out shapes over all your pencil lines will be hidden. 

Position the pieces on the card one by one and carefully glue them in place with a glue stick. You can use goggly eyes (glue these in place with a small dab of craft glue) or cut out white paper circles and draw the pupils on with black marker / felt tip pen (perhaps drawing them slightly off-centre to make it look like the owls are looking at each other). 


If you're using felt, pin or hold the templates in place to cut out all the pieces. You could sew the wings, beaks and eyes in position (as seen in steps 3 + 4 of the brooch tutorial, sewing a small piece of felt or a black bead for each pupil), or just use craft glue to attach the wings and beak and pairs of goggly eyes. 

Position the owls and the heart onto the card how you want them, and then stick them in place with small pieces of double sided tape - craft glue would also work, but it can distort the card slightly.

Finally, write "owl always love you" or your own choice of message underneath the owls in your best handwriting. You may find it helpful to write it in pencil first to help you get the words centred nicely, then just erase the pencil marks once the ink has completely dried. If you've used paper for your owls you could also draw a few extra details on them if you wanted, like feathers on their bellies or wings. 


Please note: this tutorial is for non-commercial use only. You may borrow one or two photos if you want to blog about my projects but remember to credit me and link back to the original source, and do not reproduce entire tutorials on your site. Thanks!

Enjoyed this free tutorial? Buy me a "coffee" and help support my blog!

Buy Me a Coffee at ko-fi.com

Subscribe to my newsletter for a monthly free pattern and visit my crafty tutorial archive for lots more free projects.

Visit my shop to buy my printable PDF sewing patterns:

Friday, 11 March 2011

How To: Embroidered Faux Bois Heart

A fun embroidery project - sew a faux bois (fake wood) picture of a romantic carving of a couple’s initials in the trunk of a tree.


This project would make a special gift for weddings or anniversaries, or for Valentine's day - personalise it with the couple's initials and perhaps also a special date.

You will need:
Templates (at the bottom of this post)
Dark brown felt (approx. 40 x 46cm)
Dark brown embroidery thread (1-2 skeins)
Pale brown embroidery thread
Dark brown sewing thread
White or other light coloured sewing thread.
Thin quilt batting (approx. 23 x 23cm)
Twine or brown cord (approx. 18cm)
Greaseproof paper or thin tracing paper (approx. 12 x 14cm)
Needles, scissors, pins

1. Cut two pieces of dark brown felt each approximately 23cm square, and a piece of quilt batting the same size then make a “sandwich” of the three pieces with the batting in the middle. Pin the picture template provided in the centre of the square, pinning through all three layers.

2. Sew around the outside of the template with white or other light coloured sewing thread, sewing long stitches as close to the edge of the paper as you can to accurately mark out the shape. Finish your stitching loosely so you can easily unpick it later, and remove the pins.

This line of stitching holds the three layers together, and also acts as a guiding “frame” for your embroidery.


3. Trace the heart template provided onto a piece of greaseproof paper or thin tracing paper and add the initials of the couple you’re making the picture for – or draw smaller initials and add a date below them. Remember these letters are supposed to be carved in a tree trunk so draw simple letter forms.

Position the paper in the centre of the stitched “frame” and pin it in place.


4. Using a large needle and pale brown embroidery thread, sew along your traced design using back stitch and small even stitches. Then carefully tear away the paper to remove it, using a pin to remove any small fiddly pieces.

5. Fill the empty space in the picture with freeform faux bois embroidery with dark brown embroidery thread, using half the number of strands. Start by sewing the “knots” in the wood (swirls and rings of ovals) and then add slightly wobbly lines around them to build up a fake wood effect.

Either use backstitch or sew even running stitches and fill in the gaps sewing back in the opposite direction, whichever you prefer. Make sure you leave a gap of a few mms around the pale brown stitching and around the edge of the picture.

The faux bois embroidery is quite time consuming but it’s a very relaxing project you can do while watching TV, and you can speed it up by sewing fewer lines with larger spaces between them.


6. Following the lines of the stitched “frame” cut away the excess felt and wadding to leave a neat square, taking care not to accidentally cut any of the embroidery in the process.

Remove the large stitches and use the embroidered square as a template to cut a backing piece of matching dark brown felt.


7. Cut a length of twine or narrow brown cord about 18cms long. Sew this in place with whip stitches to the back of the embroidery so the ends overlap the felt by a couple of centimetres.

You may want to add a card insert to help stiffen the picture. To make this, draw around the picture template onto some scrap card and trim it by approximately 5mm all the way round the edge to make a square slightly smaller than the template.

8. Pin the back and front pieces together (with the card insert between them if you’re using one) and sew around the edges with neat blanket stitch in matching dark brown sewing thread. Finish your stitches neatly at the back.


If you're giving this picture as a gift, you could even continue the woodland theme with the gift wrapping! (click HERE for the full gift wrap tutorial)


Here are the templates for this project - double click to view full size and print out. If you print at 100% your picture will be the same as mine, just change the % to make a smaller or larger picture (at 100% the template sheet will print out as A4 size).


This tutorial is for non commercial use only: you can use it for as many fun craft projects as you like and to make gifts for friends but not to make anything which you then sell. Please feel free to borrow photos if you want to blog about it but remember to credit me and link back to the original source, and do not reproduce my entire tutorial on your site. Thanks!


Enjoyed this free tutorial? Buy me a "coffee" and help support my blog!

Buy Me a Coffee at ko-fi.com

Subscribe to my newsletter for a monthly free pattern and visit my crafty tutorial archive for lots more free projects.

Visit my shop to buy my printable PDF sewing patterns:

Sunday, 24 August 2008

I Heart Tea (Crafting 365 day 343)

I drink a lot of tea. Many many mugs of the lovely stuff. I am totally addicted and totally obsessed with all the paraphernalia that goes along with it: teacups, teapots, teacosies, even nice teaspoons! So it seemed only right and proper that I got back into sewing after my recent break with a batch of "I love tea" badges:
Sooo many tiny letters to cut out and sew on! Very satisfying finishing that lot, but there are even more to come as I'm finally going to be restocking the other four colours over the next few weeks as well...

Thinking of tea (and you know I often am), did you know that everyday when Eastenders finishes so many British people put the kettle on for a cuppa that it almost overwhelms the National Grid? I learnt this fun little fact from the shopping blog Wee Birdy, which kindly featured some of my tea-themed brooches this month. Hurrah!

Other recent features of my work include a sweet post on I Love Hokey, my "tea taste" pin in a lovely tea-themed Etsy montage on Mon Petit Lapin (I drink plain old builders tea - Fairtrade, of course - black no sugar in case you're wondering) and in a tea themed "treasury" selection by SassaLynne, a mention of my badger brooch by Miss Frugality, kind words on Hazelnut Studio's blog ... and also a little feature on Crafty Crafty.

Any mention of my work always makes me smile, be it on shopping blogs or little mentions of my felty things on the blogs of fellow crafters (apologies to anyone I forget to mention - I love you all, I'm just forgetful!) but I have to admit to having a little giggle at CraftyCrafty's description that "These fantastic felted goodies are part of the felt 365 project, a spinoff from crafting 365." Felt 365! Heehee! I love how my Crafting 365 group is starting to get mentioned places and take on a life of its own away from me but it did make me laugh all the same :)