Showing posts with label heart. Show all posts

Wednesday, 27 May 2020

How To: Sew Felt Pocket Hugs to Send to Your Friends

Today I'm sharing a cute and easy tutorial: how to sew a felt pocket hug!


Pocket hugs have started popping up all over the place recently: little tokens you can send to a loved one at the moment to send them a virtual hug while we're not allowed to give real ones.

They can tuck the hug in their pocket, carrying a reminder of your friendship and love wherever they go. It's such a lovely idea!

Obviously I couldn't resist sewing some felt hugs :)


These are quick and easy to sew and would be a great little project to work on in the evening while you're watching TV. You can stuff them like I did or keep them flat so you can pop them inside a card. They'd also be a great project for working on with kids, especially if you're teaching them to sew as part of homeschooling.

You will need:

- A heart template (I used the one from this tutorial, but you could make bigger hearts if you'd prefer)
- Tissue paper or an air erasable marker pen
- Craft and sewing scissors
- Felt
- Sewing thread to match the felt
- A contrasting shade of embroidery thread (floss) (I used white)
- A biro or other fine pen
- A sewing needle and pins
- Toy stuffing (don't have any toy stuffing? felt scraps would also work!)

How to make a felt hug:

1. Use your heart template to trace a heart shape onto tissue paper. Then write HUG in the centre in nice clear letters.

2. Roughly cut around the tissue paper heart and pin or hold the heart onto a piece of felt. Secure the heart with some large tacking stitches, using any shade of sewing thread and avoiding the lettering.


Don't have any tissue paper but do have an air-erasable marker pen? Use the pen to draw around the heart template directly onto the felt then write HUG in the centre. You could also use an ordinary felt tip for this but some of the pen marks will remain visible on the finished heart.

3. Embroider the lettering. I used three of the six strands from my embroidery thread (floss). You can sew white lettering like I did, or choose any colour that contrasts nicely with (and will stand out clearly from) the felt.

Sew the lettering with backstitch, following the pen lines and using smaller stitches as you sew around curves (this will help make the curves smoother and neater).


4. Remove the tacking stitches then cut out your heart, cutting through the tissue paper and felt at the same time.

If you've used a pen to draw your heart, just cut along the pen line. 


5. Carefully tear away the tissue paper then use your felt heart as a template to cut a second felt heart shape.


6. Place the two heart shapes together and sew around the edge with matching sewing thread. I used blanket stitch but whip stitch also works well.

Make sure you leave a gap big enough for your finger so you can stuff the heart in a moment.


7. Use toy stuffing to stuff the heart. Stuff it lightly, gradually adding small pieces of stuffing so you fill the shape evenly.

Don't have any toy stuffing? Use felt scraps instead! Cut them nice and small then add them to the heart in place of stuffing.


8. Finish your hug by sewing up the gap with more blanket or whip stitches and finishing your stitching neatly at the back.

And that's it: one happy little hug to send to a pal.

Click here for more lockdown craft ideas!

(The rainbow boxes would make fab gift boxes for sending your hugs. You could draw a smiling yellow sun in the bottom of the box when you colour it in then add your hug to the box, or use the sun template to make round hugs instead of heart-shaped ones).

This tutorial is for non commercial use only: you can use it to stitch as many hugs as you want for yourself or as gifts, but please don't make any for sale. You may borrow a couple of photos if you want to blog about this project, but remember to credit me and link back to this page on my blog, and do not reproduce my entire  post on your site. Thanks!

Enjoyed this free tutorial? Buy me a "coffee" and help support my blog!

Buy Me a Coffee at ko-fi.com

P.S. Subscribe to my newsletter for a monthly free pattern and visit my crafty tutorial archive for lots more free projects.

Visit my shops to buy felt and colourful craft supplies, plus my printable PDF sewing patterns:

Tuesday, 4 February 2020

How To: Appliqued Heart Bag for Valentine's Day

Valentine's Day in the world of crafting basically means LET'S STICK HEARTS ON ALL THE THINGS... and there's nothing wrong with that, right?


Sooo today I'll be showing you how to embellish a small bag with a felt heart patch and some simple embroidery.

This tutorial was originally designed for The Village Haberdashery's blog - visit their shop for lots of crafty goodness!

You will need:

* The template sheet from my Valentine’s wreath tutorial.
* A blank cosmetic bag or other small purse.
* Felt in the following colours: pink, bright pink, lilac, and dark purple.
* Matching embroidery threads (floss).
* Light pink sewing thread (i.e. to match the colour of the largest heart).
* Sewing needles and pins.
* Optional: an air-erasable fabric marker pen.

To decorate the bag:

1. Use templates A, B, C and D from the Valentine’s wreath tutorial to cut out four heart pieces. A = bright pink. B = lilac. C = dark purple. D = pink.

2. Follow steps 5 and 6 of the Valentine’s Wreath tutorial to sew the layers together, using contrasting embroidery thread (I used pink thread, then bright pink, then lilac then dark purple) to decorate the hearts and stitch them together. Use half the embroidery thread strands only – so for six-stranded thread just use three strands.


3. Iron the cosmetic bag if required then position the felt heart in the centre. Hold or pin it in position then sew it in place with whip stitch and matching pink sewing thread. Take care to only sew through one layer of the bag!


4. To complete the decoration, fill in the space around the heart with embroidery. I stitched backstitch lines radiating from the heart, alternating between bright pink and dark purple and using half strands as before. Use an air-erasable fabric marker pen to draw guide lines from your stitching or just stitch freehand.

Make sure not to sew through the fabric edge of the zip (hold this away from the bag fabric when you’re stitching near the opening). Knot your thread at the end of each section of stitching and start afresh when sewing the next section, don’t carry threads across the inside of the bag (you don’t want whatever you put in the bag to “catch” on trailing threads!).


If you're giving this bag as a gift, why not fill it with Valentine's candy before wrapping it for a sweet (PUN ENTIRELY INTENDED) extra gift.

Enjoyed this free tutorial? Buy me a "coffee" and help support my blog!

Buy Me a Coffee at ko-fi.com

P.S. Subscribe to my newsletter for a monthly free pattern and visit my crafty tutorial archive for lots more free projects.

Visit my shop to buy my printable PDF sewing patterns:

Tuesday, 5 February 2019

A Year of Wreaths: February Valentine's Heart Wreath Tutorial

UPDATE: this tutorial is now available as a printable PDF pattern over on my Patreon.

Subscribe for a small monthly fee and you'll get access to a growing library of PDF patterns and tutorials, with an email whenever I add a new project. You can cancel any time.    

Click here to check out my Patreon page and sign up!

-------

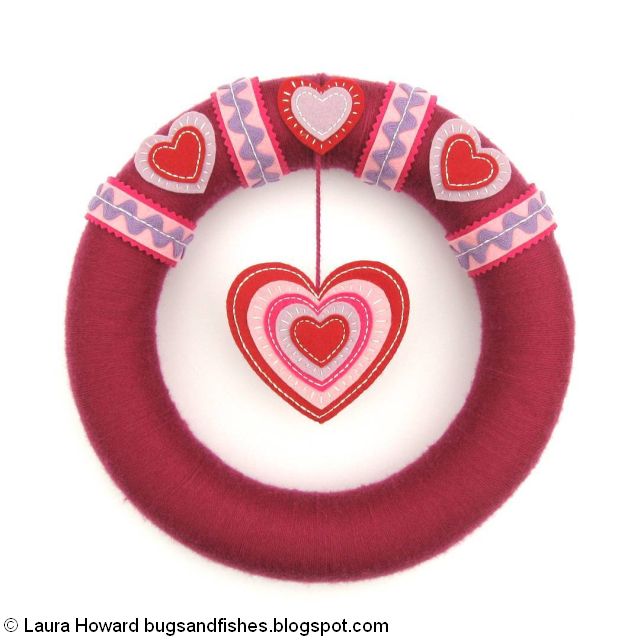
My monthly wreath project continues with a heart-themed wreath to celebrate Valentine’s Day, and to spread a little love and happiness!

Valentine's Day Wreath

This month’s wreath features embroidered felt hearts, pretty ricrac and some gorgeous berry-coloured yarn.

The hanging heart would also make a fab ornament on its own - simple add a coordinating ribbon loop and a matching backing heart (either cut a plain red felt heart or repeat the relevant steps to make two decorated hearts to join together).

Embroidered felt heart for Valentine's Day

finished wreath with all the pieces glued in position


Subscribe to my newsletter for a monthly(ish) free pattern and visit my crafty tutorial archive for lots more free projects.

Visit my shop to buy my printable PDF sewing patterns:

Monday, 7 November 2016

Christmas Ornament Tutorial: Sew a Button Heart

PLEASE NOTE: this project will be removed from my blog at the end of November, after which it will be available as part of a printable pattern from my shops. Please make a copy of the instructions and templates if you'd like to save a free copy before then! :)

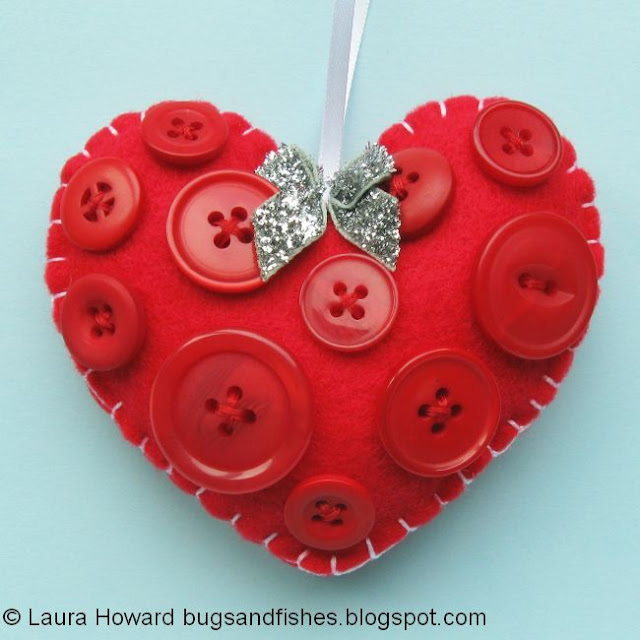
Time for another Christmas tutorial! Today, learn how to make a felt heart ornament covered in buttons.

felt heart ornament

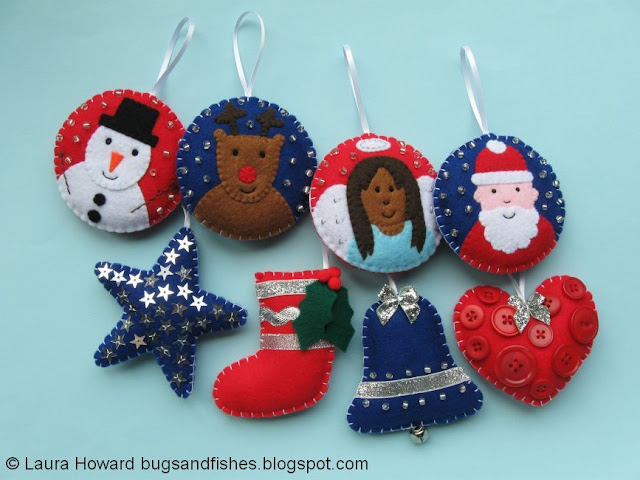
This button heart ornament is part of a set of cute felt Christmas decorations I designed for docrafts Creativity magazine last year.

I'm sharing all the tutorials so you can sew a whole set of ornaments, or mix and match your faves. So far I've shared the snowman bauble, the stripey stocking, the reindeer bauble, the sparkly star and the angel bauble. The final two projects will be popping up on my blog in the next couple of weeks.

felt Christmas decorations
 felt Christmas decorations
felt heart ornament

To make the button heart, you will need:

- templates (see the bottom of this post)
- red felt
- red sewing thread
- assorted red buttons
- a mini ribbon bow and matching sewing thread (I used a fabulously sparkly glitter bow from the docrafts Create Christmas range and white thread)
- white embroidery thread (floss)
- white narrow ribbon
- toy stuffing
- sewing scissors
- sewing needles and pins

felt heart ornament

To make the button heart:

1. Use the templates provided to cut out two heart shapes from red felt.

2. Arrange buttons. Lay out on one heart then sew onto other. Leave space at edges for sewing together and adding bow. Smaller, lighter buttons = best for this. Sew buttons on securely with several stitches of double thickness red thread.

3. Add mini bow with a few stitches in centre - to attach the silver bow I used white thread.

4. Cut a 15cm (6 inch) length of narrow white ribbon. Fold the ribbon into a loop and sew the ends to the top of the undecorated heart shape. Use whip stitch and red sewing thread, sewing into the felt not through it.

5. Place the front and back heart pieces together so the ends of the ribbon are sandwiched between the two layers and the loop sticks out the top above the bow.

Hold or pin the two heart pieces together and blanket stitch around the edge, using half strands of white embroidery thread. Stitch most of the way round - folding the bow forward as you sew behind it - and leave a gap for stuffing.

Tip: start your stitching at one side, so the gap for stuffing is along a straight edge. 

6. Add small pieces of stuffing to gradually fill the heart, stuffing it lightly so it's evenly filled but still very squishy. Then sew up the gap with more blanket stitches and finish your stitching neatly at the back. 

felt heart ornament

This tutorial is for personal use only: you can use it to stitch as many felt ornaments as you want for yourself or as gifts, but please don't make any for sale. You may borrow a photo or two if you want to blog about this project, but remember to credit me and link back to the original source, and do not reproduce my entire post or share the pattern itself on your site. Thanks!


Enjoyed this free tutorial? Buy me a "coffee" and help support my blog!

Buy Me a Coffee at ko-fi.com

Subscribe to my newsletter for a monthly free pattern and visit my crafty tutorial archive for lots more free projects.

Visit my shop to buy my printable PDF sewing patterns:

Click here to view the template sheet, make sure you're viewing it full size then print it at 100%.

felt heart ornament template

button heart felt ornament tutorial

Monday, 28 September 2015

Tutorial: Make a Stitched Heart Keepsake Card

One of the tutorials I worked on for docrafts Creativity magazine is now available on their website - hurrah!

Click here to view the free tutorial for making this pretty embroidered card:

https://www.docrafts.com/Projects/stitched-keepsake-card-tutorial/4053628

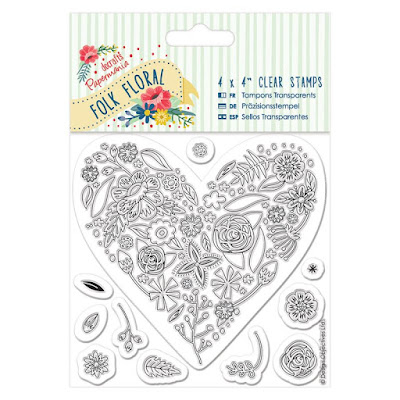
The card uses products from the Folk Floral range (so pretty!) including this lovely heart stamp:

https://www.docrafts.com/Products/papermania/4-x-4-clear-stamp-11pcs-folk-floral-heart/94139

Have you ever tried embroidering a design on card?

It's an interesting change from stitching on fabric and much easier than you might think!

Thursday, 17 October 2013

How To: Make a Mini Felt Hamster & Heart

To celebrate the launch of my new book, Super-Cute Felt Animals, I'm sharing a collection of free tutorials that you can mix and match with the projects from the book.

This week's projects coordinate with the pets in the "At Home" chapter. Today, learn to make a cute little felt hamster and a sparkly heart...


The heart would also look great in pink! I designed a heart to accompany this chapter because “home is where the heart is” but it would be a sweet accompaniment to any felt animal you sew from the book to give as a gift to someone you love :)

To make the hamster & heart, you will need...

- the template sheet from the bottom of this post
- red felt, approx. 2 x 4 in (5 x 10 cm)
- Satsuma orange felt, approx. 3 x 4 in (7 x 10 cm)
- a small piece of pink felt
- white, red, Satsuma orange, pink and black sewing thread
- pink embroidery floss (thread)
- 2 black seed beads (size 8/0)
- round red sequins – approx. ¼ in (6mm) in diameter
- stuffing & a pencil or other small stuffing tool
- needles, pins & embroidery scissors (great for cutting out small felt shapes!)


To make the hamster:

1. Use the templates provided to cut out two feet from pink felt, and one head, one front body and one back body from Satsuma felt. Also cut out a small pink oval for the nose. Turn over one of the feet pieces – this will be the right foot.

I used a single layer of felt for each foot, but you may want your hamster’s feet to be thicker or sturdier – if so, cut out four feet instead of two and sew the two layers together with running stitch or whip stitch in matching pink thread. Or, if you find sewing two small pieces together a bit fiddly you can sew one shape onto a piece of felt and then cut out the second layer after you’ve finished stitching.

2. Place the head onto the front body shape, using the back body shape as a guide to ensure the front and back sections of your hamster will match up when you sew them together. Sew the head in place with whip stitch in matching Satsuma sewing thread.


3. Sew on two black seed beads for the hamster’s eyes, sewing each bead flat like an O with three or four stitches of black sewing thread. Then whip stitch the nose in position with matching pink sewing thread, and sew six small stitches with white sewing thread to form the whiskers.


4. Cut a length of pink embroidery floss and separate half the strands (so for six stranded floss use three strands). Switch to a larger needle if necessary and use the floss to backstitch the hamster’s mouth and a curved line inside each of its ears, as pictured.


5. Sew the feet in position on the back body piece, using whip stitch in matching Satsuma sewing thread. Take care to sew into the orange felt not through it.


6. Place the front and back of the hamster together, and begin sewing around the edge with whip stitch and matching Satsuma sewing thread. Start at one side where the head joins the body, and sew up around the head and then around the body stuffing the hamster gradually as you sew. Turn the hamster back and forth as you sew past the feet to help keep your stitching neat on both sides. Continue sewing until you’ve closed up the final gap.


7. (Optional) Use Satsuma sewing thread to sew a line of running stitch flush around the edge of the hamster’s head from one side to the other. This will improve the shape of your finished hamster. Carefully sew through all the layers of felt and stuffing, so your stitches pull the layers closer together. Turn the hamster back and forth as you sew to help keep your stitching neat on both sides. Finish your stitching neatly at the back.


To make the heart:

1. Use the template provided to cut out two red felt hearts.

2. Decorate one of the hearts with round red sequins, sewing each sequin in place with three stitches of matching red sewing thread. Follow the arrangement of sequins pictured, or plan your own arrangement before you start sewing. Avoid placing the sequins too close to the edge of the felt, so you can easily sew around the edge of the heart in the next step. Arrange your sequins on one of the hearts and then transfer them one by one to the other heart, sewing them in place in the correct position.


3. Place the front and back of your heart together and sew around the edge with whip stitch in matching red sewing thread. Start at one side and sew until you have a gap large enough for your finger. Stuff the heart and then sew up the remaining gap with more whip stitches. Finish your stitching neatly at the back.

Click here to view the template sheet in another window/tab, and print it at 100%.


This tutorial is for non commercial use only: you can use it to make as many felt hamsters & hearts as you want for yourself or as gifts, but please don't make any for sale. You may borrow a few photos if you want to blog about this project, but remember to credit me and link back to the original source, and do not reproduce my entire tutorial on your site. Thanks!


Super Cute-Felt Animals is published by CICO Books, RRP £12.99. It includes 35 fun felt projects, each with illustrated step-by-step instructions. It's available to buy at Amazon UK and Amazon USA and many other bookshops.

Please note: the Amazon links in this post are affiliate links.

Enjoyed this free tutorial? Buy me a "coffee" and help support my blog!

Buy Me a Coffee at ko-fi.com

Subscribe to my newsletter for a monthly free pattern and visit my crafty tutorial archive for lots more free projects.

Visit my shop to buy my printable PDF sewing patterns:

Monday, 14 October 2013

How To: Make a Mini Felt Cactus

To celebrate the launch of my new book, Super-Cute Felt Animals, I'm sharing a collection of free tutorials that you can mix and match with the projects from the book.

This week I'm sharing three mini "extras" that are designed to coordinate with the pets in the "At Home" chapter: a cactus, a hamster... & a little heart because 'home is where the heart is' :)


Today you can make a little felt cactus. If you're sewing lots of cacti you could put them each in different coloured pots and give them different brightly-coloured flowers.


To make the cactus, you will need...
- the template sheet at the bottom of this post
- spring green felt, approx. 1 ¾ x 3 ¾ in (4 x 8 cm)
- terracotta felt, approx. 2 x 3 ¾ in (5 x 9 cm)
- (optional) a small piece of bright pink felt
- spring green, lime green, white, pale pink and terracotta sewing thread
- stuffing & a pencil or other small stuffing tool
- needle, pins & embroidery scissors (great for cutting out small felt shapes!)

1. Use the templates provided to cut out two cactus shapes from spring green felt and two pots and two pot edges from terracotta felt. If you want to add a flower to your cactus, also cut out one bright pink cactus flower. Turn over one of each of the cactus, pot and pot edge pieces – these will become the back of your cactus.

2. Place the corresponding pot and pot edge pieces together as pictured. Sew each edge piece in position with two lines of whip stitch in matching terracotta sewing thread.


3. Add the corresponding cactus pieces, sewing them in place with a line of whip stitch in matching green thread, so the cactus piece is flush with the curve of the pot edge. Make sure the front and back pieces are the mirror image of each other so you can sew them together neatly later. Turn the back cactus shape over and set it aside for the moment.


4. Backstitch four curved lines onto the front cactus shape as pictured, using lime green sewing thread.


5. Then sew a series of small stitches with white sewing thread to form the cactus’ spikes. Vary the size and angle of the stitches and sew ten rows, one along each side of the stitched lines and one along the left and right edges of the cactus.


6. (Optional) Position the cactus flower on your cactus as pictured. Sew it in place with a starburst of small stitches of pale pink sewing thread. Make sure you don’t stitch right up to the edge of the green felt behind the flower.


7. Place the front and back sides of your cactus together. Using whip stitch and matching terracotta sewing thread sew the edges of the pot together then stuff it. Switch to matching spring green thread and whip stitch the edges of the cactus together, leaving a gap for stuffing. Stuff the cactus then sew up the gap with more whip stitches. Finish your stitching neatly at the back.


Click here to view the template sheet in another window/tab, and print it at 100%.


This tutorial is for non commercial use only: you can use it to make as many felt cacti as you want for yourself or as gifts, but please don't make any for sale. You may borrow a few photos if you want to blog about this project, but remember to credit me and link back to the original source, and do not reproduce my entire tutorial on your site. Thanks!


Super Cute-Felt Animals is published by CICO Books, RRP £12.99. It includes 35 fun felt projects, each with illustrated step-by-step instructions. It's available to buy at Amazon UK and Amazon USA and many other bookshops.

Please note: the Amazon links in this post are affiliate links.

Enjoyed this free tutorial? Buy me a "coffee" and help support my blog!

Buy Me a Coffee at ko-fi.com

Subscribe to my newsletter for a monthly free pattern and visit my crafty tutorial archive for lots more free projects.

Visit my shop to buy my printable PDF sewing patterns: