
----
Few things say Spring like bunnies, especially super cute and colorful tiny bunnies! Make just one for fun or five for a whole party of adorableness.

Supplies:
- scissors
- sewing needle
- polyster stuffing / fiberfill
- 5 squares of assorted pastel felt 4.5” x 4.5” / 12cm x 12cm
- 1 square of white felt 4.5” x 4.5“ / 12cm x 12cm
- 1 square of pink felt 2.5” x 2.5” / 7cm x 7cm
- 10 7mm two-hole black buttons
- coordinating embroidery thread to match your felt colors
Stitches Used:
- straight stitch
- running stitch
How to Create Your Bunnies
1. Cut out all of your Bunny pattern pieces from the template provided.
2. Taking one of your pastel felt squares, cut out 2 x Body pieces and 2 x Ears. Repeat this for the next 4 pastel felt squares.

3. Next take your white felt square and cut out 5 x Tummy pieces, 5 x Muzzle pieces and 1 x ¼” wide strip for your bunny Teeth Segments, then take the strip and cut 5 x ½” tall pieces out of it.
4. Using your pink felt square, cut 5 x Heart Noses.

5. Picking up one of your pastel bunny Body pieces, center one Tummy piece along the bottom edge and sew in place with a straight stitch using a single strand of white embroidery thread.

6. Align one of the Teeth Segments about ¼” above the tummy piece. Sew, with a straight stitch using a single strand of white embroidery thread, along the top of the tooth first and then work your way around the entire piece.

Next, sew a straight line with a running stitch down the center of the Teeth Segment using one strand of black embroidery thread.
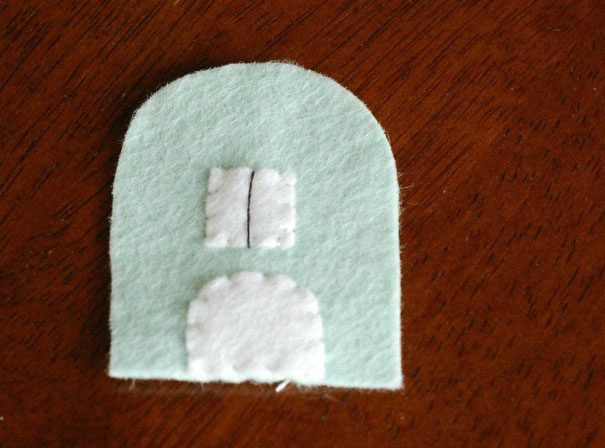
7. Center one of your Muzzle pieces over the top of the Teeth Segment. Use the black line you just sewed to help give you a visual. You’ll see the top of the Teeth Segment in between the center part of the Muzzle near the top. Starting in the middle, sew on to the Body with a straight stitch using a single strand of white embroidery thread.

8. Take one of your Heart Nose pieces and align it so that it sits nicely in the middle of the Muzzle. Sew one straight stitch in the center dip of the top part of the heart using a single strand of pink embroidery thread. Do another single straight stitch at the bottom point of the heart.

9. Attach the button eyes. Keep each eye above the Heart Nose and centered over one Muzzle pooch. Before sewing the eyes make sure you have them turned so that your button holes are horizontal.

Once your eyes are sewn in place take about 3 strands of white embroidery thread and make a knot at one end.

Pull the knot up to the interior button hole so it sits almost flush on top of the button, but not all the way thru it. This will make a pupil. Repeat for the second button eye. If you'd like you can add a very small dab of craft glue or fray check to the knots to keep them from unraveling.

10. Add details! Using one strand of black embroidery thread and a running stitch, sew a little arched line underneath each eye.

Then sew on 3 whiskers on each side of the Muzzle using one long straight stitch each.

Set the completed bunny front aside.
11. Pick up the matching felt color Body piece and one of the matching ears. Using a tiny straight stitch and one strand of matching embroidery thread, sew on the ear to the Body using the little “tab” at the bottom part of the ear. Repeat for the second ear.


12. Pair your completed bunny front together with the completed ear section, the ear “tabs” should be sandwiched between the layers. Pin together. All your stitch work should now be neatly hidden on the inside of your bunny. Sew together starting on the bottom right hand corner using a running stitch and one strand of matching embroidery thread. Sew close to the edge of your felt, using neat even stitches.

Go all the way around the bunny body till you reach the bottom left hand corner and stop to add a small amount of fiberfill to the bunny.

Stuff it so it’s slightly plump, then continue sewing the bunny closed till you reach the bottom right hand corner again. Tie off your thread and you’ve finished one of your bunnies!

Repeat steps 1-12 for the next 4 Bunnies until you have a total of 5.
Make sure you give your bunnies names and feed them each day!
Click here to view the pattern sheet at full size and print.

©2014 Tumus Designs This pattern is intended for personal use only and not for commercial distribution or reproduction. Items made from this pattern may not be resold in any form or modification. Please respect copyright law!
----
Rebekah is a gardening addict, an avid quilter and hand sewing mama to one very busy toddler, 2 ridiculous cats and the wife of an equally talented sewing husband. She enjoys designing quilt and hand sewing patterns, reading epic fantasy series, obsessing over cute things, photography, yoga pants and the occasional video game binge. You can follow her exploits and sewing adventures over on her blog.
Rebekah's second tutorial will be posted on Thursday.
---
Fancy some more free tutorials? Subscribe to my newsletter for a monthly free pattern and visit my crafty tutorial archive for lots more free projects.
Visit my shop to buy my printable PDF sewing patterns:
5 comments:
Thank you, Laura!!!! Have a good day,
hugs , Gloria
Thanks for these cute bunnies!
Such a lovely blog! And this tutorial is excellent, I love rabbits! denisesplanet com
Thanks again to Rebekah for sharing these bunnies, they are super cute :)
Thanks for posting them!
Post a Comment