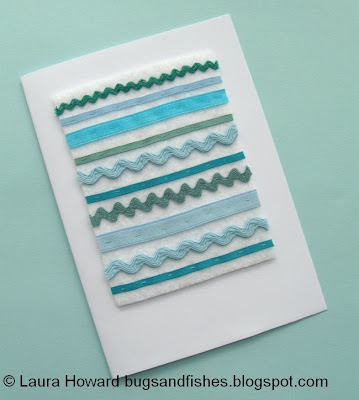
First up: a stripey card decorated with ribbons...
I don't know about you guys but I often end up with small bits of ribbon and ricrac leftover from my crafty projects and it feels wasteful to just throw them away. Now you can save up those crafty leftovers and make something from them :)
I used lots of shades of blue for my card. You can stick to one colour like I have, or use a range of colours (e.g. reds, oranges & yellows, or pinks & purples), mix and match a few colours or use a whole rainbow of different colours. Make the most of the scraps in your stash!
To make a ribbon card you will need:
- a piece of paper, a ruler, scissors & a pencil
- assorted ribbons, ric rac and other trims in your chosen colours (minimum length: 3.5 inches)
- a matching shade of sewing thread (I used a pale blue)
- white card or a card blank (I used a piece of A5 card, folded in half)
- white felt
- double sided sticky tape
- a needle, pins, sewing scissors
1. Draw a paper template measuring 3 x 4 inches. If you're using a different card size to me, draw a rectangle in the size you need. Cut out the template.
2. Use the template to cut out a piece of white felt. This will be the "base" you'll sew the ribbons to.
3. Choose the ribbons you want to use, trimming the pieces if necessary so they're all slightly wider than the narrowest side of the felt rectangle. Arrange the ribbons on the felt so they're roughly evenly spaced and you have a nice mix of colours. If you're using lots of different colours, you could arrange them in colour order to create a rainbow effect!
4. Pin the ribbons onto the felt. Then use small running stitches to sew each length of ribbon to the felt, removing the pins as you secure each ribbon. I used about 7 or 8 stitches per ribbon.
5. Turn the felt over, and trim the ribbon ends so they're flush with the edge of the felt.
The front of the felt should now look something like this:
6. Turn the felt over again and stick lengths of double-sided tape along each edge. Press the tape down firmly so it sticks securely to the felt. You could also use craft glue to stick the felt in place but make sure you test it first with scrap pieces of felt and card to ensure that the felt sticks properly and that the card isn't distorted by the glue.
7. Place the felt on your blank card so you can see where it's going to look best. Then peel off the paper from all the pieces of tape, and carefully stick the felt in position. Press the felt down onto the card and you're done!
If you prefer a slightly messier / less geometric look, here's a similar card I made years ago - a few roughly cut pieces of ribbon sewn onto (and overhanging) a scrap of white fabric, then glued onto a blank white card. Simple but effective :)
Please note: this tutorial is for non-commercial use only. You may borrow one or two photos if you want to blog about my projects but remember to credit me and link back to the original source, and do not reproduce entire tutorials on your site. Thanks!

Subscribe to my newsletter for a monthly free pattern and visit my crafty tutorial archive for lots more free projects.
Visit my shop to buy my printable PDF sewing patterns:


2 comments:
Very sweet idea!
Thanks! x
Post a Comment