Showing posts with label ricrac. Show all posts

Monday, 5 August 2013

How to: Ribbon Scrap Card

This week I'm sharing three ideas for making handmade cards!

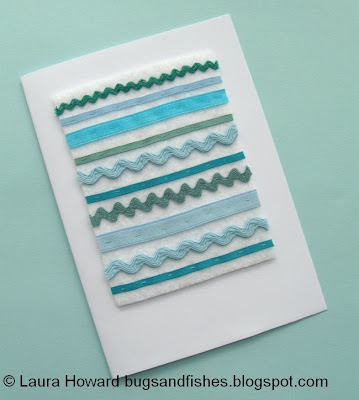
First up: a stripey card decorated with ribbons...


I don't know about you guys but I often end up with small bits of ribbon and ricrac leftover from my crafty projects and it feels wasteful to just throw them away. Now you can save up those crafty leftovers and make something from them :)


I used lots of shades of blue for my card. You can stick to one colour like I have, or use a range of colours (e.g. reds, oranges & yellows, or pinks & purples), mix and match a few colours or use a whole rainbow of different colours. Make the most of the scraps in your stash!

To make a ribbon card you will need:

- a piece of paper, a ruler, scissors & a pencil
- assorted ribbons, ric rac and other trims in your chosen colours (minimum length: 3.5 inches)
- a matching shade of sewing thread (I used a pale blue)
- white card or a card blank (I used a piece of A5 card, folded in half)
- white felt
- double sided sticky tape
- a needle, pins, sewing scissors


1. Draw a paper template measuring 3 x 4 inches. If you're using a different card size to me, draw a rectangle in the size you need. Cut out the template.

2. Use the template to cut out a piece of white felt. This will be the "base" you'll sew the ribbons to.

3. Choose the ribbons you want to use, trimming the pieces if necessary so they're all slightly wider than the narrowest side of the felt rectangle. Arrange the ribbons on the felt so they're roughly evenly spaced and you have a nice mix of colours. If you're using lots of different colours, you could arrange them in colour order to create a rainbow effect!


4. Pin the ribbons onto the felt. Then use small running stitches to sew each length of ribbon to the felt, removing the pins as you secure each ribbon. I used about 7 or 8 stitches per ribbon.


5. Turn the felt over, and trim the ribbon ends so they're flush with the edge of the felt.


The front of the felt should now look something like this:


6. Turn the felt over again and stick lengths of double-sided tape along each edge. Press the tape down firmly so it sticks securely to the felt. You could also use craft glue to stick the felt in place but make sure you test it first with scrap pieces of felt and card to ensure that the felt sticks properly and that the card isn't distorted by the glue.


7. Place the felt on your blank card so you can see where it's going to look best. Then peel off the paper from all the pieces of tape, and carefully stick the felt in position. Press the felt down onto the card and you're done!


If you prefer a slightly messier / less geometric look, here's a similar card I made years ago - a few roughly cut pieces of ribbon sewn onto (and overhanging) a scrap of white fabric, then glued onto a blank white card. Simple but effective :)


Please note: this tutorial is for non-commercial use only. You may borrow one or two photos if you want to blog about my projects but remember to credit me and link back to the original source, and do not reproduce entire tutorials on your site. Thanks!

Enjoyed this free tutorial? Buy me a "coffee" and help support my blog!

Buy Me a Coffee at ko-fi.com

Subscribe to my newsletter for a monthly free pattern and visit my crafty tutorial archive for lots more free projects.

Visit my shop to buy my printable PDF sewing patterns:

Sunday, 31 July 2011

Pink + Blue

Such a busy weekend!

I've been catching up with a lot of odd bits of admin, and getting a couple of projects finished for a looming deadline. I wish I could show you what I've been making but alas, sometimes I must keep secrets.

I've also been sorting out a big supplies order that arrived on Friday - including making up lots of colourful packs of felt, and tying them into bundles with pretty ricrac.


Ah, how I love ricrac...

Sunday, 20 December 2009

Gift Wrap Idea: Buttons

With all my business parcels packed and posted for the year it's time to turn my attention to my own Christmas gifts!

I'm using lots of yarn and pompoms (perfect for making use of the leftover yarn from the scarves I've been knitting) but I'm also trying out a few other ideas including one I'd like to share with you today... decorating your gifts with lovely buttons.


If you've got any crafty friends I think using craft supplies like buttons (or beads) and ribbon is a fab way to personalise their gifts. And because they'll be able to add the trimmings to their supplies stash and use them to make new things it's eco friendly too.

Start with a simple wrapped parcel (regular readers will know I'm a big fan of brown paper!) and tie ric rac, ribbon, yarn, lace or any other trims you fancy round it.

You can keep it simple with one striking trim like this ric rac...


... or use lots of co-ordinating trims together:


Then you need to add the buttons - this is a bit fiddly but well worth it. Thread an assortment of buttons onto a length of embroidery thread or yarn, and then weave the string around the ribbon so the button string becomes intertwined and the buttons are evenly spaced.

You don't need buttons for the underside of the parcel so I'd recommend tying one button string top to bottom around the parcel and a second string left to right (instead of using one long piece as you would with a normal bit of ribbon) leaving the ends of each string empty and tying the ends together on the underside of the parcel.


Another way to use buttons in your wrapping (and fewer of them!) is to make a button tag.

You can make a homemade tag easily with some cardstock, a holepunch and some embroidery thread or yarn as a string, or raid your stationery supplies if you've got some! Use a needle to pole the holes you'll need and then sew your buttons onto the tag using a double thickness of thread or some embroidery thread.


Use some sticky tape to secure the end of the thread and cover your sewing with a large address label or use craft glue to stick down a piece of paper or card.


Then write your tag and tie it to your parcel. Lovely.


PS if you'd like to add a vintage crafty feel to your gift wrapping without any of this messing around with buttons check out these lovely downloadable tags from doe-c-doe - button cards and vintage trims.

Please feel free to borrow one or two photos if you want to blog about this project, but remember to credit me and link back to the original source, and do not reproduce my entire post on your site. Thanks!

Enjoyed this gift wrapping idea? Buy me a "coffee" and help support my blog!

Buy Me a Coffee at ko-fi.com

Subscribe to my newsletter for a monthly free pattern and visit my crafty tutorial archive for lots more free projects.

Visit my shop to buy my printable PDF sewing patterns: