Today I'm going to walk you through the steps to make a fabric banner like the one shown above, which is included in the Oh Boy mini album kit for sale in my shop. You could certainly add more fabric pieces to make the banner longer depending on how you will use it, but I don't think it would be a good idea to have less than three pieces.
For this project you will need the following:
- fabric
- banner template
- thread
- needle
- ribbon
- scissor
- buttons (optional)
Start by gathering some fabric to use; in this case I'm using some recycled denim. You will also need a template to use to cut out your shapes. I found a template online for a banner, but it was much larger than I wanted. I used a copy machine to shrink the image to about the size I wanted, then trimmed it down a bit until it was just the right size. You could also free hand cut a template.
Once you have your template ready trace it onto the back size of the fabric and then cut out the pieces. In my case I was making 20 banners with 3 pieces on each banner so I had to cut out 60 pieces.
If you are using patterned fabric you might just want to leave it as it, but in my case I wanted to add some colorful buttons so I sewed them onto each piece. It helps if you have a good movie to watch while you do this!
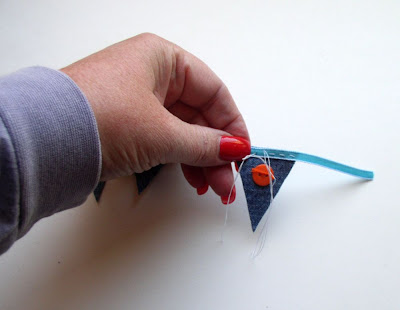
Chose a ribbon that works well with your fabric and cut it to the appropriate length. I layed my three denim pieces down and then layed the ribbon on top of them and cut to a length I thought would work well for my project. I planned to pin the pieces to the ribbon, but that turned out to be unnecessary and extra work. Instead I just lined the ribbon up with the top of the fabric piece and held it in place.
I used a single strand of thread that I doubled up so I didn't have a knot in the back. Start in the back and pull the needle through but not all the way, then when you push your needle back through pass the needle through the loop in the back to secure the thread. As I sewed I moved my thumb along to guide the needle and held the ribbon tight to the fabric.
Once the first piece is sewn on lay the ribbon on top of the second piece, making sure the corners of the two pieces are touching. Then sew on the second piece and repeat the steps to sewn on the third piece (continue if you are making a longer banner).
One thing I learned as I was busy sewing is that I really would like to have a thimble. Who would have thought I would ever say that??!! It would be useful because my pointer finger already has many little puncture marks and I'm only half done sewing my banners.
This is a fun project that makes a great accent on a scrapbook page and I'm sure would look cute on a card too.
---
Visit Nancy's SHOP to check out her range of paper goods, and read more about her crafty projects over on her BLOG.
Subscribe to my newsletter for a monthly free pattern and visit my crafty tutorial archive for lots more free projects.


0 comments:
Post a Comment