Tuesday, 12 June 2018

Making a Patchwork Quilt: My Longest-Running Work-in-Progress!

After finishing my patchwork mini squares blanket (which was a work-in-progress for six and a half years) and the Christmas quilt I made for my sister (which was a WIP for almost four years), I feel full of enthusiasm for Finally Finishing Things!

So, I've decided to tackle my biggest and oldest UFO (UnFinished Object): the patchwork quilt I started when I was a teenager. 


I started this project around 2001 or 2002, I think. It's so long ago that I can't remember whether I started it in my final year of sixth form or my first term of University - either way, it was a while ago!

In fact, I'd almost completely forgotten that this quilt existed until January 2012 when I found the half-finished quilt top stashed in a suitcase under my bed.


Back in my teens I'd used whatever cheap fabric I could get my hands on to make the squares, then sewn them together pretty haphazardly. I'm sure the fabric is a mix of loads of different fibre blends, some pre-washed and some not (i.e. probably a disaster waiting to happen when it gets washed for the first time).

It wasn't the most well-made, well-thought-out project, and upon rediscovering it I honestly thought it looked rather hideous.... but the idea of just throwing it away made me shudder.

I wasn't sure what to do about it (maybe put it back in the suitcase under the bed for another decade???) until my mum said that actually she really liked it and could I make it into a proper quilt for her. Problem solved, challenge accepted, et cetera.

At that point, the quilt top was part-stitched...


... with a few already-stitched rows ready to add...


... and lots of unstitched squares left, too.


I worked on the quilt on and off that year, gradually adding the remaining rows and squares...


... until December 2012, when it looked like this:


The squares in one corner of the quilt top didn't really match up with the rest of the quilt, so I took it out. I obviously hadn't cared about the mismatched section in my teens but on rediscovering the quilt it really bugged me so it had to go. (This section hung around it my stash for years then eventually found a new home and got turned into a fabulous monster bag!)


I decided to use the remaining squares to fill in the gap left by the mismatched piece, then added as many extra rows as I could before my stash of squares ran out.

I stitched a few squares together in 2013...


... added five more rows to the bottom of the quilt in February 2014...


...and filled in the "missing" corner in March 2014.


By April 2014 the quilt top was finished and I excitedly wrote that it was "finally ready to be turned into an actual quilt!"... before then packing it up and not looking at it for another four years (oops). 


This spring I am finally making a start on turning the quilt top into an actual quilt. I ordered some wadding and white backing fabric to complete the quilt, spreading it out on the floor of my bedroom just before we started work in there as part of my flat renovation project.


Even with most of the room emptied out, I only just had enough space!


I thought about trying to keep it a secret from my mum that I'd started the quilting, so I could just rock up one day with a finished quilt and say "ta-da!". I soon realised this was going to be impossible - it's so big and bulky now the wadding has been added that it would be very hard to hide even if I wasn't in the middle of a big DIY project with boxes everywhere and no spare space for anything.

So, I'm currently keeping the in-progress quilt and the quilting hoop in my parents' spare bedroom and working on it when I go round to visit them (and when I remember!).

I'm keeping the quilting simple, sewing a line of stitching down either side of each seam using white thread to match the backing fabric. I've got a total of 90 lines to sew, more than double the number I had to sew for my sister's Christmas quilt, which was smaller than this quilt and made up of larger squares. It took me at least 70 hours to hand quilt the Christmas quilt, so this one is going to take me... a while.

Wish me luck!!

Friday, 8 June 2018

My Flat in Progress: April & May 2017

Time for another update from my fixer-upper flat...

You can catch up with the story so far with my posts about what we got up to in December & January 2016/17, February 2017, and March 2017.

In April 2017 the living room was still looking rather chaotic, but my dad and I were starting to get everything wrapped up in there. We did the last few repairs to walls and woodwork, and finished the last bit of painting...


... then hung up the curtains and the voiles.


These curtains (like the ones in my kitchen and bedroom) were a cheap as chips clearance bargain - they don't look particularly exciting but they're wonderfully thick, which is always a bonus in an old house.

We'd taken down the old curtain track in March to scrub it and remove years of dirt and old paint splatters, then refitted it ready to hang the new curtains. I scrubbed and reused the fixings, too. Just a small thing, but every penny helps!


The DIY-related chaos continued to make for some interesting photo set-ups as I juggled work deadlines and the flat renovation. (Click here to see how this photo turned out!).


With the living room almost done, we focused on finishing the spare room.

My dad stripped some old and knackered paint from the door (revealing some fabulous texture which I was almost tempted to keep as a feature)... 


... filled, sanded and painted over the patches of wall he'd repaired the previous month...


... then filled and the door, added knotting fluid, and began painting it.

Oh, and we painted the spare room skirting boards, too. 


I turned up the voiles in the bedroom and kitchen - a task which was slightly complicated by the kitchen curtains not actually being level!

I also took this photo, which I'm calling Assorted Objects Some Kid Stuffed Into The Keyholes In My Flat (mixed media, 2017).


(As well as being a delightful bit of found artwork - in perfectly on-trend millennial pink! - this is also item number 2367 on my ongoing list of "things I have used a knitting needle for, not including actual knitting".)

In early May we finished the painting in the spare room...


... then put the room back together. It's amazing the difference just hanging a lampshade and some curtains can make to the feel of a space!


I don't have proper before/after photos to share (not least because these rooms were not and still aren't totally finished) but here's a reminder of how the spare room and living room looked when I first moved in:


After five months and lots of messy hours of DIY we finally had these two rooms smartened up, painted white, and ready for carpet. Not bad and also Hurrah!

Tuesday, 5 June 2018

Exploring Oxford: Hertford College & the Sheldonian Theatre

My virtual tour of Oxford continues!

Today I'm sharing pics from my visits to the Sheldonian Theatre - which you can climb to the top of for fabulous views like these - and nearby Hertford College.


The Sheldonian was designed by Sir Christopher Wren, built in the 1600s and named after the very wealthy guy at the university who paid for most of it (Gilbert Sheldon). 


The Sheldonian Theatre is the official ceremonial hall of Oxford University, so it's the building where you receive your degree when you graduate and where a whole bunch of other University events are held throughout the year. It's also used for music recitals and other events which are open to anyone who buys a ticket.

The theatre's ceiling is pretty spectacular:


The ceiling was painted during the rein of Charles II, and apparently depicts "Truth descending upon the Arts and Sciences and expelling ignorance from the University".

The main attraction though (in my opinion, at any rate) is the fact that you can climb up to the attic then into the cupola at the very top of the building for 360 degree views of central Oxford. 


I love climbing up towers and things to get an overview of a city! There are other places in Oxford to get good birds' eye views (like Carfax Tower, which I blogged about earlier this year) but I think this one is my favourite - those ornamental rooftops are just so gorgeous.

I visited the Sheldonian for free during Oxford Open Doors one year so there was quite a long wait to get up to the cupola, but it was totally worth it for those views. There are also informational boards in the attic about the architecture and history of the building to keep you entertained on your way up.

Near the Sheldonian - and just visible from its cupola - is Hertford College. Hertford is usually closed to the general public (unlike many of the other colleges, which you can visit for free or a small fee) so it was a real treat to be able to visit it as part of the Oxford Open Doors festival.


Hertford has a complicated history! It started out life as Hart Hall in the late 1200s and expanded to become a full college (Hertford College) in the 1700s. The college was then dissolved in 1816 and the buildings were taken over by Magdalen Hall. This then became a college in 1874 but since Magdalen College already existed, they called it Hertford College instead.


Even if you've never heard of Hertford, you'll probably recognise its most famous bit of architecture: the Bridge of Sighs, which was built in 1913 to link the old and new quads of the College together.


Sadly the open day didn't include a chance to walk across the bridge, but it was still delightful to get a peek inside another of Oxford's colleges...


... particularly one with such a striking spiral staircase!


Want to explore more of Oxford and its colleges? Click here to read all my posts about the city, including Exeter college, Carfax Tower, and Magdalen College.

Click here to browse my full archive of travel posts. 

Friday, 1 June 2018

Retro Rag Doll Tutorial

UPDATE: this tutorial is now available in my Patreon pattern library.  

Subscribe to get instant access to a growing library of PDF embroidery patterns and craft tutorials, and updates when I add something new!

---

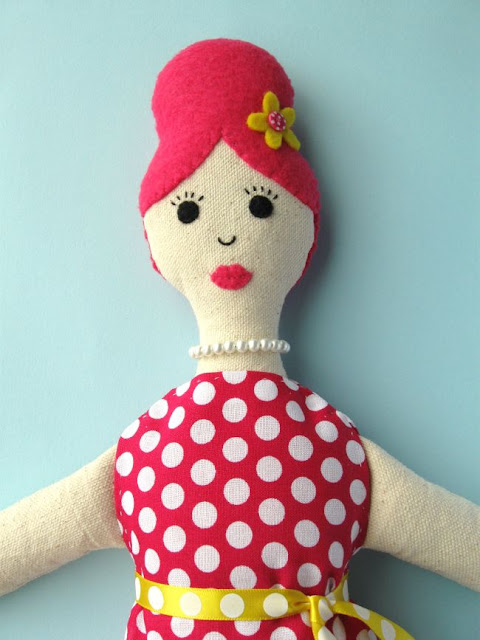
This month's freebie for my newsletter subscribers is a tutorial for sewing a decorative rag doll from felt and fabric.

http://eepurl.com/dvfYO1

I designed this doll for a magazine a few years ago, but since the issue is long out of print I thought it'd be nice to share the pattern with you guys!

http://eepurl.com/dvfYO1

The doll has lots of cute details - a beehive hairdo complete with a flower, pretty eyelashes, a beaded "pearl" necklace, and Mary Jane shoes. You could also easily adapt the basic doll pattern to give her a different look, or make a set of dolls with different hair colours and patterned dresses.

http://eepurl.com/dvfYO1
 http://eepurl.com/dvfYO1

Please note: this doll is designed as a decorative item, not a toy. Make sure you display it well out of reach of young children!

http://eepurl.com/dvfYO1

Click here to subscribe and get a monthly free pattern! For more crafty goodness, you can also subscribe to my weekly crafty newsletter, or updates about new patterns in my shop and special offers.

For lots more free tutorials, visit my archive.