Showing posts with label finger puppets. Show all posts

Friday, 7 August 2015

Show & Tell #14

One of the best bits of my job is seeing what people have been making from my books and free tutorials. I love seeing the photos of finished projects that people share with me, and I love sharing them with you guys too as part of my ongoing (though somewhat infrequent) Show & Tell series.

It's been a while since my last Show & Tell post, so I've got lots of crafty goodness to show you...

Holly stitched a fab cassette phone case using my pattern from Mollie Makes #41.


Lisa shared this in-progress photo of an angel bear she was sewing from my first book, Super-Cute Felt. Her daughter helped trace the pattern and was "very insistent that the colours are as close as possible" to the ones in the photos.


Kate bought a big bundle of felt from my shop and used it to create two colourful patchwork projects, which she shared as tutorials on her blog.

Felt patchwork table mats...


... and a rather fabulous felt patchwork blanket.


Louise emailed me these photos of a cute woodland garland she'd sewn using patterns from my second book, Super-Cute Felt Animals. It looks like lots of happy hours of sewing went into this!


Liz used my vintage felt baubles tutorial to decorate her Christmas cards last year. Look at all those baubles!


Liz said she made the ornaments "then attached them to cards using a brad, so the recipients can take the ornaments off and keep them when they are done with the card" She "made the cards from a very heavy cardstock so they wouldn't tip over" and "sewed on the coordinating borders with my machine". Such a great idea.


Linda wrote a lovely review of Super-Cute Felt Animals. "The day the book arrived in the mail our granddaughter was here and we had a wonderful time looking through the book and picking out animals I would make for her. She chose a cat and a dog"


Instead of stitching eyes (which can be quite fiddly at this scale) Linda added cute googly eyes instead.

She also stitched a pair of blackbirds using my free pattern.


The delightfully named "A Foolish Twit" tweeted photos of a whole bunch of things she's been making from my books. She said "Without your patterns I would never have got back in to crafting, now I love it!" which makes me very happy.

She combined two projects in Super-Cute Felt to make this bee needlecase...


... stitched lots of safari animals from Super-Cute Felt Animals...


... and made a whole army of mice finger puppets (I wonder what the collective noun would be for finger puppets?). You can also spot one of my floral projects in the bottom pic - patterns for the mice and the flowers can both be found in Super-Cute Felt.
 

My previous Show & Tell post was all about the sky blankets other people have been making, inspired by my sky blanket.

Here's Leanne's finished blanket - congrats, Leanne!


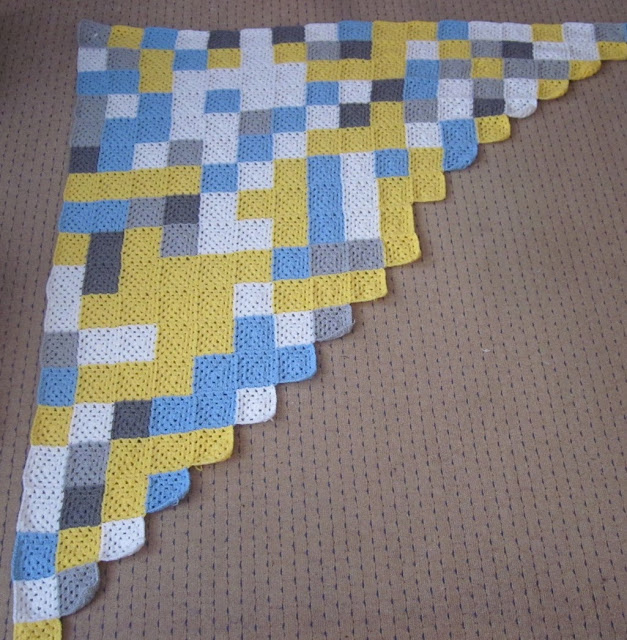
Amy is making a fab crochet version of the sky blanket, crocheting a granny square a day and using cheerful yellow yarn for sunny days instead of sticking with shades of blue.


She's blogging about the blanket as it grows. It's looking great, and has a surprising amount of yellow in it.


Amy wrote "I can't actually say just how much I love this project - it is great seeing how it grows, as I have no idea what colour the squares are going to be from one day to the next" ... "this blanket is bringing me nothing but pleasure" - which sounds a lot like how I felt when making my sky blanket. Such fun!

And last but by no means least, Polly stitched a tree stump pincushion using this guest tutorial shared on my blog by the talented Manuela.


Polly adapted the pattern slightly, using French knots to add the white spots on the toadstools which look great. She says "I'm really pleased I made this! I like having practical items which are also visually pleasing, and this makes me happy every time I use it." What more can you ask for from a crafty project?


You can see see all the previous show and tell posts here. My archive of free patterns and tutorials can be found here and you can read more about my books here 

If you want to share what you've been making from my patterns (or from supplies you bought from me back when I still sold them, or when I've done a destash sale) please do get in touch. If you just want to share your work privately and don't want to be included in a future Show & Tell post that's totally okay! :)

You can leave a comment and link here on this post, send me an message via my contact form or share a photo over on my Facebook page.

Please note: the Amazon links in this post are affiliate links. 

Friday, 13 June 2014

Guest Post: Felt Ocean Finger Puppets Tutorial

Today I'm sharing an ocean-exploration themed guest tutorial from Alicia & Patrick of Felt With Love Designs - a free pattern for making your own felt squid, hammerhead shark, walrus, deep sea angler and submarine finger puppets. 

When you've made these, head over to their site to download the patterns for making more felt ocean creatures: a pelican, manta ray, seahorse, lobster and eel! 

---


These finger puppets were a blast to create! Quiet books started my love of sewing with felt but the more we design, the more I love the smaller details in finger puppets. They also have the added bonus of a quick little project, giving you the instant satisfaction of completing something.

Finger puppets are fun for little fingers to play with. They encourage story telling and creativity. They also make excellent busy bags - throw a set into a pouch and stick them in your purse for instant fun while waiting at a doctor's appointment or for a long car trip! Our daughter loves playing with her sets of finger puppets in the car and while we sit in the bleachers and watch her brother's basketball games.


You will need:

- The Pattern Sheets (at the bottom of this post)
- Felt (colors stated below, with each puppet).
- Clear vinyl (for submarine windows. You only need a small amount of vinyl. I purchased a cheap, clear pencil pouch and cut the vinyl from that instead of purchasing a large amount of vinyl from the fabric store.)
- Thread to match felt.
- Needle.
- Scissors.

To make the Squid:

Felt colors: dark pink, bright blue, black, and white.


1. Cut all the pieces from felt.

2. Position the eyes onto the squid body front and stitch down using black thread. When creating eyes I place the white portion, place the black over the white, and stitch the black through the white. Not stitching the white separately makes the eyes pop a bit more.

3. Stitch blue spots onto the head, above the eyes, in a random pattern. I used a couple of short stitches in the center of each spot.


4. Using light pink thread, stitch lines on either side of the head, lines for the tentacles, and spots onto the large tentacles. I stitched these free-hand but have but included the lines on the pattern pieces so you can trace them if you want.


5. Match up the squid body front and back and stitch them together using a blanket stitch, leaving the bottom open. I also go back and stitch just the front edge of the opening with a blanket stitch to reinforce it but that is totally optional.


To make the Hammerhead Shark:

Felt colors: blue, black, and white.


1. Cut all the pieces from felt.

2. Position the black and white eye pieces onto the blue front eye piece and stitch them down using black thread (same as with the squid).

3. Stitch the blue opposite eye to the front white body piece.

4. Line up the blue top piece with fins on the front white body piece and pin it in place. Stitch along the bottom of the blue piece where it meets the white to create the shark's belly.

5. Line up the front eye piece and stitch it in place.

6. Using black thread, stitch lines on the eye pieces, gills, and lines where fins meet body. I stitched these free-hand but have included lines on the pattern pieces so you can trace them if you want.


7. Match up the shark body front and back and stitch them together using a blanket stitch, leaving the bottom open. I also go back and stitch just the front edge of the opening with a blanket stitch to reinforce it but that is totally optional.

To make the Walrus:

Felt colors: dark brown, light brown, ivory, back, and white.


1. Cut all the pieces from felt.

2. Position the black and white eyes onto the brown front body piece and stitch them down using black thread (same as with the squid).

3. Using black thread, stitch wrinkles and flippers on the brown front body piece. I stitched these free-hand but I've included the lines on the pattern pieces so you can trace them if you want.

4. Line up the ivory tusks and stitch them in place.

5. Line up the light brown whiskers over the tusks and stitch them in place.

6. Using black thread, stitch nostrils onto the whiskers.


7. Match up the walrus body front and back and stitch them together using a blanket stitch, leaving the bottom open. I also go back and stitch just the front edge of the opening with a blanket stitch to reinforce it but that is totally optional.


To make the Deep Sea Angler:

Felt colors: dark grey, golden yellow, back, and white.


1. Cut all the pieces from felt.

2. Position the black and white eyes on the brown front body piece and stitch them down using black thread (same as with the squid).

3. Position the grey body piece inside the front black piece and stitch it down.

4. Using black thread, stitch the mouth, gills, and fins on the grey body piece. I stitched these free-hand but I've included the lines on the pattern pieces so you can trace them if you want.


5. Line up the yellow ball and stitch it in place.

6. Line up the white teeth with the stitched black line of mouth and stitch it in place.


7. Match up the black front and back and stitch them together using a blanket stitch, leaving the bottom open. I also go back and stitch just the front edge of the opening with a blanket stitch to reinforce it but that is totally optional.


To make the Submarine:

Felt colors: dark grey, yellow, back, and a piece of clear vinyl.


1. Cut all the pieces from felt and cut the vinyl piece.

2. Position the black propeller background and sew it down.

3. Position the grey propeller piece and tack it down in center of the black propeller piece.

4. Line up the clear vinyl and yellow front piece on the dark gray front piece, then pin them in place.

5. Using black thread, stitch around the cut-outs in yellow front piece to create a circular outline for the windows. I stitched this free-hand but I've included the lines on the pattern pieces so you can trace them if you want. 


6. Stitch horizontal and vertical lines on the yellow portion, connecting the windows.

7. Using yellow thread, stitch down the yellow front piece, covering the propeller so only a bit shows through the hole.


8. Position the top fin and stitch it in place.

9. Using black thread, stitch dimensional lines on the top of the submarine.


10. Match up the grey/yellow front and the grey back and stitch them together using a blanket stitch, leaving bottom open. I also go back and stitch just the front edge of the opening with a blanket stitch to reinforce it but that is totally optional.


We had a wonderful time designing and creating this set of finger puppets. We hope you are inspired to create some fun finger puppets of your own with our free pattern! If you do sew some, please share them with us! We would love to see your finished work and display them in our reader gallery.

Click on the pattern sheets to view them in another tab or window, make sure you're viewing them at full size and then print.


Don't forget to stop by Felt With Love Designs to download the corresponding set of ocean finger puppets too! We also enjoy custom requests!

---

Alicia and her husband, Patrick specialize in felt creations and write about their endeavors at Felt With Love Designs. Patrick is the artist behind the designs. Alicia creates patterns from his sketches and brings them to life with a needle and thread.

In addition to felt, they are passionate about family, creative writing, crafts, drawing, reading, sewing, and education. Patrick enjoys sketching coloring pages for their three-year-old daughter and shares those along with his creative writing. When she's not working on the latest felt projects, Alicia also enjoys writing about their favorite children's books (she's a sucker for a great picture book!), her latest sewing projects, and her journey teaching their youngest at home. 

---

Fancy some more free tutorials? Subscribe to my newsletter for a monthly free pattern and visit my crafty tutorial archive for lots more free projects.

Visit my shop to buy my printable PDF sewing patterns: