Tuesday, 7 April 2020

Spring Trees: Embroidered Felt Textile Art Tutorial

This week on my blog it's all about SPRING.

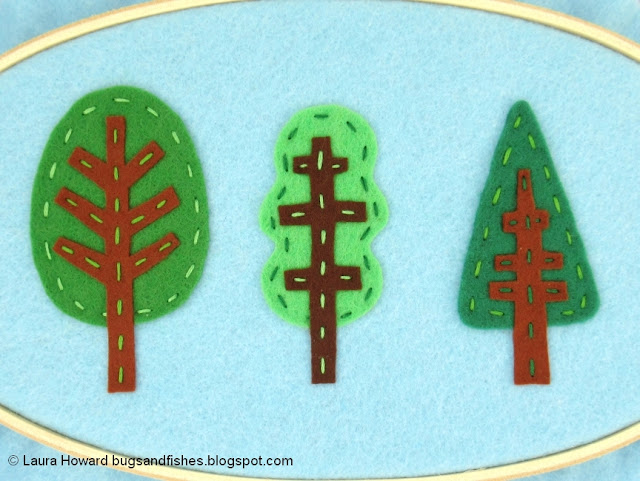
Today I'll show you how to sew some embroidery hoop art featuring a trio of spring trees, then later in the week I'll be sharing some spring-themed embroidery patterns.


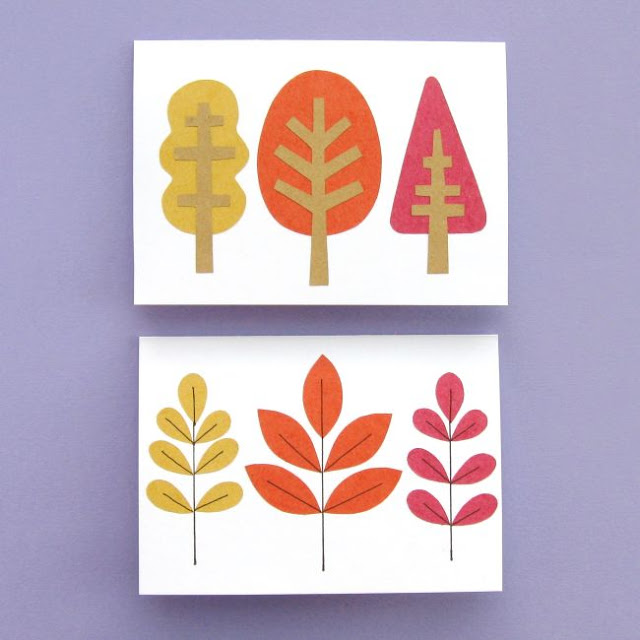
I drew these trees a couple of years ago, as part of a tutorial for making some autumn tree and leaf cards (which would also look fab in spring greens, by the way!). At the time I thought "ooh, these would look awesome in felt"... and now I've finally got around to trying that out.

https://bugsandfishes.blogspot.com/2018/09/diy-autumn-trees-leaves-cards-tutorial.html

I framed my trio of little trees in an oval embroidery hoop, but they'd also look great in a round hoop with some text added to fill the extra space (or maybe some simple felt flowers?). You could also use the shapes as a felt applique, adding a tree (or three!) to other sewing projects.

   
You will need:

- The tree templates from this tutorial
- Green and brown felt (three shades of green, plus two or three shades of brown)
- Green embroidery thread/floss (to match the green felt)
- Felt or fabric for the background
- A large embroidery hoop (you can resize the tree templates to fit if you need to)
- Sewing scissors (embroidery scissors are great for cutting out small felt shapes!)
- A sewing needle and some pins
- Sewing thread (any colour)


To make the hoop art:

1. Stretch your chosen backing felt/fabric in your embroidery hoop.

2. Use the templates to cut out one of each of the tree and trunk/branch shapes. Arrange the pieces on your hoop until you're happy with them. If I was sewing this again I'd definitely put the oval tree in the centre, as I did in the card tutorial, but this way is cute too!


3. Set aside the trunks/branches. Use sewing thread and large tacking stitches to hold the tree shapes in place on the backing felt/fabric.


4. With your chosen embroidery threads/floss (using three of the six strands in the skein), sew a line of running stitch around the inside of each tree shape. Try to keep your stitches neat and even to create a nice decorative effect.

I used darker thread on the lighter felt, and vice versa, so the stitches stood out clearly against the felt. Lie all your threads out on the felt pieces to test how they'll look and go with what looks best to you.


5. Remove the tacking stitches then, one by one, add the trunk/branch shapes and sew them in position. Use more embroidery thread/floss (using three strands again), this time using the green that matches the tree you're adding the trunk/branches to.


I recommend sewing a stitch at the very top and very bottom of the brown felt shapes to help hold them in position before filling in the rest of the stitching.


6. Trim any excess felt/fabric from around your embroidery hoop, leaving a few centimetres (about an inch) remaining. Then use a double thickness of sewing thread and running stitches to gather the felt/fabric together and pull it tight. Sew it securely then your hoop art will be ready to display.


This tutorial is for non commercial use only: you can use it to stitch as many trees as you want for yourself or as gifts, but please don't make any for sale. You may borrow a couple of photos if you want to blog about this project, but remember to credit me and link back to this page on my blog, and do not reproduce my entire  post or share my pattern on your site. Thanks!

Enjoyed this free tutorial? Buy me a "coffee" and help support my blog!

Buy Me a Coffee at ko-fi.com

P.S. Subscribe to my newsletter for a monthly free pattern and visit my crafty tutorial archive for lots more free projects.

Visit my shop to buy my printable PDF sewing patterns:


Sunday, 5 April 2020

5 Little House Embroidery Patterns

Today I've got some more cute little houses for you to stitch!


A few days ago I shared a "Stay Home" embroidery pattern...

http://bugsandfishes.blogspot.com/2020/04/stay-home-cute-house-embroidery-pattern.html

... and now I've got a whole village of little houses for you to sew.

Stitch one, like I have! Stitch them all in a row like a little street! Stitch the set and send them to your friends in lockdown! So many stitchy options!

You'll find the pattern sheets for all 5 houses at the bottom of this post.


These embroidery patterns would look cute framed in an embroidery hoop. You could also embroider them onto felt to make little house ornaments (like the owl ornament I stitched earlier this year), or sew them onto rectangles of fabric to use for making lavender sachets.


I adapted the patterns from a tutorial I designed a few years ago for making cute little felt houses. Follow the link for the templates and step-by-step instructions! They also make super cute felt gingerbread houses.

https://bugsandfishes.blogspot.com/2016/07/how-to-sew-cute-felt-houses.html

These patterns are for non commercial use only: you can use them to embroider as many houses as you want for yourself or as gifts, but please don't make any for sale. You may borrow a couple of photos if you want to blog about this project, but remember to credit me and link back to this page on my blog, and do not reproduce my entire  post or share my pattern on your site. Thanks!

Enjoyed these free patterns? Buy me a "coffee" and help support my blog!

Buy Me a Coffee at ko-fi.com

P.S. Subscribe to my newsletter for a monthly free pattern and visit my crafty tutorial archive for lots more free projects.

Visit my shop to buy my printable PDF sewing patterns:


Follow the links to open each pattern sheet in a new window, make sure you're viewing it full size then print it at 100%.

Little houses embroidery patterns sheet 1.


Litte houses embroidery patterns, sheet 2.

Saturday, 4 April 2020

Dove & Robin Christmas Ornament Tutorials

UPDATE:  my felt doves tutorial and little felt robins tutorial (originally shared with my newsletter subscribers) are both now available as printable PDF patterns in my Etsy shop!

http://eepurl.com/dvfYO1


Wednesday, 1 April 2020

Stay Home, Save Lives: Free Embroidery Pattern

This week I'm sharing lots of little houses to stitch while you're stuck at home!


Maybe your community is currently in lockdown due to Covid-19, or maybe you're just staying home as much as possible to practise social distancing and help save lives. Either way I hope you'll enjoy stitching one of these projects to keep yourself entertained while normal life is on hold. I'm finding creative projects a great solace right now!

Today I'm sharing a sweet "Stay Home" pattern, then later in the week I'll be posting a set of five cute house patterns which you can frame in embroidery hoops, use to make embroidered ornaments, or stitch on anything else you fancy.


You'll find the "Stay Home" embroidery pattern at the bottom of this post.


I stitched my version in mainly pastel shades, on a bit of lovely grey linen-blend fabric. I used backstitch for most of the design, using all six strands in the skein to make the lines stand out really boldly, but you can of course use fewer strands if you prefer. Sewing with all six can be a little tricky!


I also used lazy daisy stitches for the leaves, and a French knot for the door handle. When sewing the flowers, work clockwise (or anticlockwise, either is fine!) sewing one single stitch per petal. I'd recommend sewing the flowers in front of the house before you sew their stems, so you can fill all of the vertical line that remains (after sewing the vertical petals) with green.

I stitched the design in a 7 inch embroidery hoop and framed it in a 6 inch hoop. Using the slightly larger hoop gives you a bit more room to work with.


The house embroidery patterns I'm sharing this week are all adapted from a tutorial I designed a few years ago for making cute little felt houses. Follow the link for the templates and step-by-step instructions! These patterns also make super cute gingerbread houses, perfect for Christmas.

https://bugsandfishes.blogspot.com/2016/07/how-to-sew-cute-felt-houses.html

This pattern is for non commercial use only: you can use it to stitch as many houses as you want for yourself or as gifts, but please don't make any for sale. You may borrow a couple of photos if you want to blog about this project, but remember to credit me and link back to this page on my blog, and do not reproduce my entire  post or share my pattern on your site. Thanks!

Enjoyed this free pattern? Buy me a "coffee" and help support my blog!

Buy Me a Coffee at ko-fi.com

P.S. Subscribe to my newsletter for a monthly free pattern and visit my crafty tutorial archive for lots more free projects.

Visit my shop to buy my printable PDF sewing patterns:


Click here to open the pattern in a new window, make sure you're viewing it full size then print it at 100%.