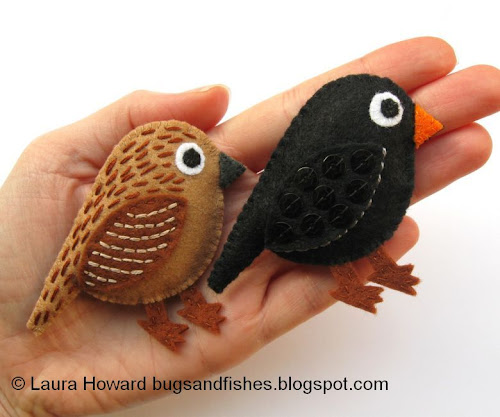
Today I'm sharing the last free project - a tutorial for sewing two felt blackbirds. The blackbirds were originally designed as part of the "In the Garden" chapter but didn't make the final line-up.
Like many birds, the male and female blackbirds are different colours. You can choose your favourite, make the pair of birds or use your imagination to create a new, colourful species!
To make Mr & Mrs Blackbird, you will need...
- the template sheet at the bottom of this post
- black felt, approx. 3 ¼ x 6 in (8 x 15 cm)
- light brown felt, approx. 3 ¼ x 5 in (8 x 12 cm)
- brown felt, approx. 3 ¼ x 4 in (8 x 10 cm)
- small pieces of black, white, dark grey and orange felt
- matching sewing threads
- light brown, brown and dark grey embroidery floss (thread)
- round black sequins – approx. ¼ in (6mm) in diameter
- stuffing & a pencil or other small stuffing tool
- needles, pins & embroidery scissors (great for cutting out small felt shapes!)
1. Use the templates provided to cut out the pieces you need.
For Mrs Blackbird, cut two light brown blackbirds, one brown wing, one set of brown legs, one dark grey beak and one white eye. Also cut out a small black felt circle for the pupil.
For Mr Blackbird, cut out two blackbirds and one wing from black felt, one eye from white felt, one beak from orange felt and one set of legs from brown felt. Also cut out a small black felt circle for the pupil
2. Pin the wing on one of the blackbird shapes as pictured, and sew it in place with a line of running stitch around the edge in matching sewing thread. Then remove the pin.
3. Sew the eye, pupil and beak in position with whip stitch in matching sewing threads.
4. Now it's time to decorate the birds. For Mrs Blackbird, cut a length of brown embroidery floss and a length of light brown embroidery floss. Separate half the strands of each colour (so for six stranded floss, use three strands). Switch to a larger needle if necessary and use the brown floss to sew lots of single stitches for the “feathers” along the back of the blackbird. Then use the light brown floss to backstitch a series of curved lines along the wing, as pictured.
For Mr Blackbird, sew rows of round black sequins on the blackbird’s wing using black sewing thread. Sew each sequin in place with two stitches forming a straight line across the sequin, so your stitches face the same direction.
Then cut a length of dark grey embroidery floss and separate half the strands (so for six stranded floss, use three strands). Switch to a larger needle if necessary and use the floss to backstitch a line flush along the bottom edge of the wing.
5. Place the legs on a matching scrap of brown felt. Use brown sewing thread and running stitch to sew the legs to the backing felt, starting at the top of one of the legs. Sew the layers together with small stitches, following the outline of the legs and turning the felt back and forth as you sew to help keep your stitching neat on both sides. Then carefully cut around the leg shape, so you end up with a pair of legs that are two layers of felt thick.
6. Position the legs on the back blackbird shape, as pictured. Sew them in place with sewing thread to match the backing felt (light brown or black) taking care to sew into the light brown felt not through it.
7. Place the front and back blackbird pieces together. Trim any excess felt from the dark grey beak if necessary, so it matches the beak on the back blackbird shape. Then sew the edges of the beaks together with matching dark grey sewing thread and small whip stitches.
8. Start from just under the beak and begin sewing the blackbird together with matching sewing thread and whip stitch. Sew down the bird’s belly and around the tail, turning the bird back and forth as you sew past the legs to help keep your stitching neat on both sides.
9. Stuff the tail and then stuff the rest of the blackbird gradually as you sew up the back with more whip stitches. Finish your stitching neatly at the back.
Click here to view the template sheet in another window/tab, and print it at 100%.
This tutorial is for non commercial use only: you can use it to make as many felt blackbirds as you want for yourself or as gifts, but please don't make any for sale. You may borrow a few photos if you want to blog about this project, but remember to credit me and link back to the original source, and do not reproduce my entire tutorial on your site. Thanks!
Please note: the Amazon links in this post are affiliate links.
Enjoyed this free tutorial? Buy me a "coffee" and help support my blog!

Subscribe to my newsletter for a monthly free pattern and visit my crafty tutorial archive for lots more free projects.
Visit my shop to buy my printable PDF sewing patterns:
13 comments:
Pretty! I didn't see the black sequins at first, in person the blackbird should look all shiny and even more cute than it is in the pictures (which is a lot)!
These are the cutest! :)
Manu - yes, it is lovely and sparkly in real life! Sequins are soooo tricky to photograph :)
Leanne - thanks! x
Excellent tip about doubling up the legs, much easier than cutting two out first and trying to match them up. I wouldn't have thought of doing it like that!
Thanks Heather! It is MUCH easier than cutting out two shapes and sewing them together - no need to worry about cutting out both shapes so they perfectly match, and more felt to hold on to as you sew :)
so sweet!
Thanks Marsha! :)
I love these 'extras' to the Super Cute Felt book. I can't wait to get started on the blackbirds.
Anon - I hope you'll have fun sewing your birds x
The birds are adorable and you've given us a free pattern! How very lovely you are.
~Happy 2014~
Thanks Barbara xx Happy New Year to you too! :)
This is so cute!! Thank you for the inspiration!
Thank you! :)
Post a Comment