Showing posts with label hairclips. Show all posts

Saturday, 8 June 2019

Felt Butterfly Hair Clips Tutorial

One of the awesome things about felt crafting is how easy it is to get creative and adapt projects to make new things. Swap ribbon for a brooch clasp to turn an ornament into a brooch, stuff a pincushion with lavender to turn it into a lavender sachet, enlarge some brooch templates and use them to add an applique design to a cushion… there are always so many crafty possibilities!

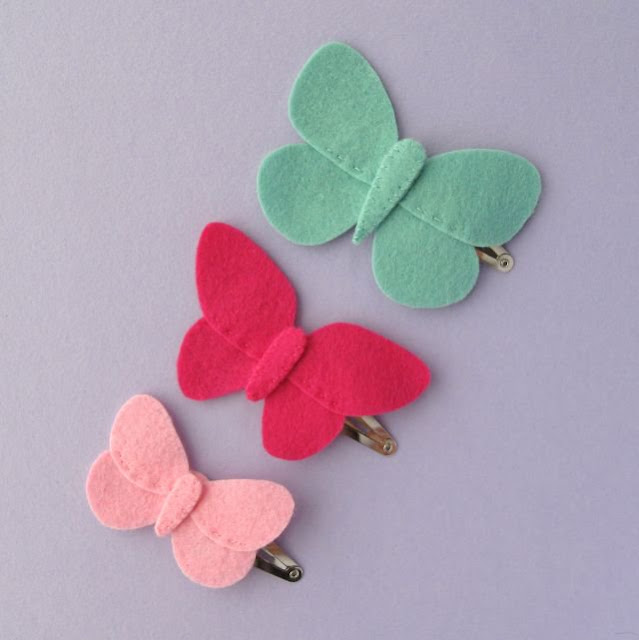
Inspired by this, after working on my Year of Wreaths tutorials for The Village Haberdashery's blog I created some easy ideas for re-using the templates from some of the wreaths. I'll be sharing these ideas here on my blog over the coming months, starting with today's project: making some pretty felt butterfly hair clips using the templates from June's butterfly wreath.

Felt Butterfly Hair Clips Tutorial
 Felt Butterfly Hair Clips Tutorial
Felt Butterfly Wreath Tutorial

You will need: 

- The template sheet from the Butterfly Wreath tutorial
- Wool felt in assorted colours
- Matching sewing threads
- Hair clips
- Sewing scissors or embroidery scissors
- A sewing needle and pins
- A glue gun and glue
- A heat-proof mat for the glue gun
- Newspaper to protect your workspace from any glue drips

Felt Butterfly Hair Clips Tutorial
 Felt Butterfly Hair Clips

To make the hairclips: 

Use the templates to cut out the butterfly pieces from your chosen felt colours (I used butterflies 2, 4 and 5).

Follow step 3 of the Butterfly Wreath tutorial to sew the butterfly pieces together.

For each hairclip, cut a felt circle approximately 17mm in diameter in the matching felt colour. Sew each circle to the end of a clip using matching sewing thread, as shown. This felt circle is the base onto which you’ll glue the butterfly pieces.

Felt Butterfly Hair Clips Tutorial: attach felt circles to the hair clips

Very carefully glue the butterfly pieces to the circles. Add the wings first, adding a small amount of glue to the circle then carefully pressing the wings into place.

IMPORTANT: take care when working with the glue gun as the glue gets very hot! Always place it on a heat-proof mat when not in use, and use newspaper or other scrap paper to protect your workspace. Work slowly, squeezing the gun with care to control the amount of glue you’re using and keeping your fingers out of the way of the hot glue.

Felt Butterfly Hair Clips Tutorial: glue the wings in place

Then add a very small amount of glue to the back of each body piece and carefully press them into position between the wings.

Felt Butterfly Hair Clips Tutorial: assemble the butterfly pieces

Ta-dah! Pretty felt butterflies to wear in your hair!

Felt Butterfly Hair Clips Tutorial


This tutorial is for non commercial use only: you can use it to make as many hair clips as you want for yourself or as gifts, but please don't make any for sale. You may borrow a couple of photos if you want to blog about this project, but remember to credit me and link back to this page on my blog, and do not reproduce my entire tutorial / share my templates on your site. Thanks!

Enjoyed this free tutorial? Buy me a "coffee" and help support my blog!

Buy Me a Coffee at ko-fi.com

P.S. Subscribe to my newsletter for a monthly free pattern and visit my crafty tutorial archive for lots more free projects.

Visit my shop to buy my printable PDF sewing patterns:


Friday, 9 March 2018

DIY Felt Butterfly Hairclips Tutorial

Update: this tutorial can now be found here on my blog! Make some felt butterfly hair clips, using the templates from my June butterfly wreath tutorial.

-----

My latest tutorial for The Village Haberdashery's blog is all about felt butterflies!

Use the free patterns and step-by-step tutorial to make some pretty felt butterfly hairclips:

Felt Butterfly Hairclips
Felt butterfly hair clips
 
This tutorial is part of a spin-off series, showing ways you can reuse some of the patterns from my A Year of Wreaths project. I originally designed the felt butterflies for June's butterfly wreath.

 Yarn-wrapped wreath decorated with felt butterflies

Click here for the butterfly hairclips tutorial!

You'll find the butterfly wreath tutorial here and you can explore all the wreaths in the series here.

12 seasonal wreath tutorials


Subscribe to my newsletter for a monthly free pattern and visit my crafty tutorial archive for lots more free projects.

Wednesday, 17 September 2008

Show and Tell (C365/361)

Lots of lovely pictures to show you today! First up, here's the product of last night's sewing session:
Sprigs of mistletoe! It's lovely to be making these again this year, and it's always interesting to revisit old designs. This year's are sewn onto thicker red felt to make them a bit more sturdy and I've decided that I rather like the bolder, more solid shape made by leaving the middle bit of red as it is. Of course I only worked this out when I'd cut out the first one and had it side by side with the others for comparison! Ah well. I may list both options and let the customers decide which is best!

Next up: some shots of a few special items I've been working on recently...

I got a fun custom order this month to make an embroidered teabag - the reverse is embroidered with details of the occasion & the reverse of the tag (rather obviously) says "tea". A simple but very sweet idea for a gift I think!
I also finished some long-delayed gifts made as a "thankyou" to the girls who did some felt modelling for me back at the start of the summer... some sets of hairclips...

... and a couple of snowy owl brooches:
Here's a peek at some of the owl sketches I've been doing since making that last brooch (I'm plotting a whole little series of owls for my shop) - this was pinned to our noticeboard today by my boyfriend who was slightly annoyed and greatly amused at how I'd scribbled all over his to do list in my owl-sketching frenzy: "typical!"

Saturday, 12 July 2008

How To: Felt Flower Hairpins

Yesterday (day 308) my crafty task was making lots of felt flower hairpins ready for our evening out. I was wearing a flame red dress with a floral print and wanted something really bold for my hair to match it... so I thought, why not make something out of felt? Here's the finished product, stuck fairly at random into a bun:[You can see a better picture here!] I think they looked pretty effective, and they'd work really well pinned into a looser hairstyle too. They're a very quick project, and very affordable for the amount of impact you get. To make your own, you'll need:
- a couple of sheets of felt to match your outfit (I used two 9x9 inch squares of red wool-mix felt, but obviously you'll need more or less felt depending how many flowers you want to make)
- a small piece of contrasting felt to use as the centres of the flowers (I used brown to match my dress & for a dark poppy-ish look)
- sewing thread to match the flower centres (matching thread means you can be as messy as you like with your sewing and it won't show!)
- a pack of kirbygrip hairpins
- a sewing needle and some scissors, and some pins and paper for pattern-making

You'll be making two types of flowers - large layered ones (for lots of impact) and small ones to add a bit of extra detail and fill in awkward spaces. You can make as many of each as you like.To make the large flowers, you'll need three layers of your main felt. I cut all my flowers out freehand in a bit of a rush, but if you want to make a pattern you can. The back layer will be the largest (seven petals) the middle layer slightly smaller (six petals) and the front layer smaller still (five petals) so you can offset the petals for a great layered effect. Draw all three together like this, then trace over each shape and cut it out and there you have your main pattern:
Pin the pattern pieces to your felt and get cutting! Now you need the centre of your flower. For this, cut out a circle of your contrasting colour (you can draw round something circular and make a pattern if you like, or cut freehand) and then cut a series of small triangles out of it, like this:
Put all four pieces together so the flower is how you want it, and sew them together right in the centre, starting and finishing on the back of your flower so you can hide your knots and finishing off. I used about 8 stitches to hold each flower together - it doesn't take much as the felt is so light.Then get your hairgrip, lay it on the back of the flower and sew it on tightly. The joy of this is that the back will always be hidden against your hair so you can be as messy as you like. You might want to experiment with the angle of the hairgrip - mine were destined to be stuck in a bun so it didn't matter, but if you're clipping the flowers flat into your hair you'll need the clips to be the right way up, etc.
Then: that's it! Finished. You can make as many flowers as you like, and the small / single layered flowers are made in the same way just, you know, only using one small flower shape.If any of that made no sense, please do let me know by leaving a comment. This is my very first how to and very hastily written! :)

Anyone is very welcome to make as many of these flowers as they like, but please don't sell them (this tutorial is NOT for commercial use) or reproduce my tutorial anywhere without my permission. If you give it a mention, please do link back to the original page & if you make the flowers please let me know - I'd love to hear how it went & would adore to see pictures!

Enjoyed this free tutorial? Buy me a "coffee" and help support my blog!

Buy Me a Coffee at ko-fi.com

Subscribe to my newsletter for a monthly free pattern and visit my crafty tutorial archive for lots more free projects.

Visit my shop to buy my printable PDF sewing patterns: