Friday 31 August 2018

June, July & August in Pictures: Crafty WIPs, Tidy Shelves, & Giant Waterlilies

This summer...

... I've been finishing lots of long-running crafty projects, or trying to!

I've finally started quilting a patchwork quilt I started way back when I was a teenager:

http://bugsandfishes.blogspot.com/2018/06/scrappy-patchwork-cross-stitch-leftover-threads.html

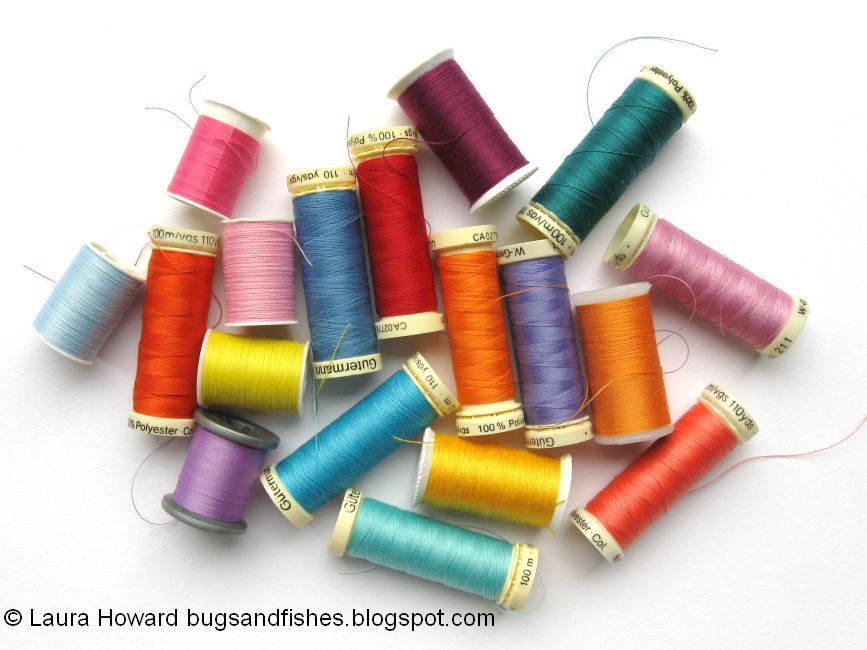
I've almost finished my scrappy patchwork cross stitch, which I've been making using leftover embroidery threads from other projects:

 http://bugsandfishes.blogspot.com/2018/06/scrappy-patchwork-cross-stitch-leftover-threads.html

I finished the patchwork quilt I've been making for my sister (she loves Christmas so, of course, I had to make her a Christmas quilt):

http://bugsandfishes.blogspot.com/2018/08/making-christmas-quilt-finished-quilt.html

And I spent some time stitching up lovely felt Christmas ornaments I bought as kits several years ago:

http://bugsandfishes.blogspot.com/2018/08/sewing-felt-christmas-ornaments.html

... I've shared three projects with my pattern newsletter subscribers.

A retro rag doll made with felt and fabric:

http://eepurl.com/dvfYO1

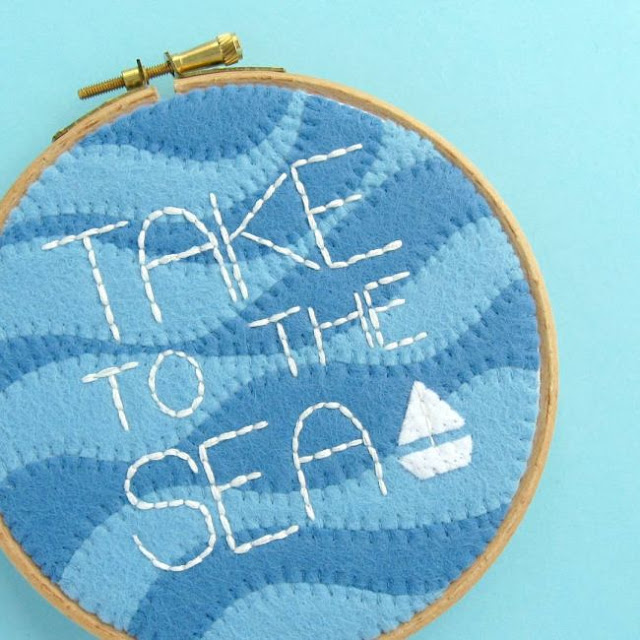
A nautical stitching project:

http://eepurl.com/dvfYO1

And some pretty felt floral art:

http://eepurl.com/dvfYO1
 http://eepurl.com/dvfYO1

(There's still time to get your hands on the floral hoop tutorial, as I'll be sending the link out again in September's newsletter. Click here for more info and to sign up!).

... I reopened my Etsy shop with a shiny new privacy policy (after temporarily closing it while I worked through a mountain of GDPR-related paperwork) and have been working behind the scenes on some new patterns I'll be launching this autumn.

https://www.etsy.com/uk/listing/571069328/felt-poppies-tutorial-and-poppy

I'd like to pretend that wearing a coordinating flannel shirt while taking this photo for my felt poppies tutorial was a clever styling strategy... but really, I just like flannel shirts.

... I shared tutorials for making a giant floral wreath for your garden, and colourful felt cushions for your sofa.

http://bugsandfishes.blogspot.com/2018/08/diy-floral-hula-hoop-wreath-tutorial.html
 http://bugsandfishes.blogspot.com/2018/08/how-to-felt-butterfly-cushion-pillow-tutorial.html

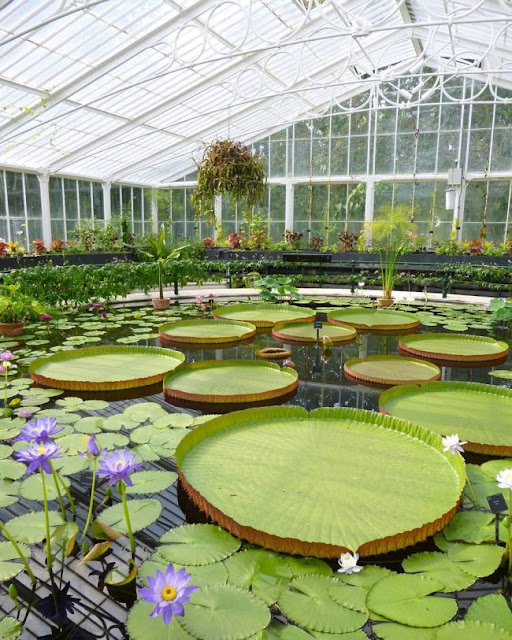
... I blogged about my summer visit to Kew Gardens, including the gorgeous rose garden and the magnificent giant waterlilies (which proved very popular on Instagram! I think that's now officially my most "liked" photo on there).

 http://bugsandfishes.blogspot.com/2018/06/summer-at-kew-rose-garden.html
http://bugsandfishes.blogspot.com/2018/06/kew-waterlily-house-queens-garden.html

... I also shared a photo of my current office shelf situation... (which is very much a work in progress as I'm still settling into my new space - I'll blog about it with lots of photos sometime soon, I promise!).


... and shared one of the fabulous pictures I've been framing to hang on the walls of my flat. It's been a slow and expensive process getting everything framed (even buying cheap frames!) as I've collected quite a lot of art and other things over the years, and I've never framed any of it properly before (I don't think clip frames count)... but I'm getting there bit by bit!


This illustration of British shells (by E.C. Mansell) is from an old set of reference books called The Book of Knowledge, which my mum had when she was a kid and which I then spent hours reading when I was little (even though a lot of the knowledge in it was a bit out of date by then!). I saved a few of my favourite pages when the books got thrown away years ago, and I'm delighted to finally have space to display them. This page reminds me of my childhood shell collection, I love it.


Want regular updates without visiting my blog to check for new posts? You can find me on Instagram and Facebook or subscribe to my weekly(ish) newsletter.

Wednesday 29 August 2018

How To: Felt Flower Cushion (Pillow) Tutorial

Today I'm sharing a tutorial for making this colourful floral cushion (pillow) - including templates for 19 different flower shapes!


This project is the perfect example of how you don't need a lot of fancy sewing skills to make something awesome, just a bit of time and patience. It's a fab project for working on in front of the TV in the evenings, gradually building up the design to cover the cushion with flowers.

I used quite a bright palette for my cushion, but you could use any colours you fancy. You could also add extra detail by embellishing the flowers with embroidery, buttons, seed beads or sequins. I've been thinking about adding some embroidery to my cushion, so maybe I'll post an update to this tutorial one day!

You could also use the flower templates included in this post for lots of different floral projects, including card-making.


You'll probably recognise this cushion as the one from my blog header - I finished it before I moved house and packed up all my things, and I've only just got round to unpacking it and borrowing someone else's living room to take photos (my living room is currently full of boxes and still doesn't have a sofa in it!).

Click here for the felt butterfly cushion tutorial, and click here for the MAKE ALL THE THINGS cushion tutorial.


To make a felt flower cushion, you will need a cushion cover, some felt in lots of different colours, matching sewing threads, scissors (embroidery scissors are great for cutting out small or detailed shapes), a sewing needle, pins, and the flower templates at the bottom of this post.

1. Use the templates provided to cut out lots of felt flowers in different colours. Make sure you cut an assortment of shapes in each colour! Lay the flowers out roughly on your cushion cover so you can see if you've got approximately the right amount. I cut out one batch of flowers to start with then cut out some extras towards the end to fill in the final spaces.

You can easily enlarge the templates to make larger flowers, which will give your cushion a different look and also mean you have fewer pieces to cut out and sew.


2. Make sure you have matching threads for all your felt colours! For a different look you could use one thread to sew all the flowers in position, but remember that your stitching will then be more visible so try to keep your stitching neat and even.


3. Begin adding the flowers. Start in the centre of the cushion and work outwards, adding a few flowers at a time. Position the flowers and pin them in place, taking care to only pin them to the front of the cushion cover and not through all the layers of fabric.

Use sewing thread (in any colour) and large stitches to tack the flowers in position, removing the pins as you sew each one. Make sure you only sew through the front of the cushion! Then use whip stitch and matching sewing threads to sew the flowers neatly. Once you've sewn all the flowers in this batch, remove the tacking threads.


4. Work outwards, repeating step 3 to fill the cushion with flowers. 


You may find it helful to cut more of the smaller flower shapes when you come to filling in the edges of the cushion.

When you've finished, your cushion cover will look something like this:


5. When all the flowers have been sewn in place and all the tacking threads have been removed, add a cushion insert and display your cushion in pride of place on your sofa!


For a no-sew version of this project, you could use fabric glue to attach the flowers to the cushion cover. I'd recommend sticking one flower to a piece of scrap fabric first, to test how much glue you need to use and placing something like a piece of plastic or tin foil between the layers of the cushion to prevent the glue seeping through and sticking the cushion together.

Enjoyed this free tutorial? Buy me a "coffee" and help support my blog!

Buy Me a Coffee at ko-fi.com

Subscribe to my newsletter for a monthly free pattern and visit my crafty tutorial archive for lots more free projects.

Visit my shop to buy my printable PDF sewing patterns:

This tutorial is for non commercial use only: you can use it to make as many floral cushions as you want for yourself and as gifts, but please don't make any for sale. You may borrow a couple of photos if you want to blog about this project, but remember to credit me and link back to this page on my blog, and do not reproduce my entire tutorial / share my templates on your site. Thanks!

Click here to view template sheet one, make sure you're viewing it full size then print it at 100%. 


Click here to view template sheet two, make sure you're viewing it full size then print it at 100%.

Monday 27 August 2018

Summer at Kew: Blue Skies & Lush Greenery

My final summer visit to Kew Gardens was gloriously hot - in fact, I think I'd describe it as a little too hot. Instead of striding round the gardens like normal my pace was reduced to a veeeeeery slow wander with frequent rest stops in patches of shade, and the train journey home was rather sticky (ah, the joys of public transport in summer!).

If you're going to sit in a garden on a hot sunny day, though, this is not a bad one to choose!

The rock garden was looking lush in the sunshine...


... and the waterlily house was a riot of green.


Shady, tree-lined paths were a must this visit...


... as was a walk round a lake. I'm not sure if it's actually cooler near water or it just feels like it, but either way this was lovely!


I also went for a walk through the woodland at Kew (which is full of bluebells in the spring - something I sadly missed seeing due to deadlines! - and wonderfully shady on a hot summer's day), and visited Queen Charlotte's Cottage. The cottage was originally a private retreat of the royal family, and was gifted to Kew by Queen Victoria on the condition that the surrounding woodland was kept in its natural state.


Apparently there was once a paddock next to this cottage, known as the New Menagerie, which was a mini zoo for the royals to enjoy - including "a pair of black swans, buffaloes, the now extinct quagga (an animal similar to a zebra) and the first kangaroos to arrive in England".

There aren't any exotic animals at the cottage these days, but if you visit at the weekend you can go inside and imagine being a prince or princess stopping for afternoon tea on a walk through the gardens. (It's a shame they don't actually serve royal-themed afternoon teas here, because that would be awesome).


Finally, I visited the gardens that make up Kew's Japanese landscape...


... and the Great Pagoda (the base of which is another wonderfully shady spot to sit on a hot day!). The Pagoda was completed in 1762 and was being restored when I visited, but it's now open to the public again - if you fancy climbing those 253 steps!


I've been a bit wary of climbing towers since I visited York Minster and nearly had a panic attack climbing the central tower, but the Pagoda staircase doesn't look particularly claustrophobic (unlike the narrow stone staircase at York!)... and I bet the views are amazing. A return visit may be called for!*

Click here to catch up with all my posts about my visits to Kew during my year's membership (definitely one of the best things I've ever bought for myself).

Click here to view my travel archive for lots more posts about my days out in London and around the UK.


(*To Kew, not York Minster's tower! I'm proud that I conquered my fear and got to the top of the Minster's tower, but you couldn't pay me to climb it a second time!!).

Friday 24 August 2018

My Current Project: Sewing Felt Christmas Ornaments

I've spent my spare crafty time this summer sewing Christmas ornaments!


These charming designs are by Alicia Paulson - I've long been a fan of her blog, Posie Gets Cozy, and bought a whole bunch of her felt ornament kits back in 2012 & 2013. I've resolved to "finally make these in time for Christmas" several times since then, but with very little to show for it... until now!

I'm on a mission this year to finish up lots of my UFOs (UnFinished Objects), those personal crafty projects that have been hanging around in the back of cupboards and under beds for far too long.

I finished the Christmas quilt I was sewing for my sister (which I started in 2014) and the patchwork blanket I've been slowly making with leftover yarn (started in 2011), and my scrappy cross stitch project (started in 2014) is nearly finished, too. I've even finally started quilting the patchwork quilt I began way back when I was a teen almost two decades ago.

During our unexpectedly hot summer (it's been ridiculously hot) I definitely didn't want to spend my time curled up under a cosy quilt... but I also didn't want to lose my Finishing All The Things momentum. It was the perfect time to dig out these long-neglected Christmas ornament kits!

I adore these ornaments but they've ended up being put on the back-burner because my personal projects usually get squeezed into evenings when I'm too tired to focus on this kind of detailed work or to follow instructions (this is why I tend to do a lot of simple crafts in my spare time, like knitting basic blanket squares - I don't have the brainpower to manage anything else!).

I'm now determined to devote the time and focused attention to these ornaments that they deserve and finally get them all finished "in time for Christmas". 

I've completed seven of the ornaments so far (after a frankly embarrasing number of years) and have another eight still to go. The remaining ornaments are all in various stages of completion as I've been stitching a bit here and a bit there depending on what I've felt like working on. Here's a peek at some in progress:


It's been a really interesting experience working on these. They're similar to my own work in that they're ornaments made from felt (which is something I've made a lot of over the years) but they're also very different... and I'm really not used to following someone else's patterns, instructions and methods instead of just finding my own way with a project!

Weirdly I think I'm more proud of how they're turning out than I am of my own designs - maybe because I can love them wholeheartedly instead of having all the usual complicated feelings about my own work getting in the way? I'm loving making them, anyway.

Here's a closer look at the Little Deer and Snowy Tree ornaments. If you're thinking I probably started with these because they're the simplest: you'd be right!


The ornaments are double-sided, so you do all the steps twice but mirrored. It's double the work but you get a doubly lovely end result.


Here's the Cozy Cottage, New-Fallen Snowflake, and Polar Bear.


The polar bear is a bit different to these others, as his back is the actual back of the bear instead of a mirror of the front. I love his little knitted scarf - it's definitely the smallest thing I've ever knitted!


I keep changing my mind about which ornaments are my favourites, but I particularly love the Red Wool Coat and the Norwegian Selbu Mitten.


The coat with its tiny mittens is just completely adorable, and is making me daydream about buying a red coat of my own this winter (I do need to buy a new coat...). The Norwegian mitten is gorgeously detailed, and was my first introduction to using waste canvas to cross stitch on felt/fabric. It was so easy and fun to work it (and so satisfying pulling out the canvas threads at the end to reveal the finished pattern), I must try and design something of my own using it. 

Like the polar bear, these two ornaments aren't mirrored but have a different design on the back. Aren't they lovely?


I'll hopefully have some more snaps of finished ornaments to share with you guys soon... I wonder how many I'll manage to make by Christmas?

Want to stitch these ornaments yourself? Click here for Alicia's ornament patterns!