Saturday 29 September 2018

DIY Autumn Trees & Leaves Cards Tutorial

I love the colours of autumn, especially seeing the trees and leaves change colour throughout the season... and you guys know how much I like a nice bit of snail mail, so I thought I'd combine these two awesome things and make some autumn-themed cards!

 woodland cards for autumn / fall
autumn leaf cards

This tutorial is sponsored by Bostik - it's the second in a series of crafty projects I'm sharing using their range of adhesives (click here to see last month's project: a giant floral hula hoop wreath).

I really enjoyed making these cards, they're so simple but so effective (I actually did a little happy dance round the room when I saw how they'd turned out). They'd be perfect for autumn birthdays or just for sending a note to a friend. You could even frame them as a pair to add some autumn colour to your decor!

autumn leaf and tree cards

You will need: 

- Blank cards (I used an A5 piece of white card, folded in half)
- Paper or card in autumnal colours (I used sugar paper / construction paper)
- Brown paper (I re-used an old envelope!)
- Craft scissors
- A pencil
- A fine black pen
- A ruler
- The templates provided at the bottom of the post (if you're using different size cards from me, you may need to resize the templates to better fit your cards)
- And craft adhesive suitable for sticking paper and card (I used Bostik Micro Dots and a Bostik Blu Stick)

Bostik micro dots and blu stick


To make the trees card:

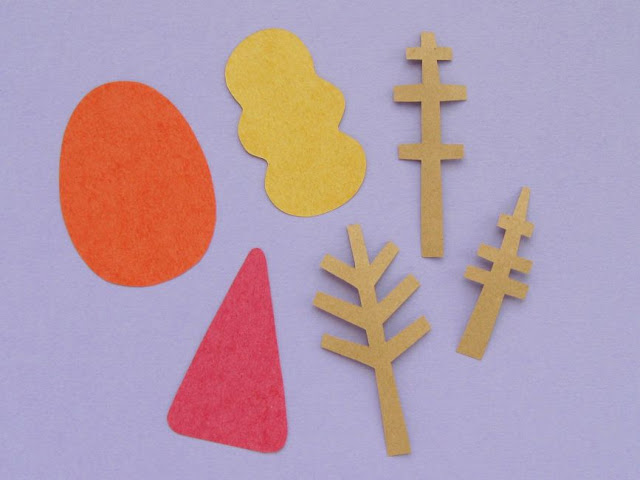
1. Use the templates provided to cut out the three tree shapes (each from a different autumnal colour) and three brown treetrunk and branch shapes.

To cut out each shape, place the paper template on the back of your chosen piece of paper or card and trace around it with a sharp pencil. Then carefully cut out the shape and turn it over so any remaining pencil marks are hidden.

cutting out tree shapes for an autumn card

2. Stick the three tree shapes to the card in a row, leaving room for the trunks at the bottom of the card. Start with the central tree shape (A) then add the other two either side.

Tip: lay out all six shapes on the card to test out the arrangement before you stick anything in place!

I used a Bostik Blu Stick to glue my tree shapes to the blank card. The glue in the Blu Stick (as you might guess from the name) starts out blue and dries clear. This means you can easily see which bits of the paper/card you've already glued, but any bits of stray glue won't be visible on your finished project. 

autumn trees card tutorial sticking the trees in position
 autumn trees card tutorial, tree shapes added

3. Next, add the treetrunk and branch pieces to the card. These small, detailed shapes would be quite fiddly to glue with an ordinary glue stick or other craft glue... which is why I've used Bostik Micro Dots instead.

making an autumn card with Bostik micro dots

The micro dots work a bit like double-sided sticky tape, except that instead of being one small piece the adhesive area is made up of loads of teeny tiny sticky dots. You peel off the backing paper from the dots, press your shape onto them and then peel it off and - voila! - your paper shape has turned into a sticker!

You can then easily stick the paper shape in position, with no messy glue to worry about.

autumn trees card tutorial adding the treetrunks

Once you've stuck all three of the treetrunks in position, your finished card will look something like this:

the finished autumn trees card


To make the leaves card

1. Use the leaf templates provided to cut out three sets of leaf shapes: two sets of the smaller leaves (cutting one of piece A, and two each of pieces B, C and D), and one set of the larger leaves (cutting out of piece A, and two each of pieces B and C).

As in the tree card tutorial, trace the shapes onto the back of your chosen paper or card then cut them out and flip them over. This time also make sure to lightly label each piece on the back with the letter that corresponds to the template, so you won't muddle up which leaf is which later.

cutting out paper leaves

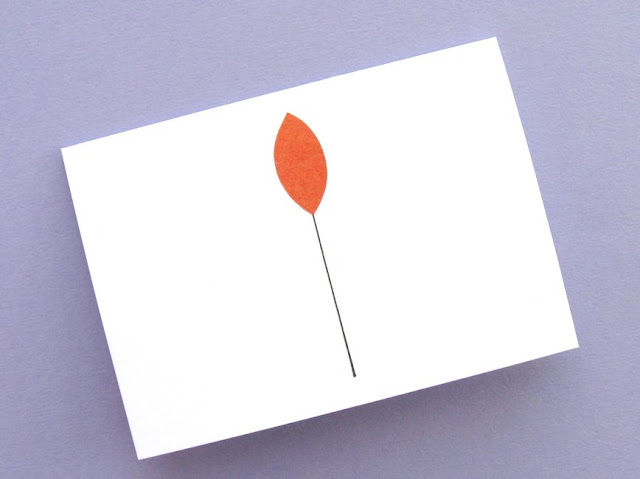
2. Use a fine black pen and a ruler to draw a line in the centre of your card, approximately 8.5 cm long.

starting the autumn leaf card

3. Now it's time to add the first leaves!

I decided to use more of Bostik Micro Dots for this and it worked out great - particularly as the small leaf shapes were perfect for using up the leftover dots on the sheet I'd used for sticking the tree trunks (waste not want not, right?).

sticking small paper leaves with Bostik micro dots

Stick large leaf A in position on the line you drew earlier, so the top point of the leaf just overlaps the top of the line as shown. 

autumn leaves card tutorial adding the first leaf

Then add the two B leaves below further down the ink line, then the pair of C leaves further still. Aim to create a roughly symmetrical shape with the points of the leaves all touching the ink line.

autumn leaf card tutorials first set of leaves added

4. Use the ruler and pen to draw two more lines either side of the leaves you've already added. I drew two lines measuring 7.5cm each, both about halfway between the outer point of the large leaves and the side edge of the card.

autumn leaf card tutorial drawing leaf stems

5. Add one set of small paper leaves to each line, using the same method as for the larger leaves: the top of leaf A should just overlap the top of the ink line, then the pairs of leaves should be stuck in place down the line in alphabetical order.

Tip: you may find it helpful to lay the leaves out on the card to test the arrangement before you begin sticking them in place.

autumn leaf card tutorial leaves stuck in place

6. Finally, add some extra detail to your leaves with the fine black pen. Draw one line along each leaf, from the main line (stem) of the leaves towards but not reaching the leaf tips. You could use a ruler for this or just draw the lines freehand.

autumn leaf card tutorial finishing the leaves

Your finished card will look something like this:

autumn leaf card tutorial


A set of the cards tied up with coordinating ribbon would make a great host or hostess gift for autumn visits, or even Thanksgiving.

You could also use these leaf and tree motifs to decorate gift tags - combine them with brown paper and gold ribbon for a fab autumnal vibe! 

And, of course, you don't have to make these cards in autumn colours at all: why not cut the tree and leaf shapes from green card or paper, and make springtime cards instead?

autumn fall leaf and tree cards
autumn leaf and tree cards

DISCLOSURE: this post is sponsored by Bostik, who also provided the Micro Dots and Blu Stick I used to make the cards. 

Subscribe to my newsletter for a monthly free pattern and visit my crafty tutorial archive for lots more free projects.

Click here to open the template sheet in a new window, make sure you're viewing it full size then print it at 100%.



autumn leaf and tree cards free tutorial

Thursday 27 September 2018

New in My Shop: Felt Robins Tutorial (& Robin Embroidery Pattern)

I've been busy working behind the scenes on my felt bird sewing patterns, and the first one is now in my shops! Hurrah!

My robins pattern includes templates and step by step instructions for sewing felt robin brooches and felt robin Christmas ornaments.

felt robin brooch
 felt robin Christmas ornament PDF pattern

Once you've bought the pattern, you can use it to make items for yourself and as gifts for friends and family or to sell at craft fairs, etc (as long as you credit me as the designer).

felt robin bird brooch sewing tutorial
felt robin Christmas ornament tutorial

I've also included a robin and holly embroidery pattern, which you can stitch onto anything you fancy or frame in a 5 inch embroidery hoop.

Christmas robin and holly embroidery pattern

I really enjoyed stitching this and I hope you will, too!

robin and holly Christmas embroidery pattern

You can buy the printable PDF pattern from my Etsy shop - it'll be available to download immediately after purchase!

P.S. I've got lots more patterns in the works - follow me on Instagram or subscribe to my newsletter for all the latest updates from me and my shop.

Robin PDF Sewing Tutorial & Embroidery Pattern by Laura Lupin Howard

Monday 24 September 2018

My Flat in Progress: May & June 2018

For the first year and a half of living in my "new" flat, I slept on a single bed in the main bedroom surrounded by boxes and furniture and general chaos while my parents and I worked on renovating the spare bedroom and the lounge.

We pressed pause last summer to focus on other important life stuff... then, almost a year to the day, picked up our tools again this May. I moved my single bed into the spare bedroom, squeezed the boxes and furniture and everything else in wherever I could find space (including under beds, on top of wardrobes and in the back of cupboards at my parents house), and we started work in the newly empty bedroom.

Just like in the previous two rooms, there was lots of filling and sanding to do to prep the walls and woodwork... and a few sections of plaster needed patching up as well.


It's a lovely big room, which will be great when I'm actually using it as a bedroom but in the meantime this just means that there's a lot of ground to cover!

We had to take up the old laminate flooring a little earlier than we'd planned, because we had to get a surveyor in to check out a possible damp problem (which thankfully turned out not to be a damp problem after all, hurrah!).


This was intitially an annoying disruption, but actually it turned out to be rather brilliant.

I'd been feeling really guilty about having taken almost a whole year off from the renovations - I knew that I'd been too busy to focus on it, but I still felt irrationally bad about it, like maybe I'd just been being lazy and I should have magically got the main bedroom finished by now. But if we'd finished the bedroom last year and had carpet fitted and bought furniture... the floorboards would still have had to come up this summer to investigate the potential damp problem, and just thinking about moving all that furniture, taking up the carpet, etc, makes me feel exhausted. Taking up floorboards when the whole room was empty because we were decorating it, though? Perfect timing.

Taking up the flooring revealed some lovely old fireplace tiles, which have sadly been damaged over the years. Okay, so they don't look too lovely in this photo but there's actually a sweet little floral pattern under there. I'm thinking about drawing it before we get the carpet fitted, so I can maybe use the motif elsewhere in the flat in the future.   


The bedroom renovations continued in June: the walls gradually got painted (goodbye dark purple!)...


 ... and my dad repaired more bits of plaster...


... replaced a missing section of skirting board, re-opened the vent in the chimney...


...and did a whole bunch of other little repairs which collectively have made a real difference to the neatness of the room.

Elsewhere in the flat, we got the bay window roof repaired and (no longer paranoid that the roof was going to fall in) I moved everything back into the living room. It was really great to unpack boxes, put stuff back on shelves, and move my desk out of the kitchen where I'd been working sandwiched between the oven and my drying launding for weeks.


There's currently an island of furniture and boxes (displaced from my bedroom while we're working on it) in the middle of my lounge but it's still wonderful to have the rest of the room looking nice again.

Here's how my office shelves were looking this summer - I'm so pleased with them!


I've been doing lots of tidying and re-organising and decluttering this summer and I'm sloooowly getting things set up how I want them.

I'm also slowly working on my "finally frame and hang all the artwork I've collected over the years" project. It was really exciting getting the first things framed. It turns out actual proper frames (even super cheap ones) look approx a zillion times better than clip frames. Who knew??


As you can see I've opted to frame pretty much everything in simple white frames. I might upgrade them to something fancier in the future, but for the moment these are working really well. It's easy to find cheap white frames like this in all the sizes I need, collectively they're not breaking my budget too badly, and they'll look really great on the plain white walls of my flat.

It's obviously time consuming buying frames and custom mounts and getting the pictures neatly framed and mounted, but the real time-suck is the hours spent thinking where to hang everything! I've accumulated so many different pictures over the years, and there are so many different possibilities for where I could hang them all in my flat. I've changed my mind about the grand picture-hanging plan a frankly ridiculous number of times over the past year and will probably continue to change it again with great frequency over the coming months.

Despite all this indecision, at the end of June we finally got the first batch of pictures up on the wall.


I was beyond thrilled when we hung these eight pictures up - it was a much more exciting moment than it looks from that slightly gloomy photo! They're a set of pages from a vintage book, The Good Housewife's Enyclopedia, which has some really gorgeous illustrations in it - you can see them all here.


I had three of the pages on the wall in my old flat and the paper darkened gradually over time due to the sunlight, so they no longer matched the rest of the set. I was a bit worried about how they'd look hanging together because of this but actually the reason that photo is so gloomy is because we've hung the pages up in my dark and gloomy hallway (which gets very little natural light)... and the gloom helps hide how the pages are all different colours. Hurrah!

It might seem weird to have hung pictures up in the hall when we've not decorated that part of the flat yet but the joy of this space is that I'm not going to be putting any furniture in it, so I don't need to wait until I've bought and/or planned furniture to work out where the pictures need to go. Decorating the "big" wall in my hallway is also soooo far down the priority list of my renovation plans that these pictures will likely sit happily on this undecorated wall for years before I need to take them down again.

More flat updates soon! In the meantime, you can catch up with all my home renovation posts here. 

Friday 21 September 2018

Destashing & Decluttering Sale: Coming Soon!

I'm having another Instagram sale!

I'll be listing craft books and supplies, stitched samples, and a whole load of other lovely bits and pieces over at lauralupinsells on Saturday 29th September (starting at 10am, UK time).

Here's a sneak peek at some of the things I'll be selling...

https://www.instagram.com/lauralupinsells/
 https://www.instagram.com/lauralupinsells/
 https://www.instagram.com/lauralupinsells/
 https://www.instagram.com/lauralupinsells/

There are also a few things left over from previous sales, which are now listed at totally bargain prices (hurrah!).

I'll list the price and UK postage of each individual item, but I'll combine the postage for each parcel and only charge what it actually costs to post - in the UK you can send a roughly shoebox sized parcel weighing up to 2 kilos second class for just £2.95. I'm also always happy to look up international postage prices - just ask!

When the sale starts you can leave a comment on an item to claim it, but if you don't use Instagram don't worry! If you see things you want to purchase, simply send me a message via my contact form to let me know what you're interested in and I'll get back to you as soon as possible. 

Wednesday 19 September 2018

Christmas Crafting: Felt Gingerbread Houses Tutorial

I love Christmas crafts!

I've shared lots of free festive tutorials here on my blog over the years (click here to visit my tutorial archive and see them all) and I'm always itching to start sewing Christmas-themed things as soon as autumn rolls round.

I'm sure there are some of you who will be frowning slightly at this - "surely it's too early to be thinking about Christmas?", you mutter to yourself - but as every crafter knows there's never enough hours in the day to work on your creative projects... and the festive season will be here before you know it!

Sooo... I'm sharing this idea for making a felt gingerbread house nice and early, so those of you who like to start your Christmas crafting early can get stitching, and anyone who prefers to wait until December to think about "the C word" can bookmark the page and come back to it when they're ready :)

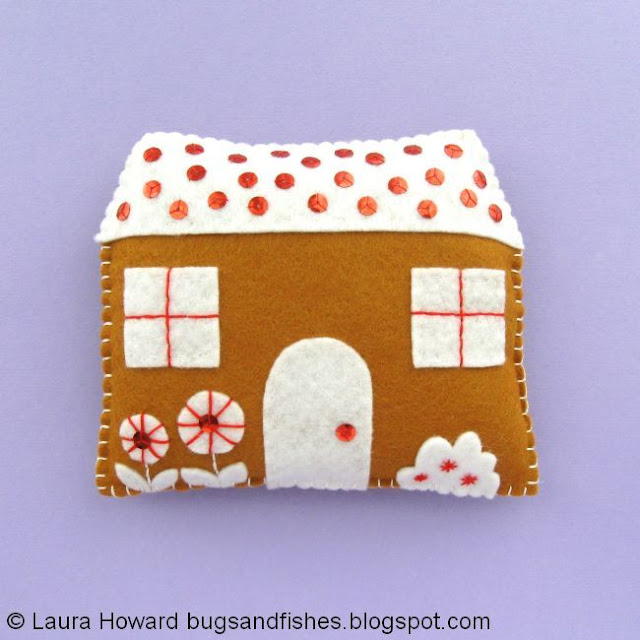
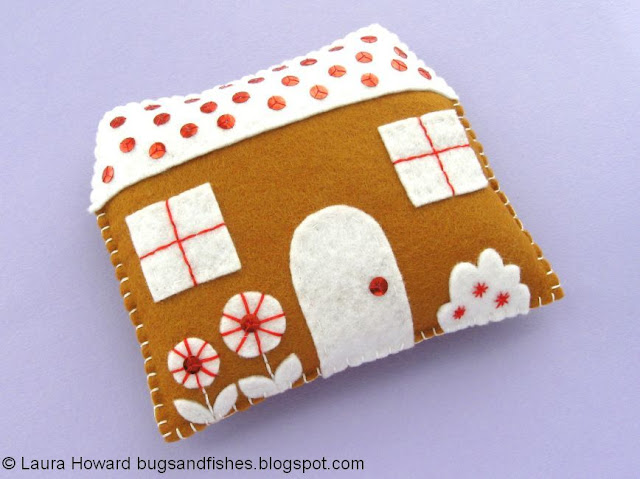
 felt gingerbread house

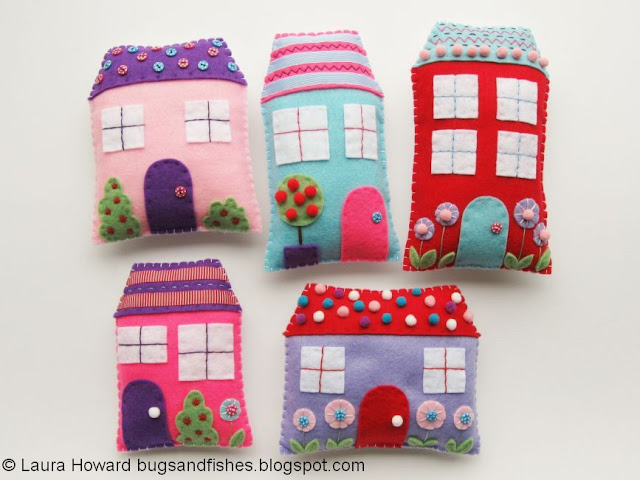
This project is a Christmas version of the felt houses tutorial I shared a couple of years ago.

felt houses

When I first stitched these little felt houses I thought to myself "ooh, these would make such cute gingerbread houses"... and I was totally right!

felt gingerbread house

To make a felt gingerbread house or two (or even a whole village of little felt houses), use the patterns and instructions in the felt houses tutorial but stick to a gingerbread-themed colour palette: ginger/brown felt for the house itself and white felt for the roof, door, windows and other details.

I used red sequins and embroidery thread to embellish my house, and joined the whole thing together with blanket stitch and white embroidery thread.

Your finished house(s) would look great propped up on a bookshelf or a mantlepiece, or you could add a loop of ribbon to turn each house into a Christmas ornament - perfect for hanging on large trees or from a hook or a door knob.

felt gingerbread house

Click here to view the step by step tutorial and the free templates for making all the felt houses.

Enjoyed this free tutorial? Buy me a "coffee" and help support my blog!

Buy Me a Coffee at ko-fi.com

Subscribe to my newsletter for a monthly free pattern and visit my crafty tutorial archive for lots more free projects.

Visit my shop to buy my printable PDF sewing patterns:


felt gingerbread houses tutorial