Showing posts with label felt hairclips. Show all posts

Saturday, 8 June 2019

Felt Butterfly Hair Clips Tutorial

One of the awesome things about felt crafting is how easy it is to get creative and adapt projects to make new things. Swap ribbon for a brooch clasp to turn an ornament into a brooch, stuff a pincushion with lavender to turn it into a lavender sachet, enlarge some brooch templates and use them to add an applique design to a cushion… there are always so many crafty possibilities!

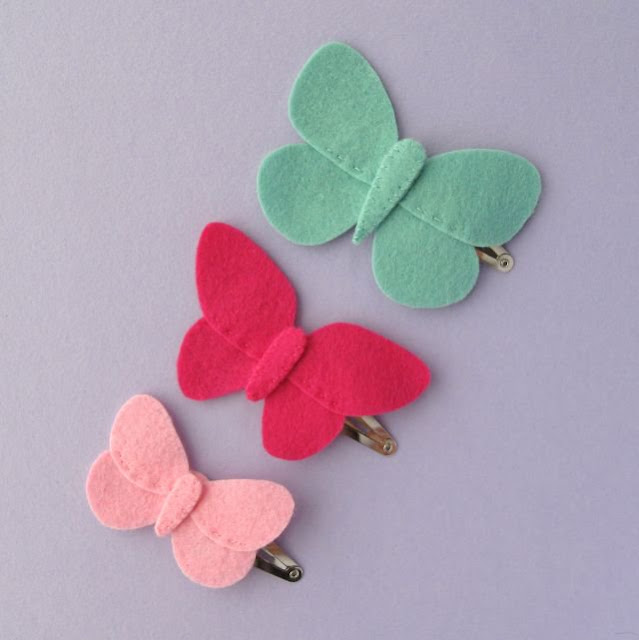
Inspired by this, after working on my Year of Wreaths tutorials for The Village Haberdashery's blog I created some easy ideas for re-using the templates from some of the wreaths. I'll be sharing these ideas here on my blog over the coming months, starting with today's project: making some pretty felt butterfly hair clips using the templates from June's butterfly wreath.

Felt Butterfly Hair Clips Tutorial
 Felt Butterfly Hair Clips Tutorial
Felt Butterfly Wreath Tutorial

You will need: 

- The template sheet from the Butterfly Wreath tutorial
- Wool felt in assorted colours
- Matching sewing threads
- Hair clips
- Sewing scissors or embroidery scissors
- A sewing needle and pins
- A glue gun and glue
- A heat-proof mat for the glue gun
- Newspaper to protect your workspace from any glue drips

Felt Butterfly Hair Clips Tutorial
 Felt Butterfly Hair Clips

To make the hairclips: 

Use the templates to cut out the butterfly pieces from your chosen felt colours (I used butterflies 2, 4 and 5).

Follow step 3 of the Butterfly Wreath tutorial to sew the butterfly pieces together.

For each hairclip, cut a felt circle approximately 17mm in diameter in the matching felt colour. Sew each circle to the end of a clip using matching sewing thread, as shown. This felt circle is the base onto which you’ll glue the butterfly pieces.

Felt Butterfly Hair Clips Tutorial: attach felt circles to the hair clips

Very carefully glue the butterfly pieces to the circles. Add the wings first, adding a small amount of glue to the circle then carefully pressing the wings into place.

IMPORTANT: take care when working with the glue gun as the glue gets very hot! Always place it on a heat-proof mat when not in use, and use newspaper or other scrap paper to protect your workspace. Work slowly, squeezing the gun with care to control the amount of glue you’re using and keeping your fingers out of the way of the hot glue.

Felt Butterfly Hair Clips Tutorial: glue the wings in place

Then add a very small amount of glue to the back of each body piece and carefully press them into position between the wings.

Felt Butterfly Hair Clips Tutorial: assemble the butterfly pieces

Ta-dah! Pretty felt butterflies to wear in your hair!

Felt Butterfly Hair Clips Tutorial


This tutorial is for non commercial use only: you can use it to make as many hair clips as you want for yourself or as gifts, but please don't make any for sale. You may borrow a couple of photos if you want to blog about this project, but remember to credit me and link back to this page on my blog, and do not reproduce my entire tutorial / share my templates on your site. Thanks!

Enjoyed this free tutorial? Buy me a "coffee" and help support my blog!

Buy Me a Coffee at ko-fi.com

P.S. Subscribe to my newsletter for a monthly free pattern and visit my crafty tutorial archive for lots more free projects.

Visit my shop to buy my printable PDF sewing patterns:


Friday, 9 March 2018

DIY Felt Butterfly Hairclips Tutorial

Update: this tutorial can now be found here on my blog! Make some felt butterfly hair clips, using the templates from my June butterfly wreath tutorial.

-----

My latest tutorial for The Village Haberdashery's blog is all about felt butterflies!

Use the free patterns and step-by-step tutorial to make some pretty felt butterfly hairclips:

Felt Butterfly Hairclips
Felt butterfly hair clips
 
This tutorial is part of a spin-off series, showing ways you can reuse some of the patterns from my A Year of Wreaths project. I originally designed the felt butterflies for June's butterfly wreath.

 Yarn-wrapped wreath decorated with felt butterflies

Click here for the butterfly hairclips tutorial!

You'll find the butterfly wreath tutorial here and you can explore all the wreaths in the series here.

12 seasonal wreath tutorials


Subscribe to my newsletter for a monthly free pattern and visit my crafty tutorial archive for lots more free projects.

Tuesday, 6 December 2011

DIY Stocking Stuffers

Looking for some quick and easy gifts to sew as stocking stuffers or small gifts for friends & family this Christmas?

Here are a few tutorials from my blog archive which might fit the bill...


Butterfly brooches decorated with buttons. You could make these in your friends' favourite colours, or use lots of shades of brown felt to make a moth instead of a butterfly. They'd also look super cute sewn onto a hair clip or an elasticated headband, and you could decorate the butterflies with sparkly sequins, beads or stitch a design with embroidery thread onto the wings instead of adding buttons.


A cute owl brooch. These are really quick and easy to sew, and everyone loves owls, right? Like the butterflies, this owl would also make a sweet hair clip or you could add a little loop of ribbon to make a sweet woodland-themed Christmas ornament.


Easy felt flower hair clips. These are a great beginner sewing project, and perfect if you need to whip up a little gift in a hurry! I used kirby grips / hair pins but you could also sew the flowers onto snap clips... and they'd look great with some sparkly seed beads sewn in the centre. You can make them look extra fancy by cutting a couple of slits in pieces of scrap card to make little display cards for the flowers (like the ones you get at the jewellery store).


A felt flower brooch. As with the butterflies, you could sew your flower onto an elasticated headband instead of adding a brooch clasp (great for teen girls!). This tutorial includes templates for sewing the brooch pictured, but is also a helpful beginners guide to designing and making your own brooches so you can get creative and make lots of different felt flowers if you want!


Teabag shaped lavender sachets. If you've got any dried lavender harvested from your garden this year, or can get hold of some from your local craft store these lavender sachets are a very fun gift for a tea lover. Lavender is a great natural moth deterrent, so lavender sachets make fab gifts for friends with pretty woollens in their wardrobes!


More lavender sachets... the little house sachets would also make sweet door hanger decorations, and the square sachets could become pincushions if you stuffed them with polyester stuffing or felt/fabric scraps instead of lavender.


I backed my little houses with cute house print fabric, but you could use fabric from your stash or felt instead. They'd make very sweet gifts for people celebrating their first Christmas in a new home, and you could personalise them by stitching their initials into the back of the ornament.

The square sachets are very easy to sew and a great way to use up scraps of ribbon or odd buttons leftover from other projects. You could also personalise them by embroidering an initial into the centre of the heart. I made a big batch of these sachets as gifts for friends and neighbours one Christmas, it was a huge amount of fun mixing & matching colours and making each one slightly different.

.


Want some more ideas? You can find more projects on my crafty tutorials page.