Showing posts with label applique. Show all posts

Tuesday, 4 February 2020

How To: Appliqued Heart Bag for Valentine's Day

Valentine's Day in the world of crafting basically means LET'S STICK HEARTS ON ALL THE THINGS... and there's nothing wrong with that, right?


Sooo today I'll be showing you how to embellish a small bag with a felt heart patch and some simple embroidery.

This tutorial was originally designed for The Village Haberdashery's blog - visit their shop for lots of crafty goodness!

You will need:

* The template sheet from my Valentine’s wreath tutorial.
* A blank cosmetic bag or other small purse.
* Felt in the following colours: pink, bright pink, lilac, and dark purple.
* Matching embroidery threads (floss).
* Light pink sewing thread (i.e. to match the colour of the largest heart).
* Sewing needles and pins.
* Optional: an air-erasable fabric marker pen.

To decorate the bag:

1. Use templates A, B, C and D from the Valentine’s wreath tutorial to cut out four heart pieces. A = bright pink. B = lilac. C = dark purple. D = pink.

2. Follow steps 5 and 6 of the Valentine’s Wreath tutorial to sew the layers together, using contrasting embroidery thread (I used pink thread, then bright pink, then lilac then dark purple) to decorate the hearts and stitch them together. Use half the embroidery thread strands only – so for six-stranded thread just use three strands.


3. Iron the cosmetic bag if required then position the felt heart in the centre. Hold or pin it in position then sew it in place with whip stitch and matching pink sewing thread. Take care to only sew through one layer of the bag!


4. To complete the decoration, fill in the space around the heart with embroidery. I stitched backstitch lines radiating from the heart, alternating between bright pink and dark purple and using half strands as before. Use an air-erasable fabric marker pen to draw guide lines from your stitching or just stitch freehand.

Make sure not to sew through the fabric edge of the zip (hold this away from the bag fabric when you’re stitching near the opening). Knot your thread at the end of each section of stitching and start afresh when sewing the next section, don’t carry threads across the inside of the bag (you don’t want whatever you put in the bag to “catch” on trailing threads!).


If you're giving this bag as a gift, why not fill it with Valentine's candy before wrapping it for a sweet (PUN ENTIRELY INTENDED) extra gift.

Enjoyed this free tutorial? Buy me a "coffee" and help support my blog!

Buy Me a Coffee at ko-fi.com

P.S. Subscribe to my newsletter for a monthly free pattern and visit my crafty tutorial archive for lots more free projects.

Visit my shop to buy my printable PDF sewing patterns:

Wednesday, 12 June 2019

Crafting With Felt Flowers: Floral Applique T-shirt Tutorial

Jazz up a plain t-shirt with some colourful felt flowers!

Floral Applique T-shirt Tutorial
 
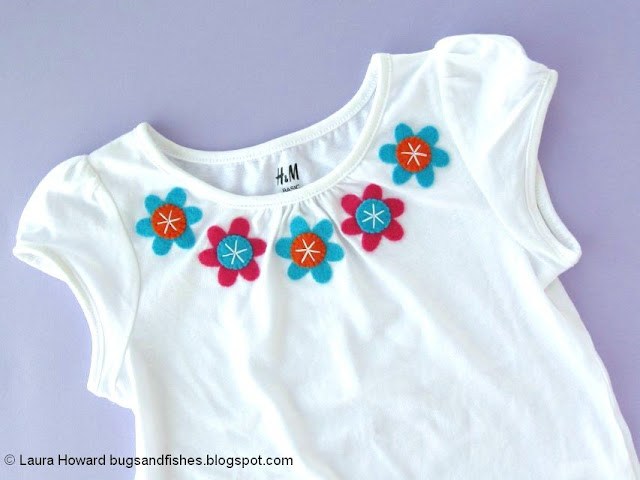
This week I'm sharing four easy ideas for crafting with felt flowers, making use of the flower templates from my spring flowers wreath tutorial. Todays's project? Adding little felt flowers to a kids' t-shirt!

Felt Spring Flowers Wreath Tutorial

This tutorial was originally designed for The Village Haberdashery's blog, using felt and other craft supplies from their shop.

Floral Applique T-shirt Tutorial

You will need:

- The flower templates from my April wreath tutorial
- A t-shirt
- Felt in at least two colours
- Matching sewing threads
- Contrasting embroidery thread
- Sewing needles and pins
- Sewing scissors or embroidery scissors

To decorate the t-shirt:

Use templates D and H to cut out enough felt flower pieces to decorate the neckline of your chosen t-shirt. I cut enough pieces for five flowers, mixing and matching three shades of felt.

Stitch the flower pieces together with half strands of contrasting embroidery thread (so for six-stranded thread just use three strands), sewing six radiating stitches from the centre of each flower as shown. I used white embroidery thread for this, to match the white t-shirt.

Floral Applique T-shirt Tutorial: preparing the flowers

One by one, sew the flowers to the t-shirt using whip stitch and matching sewing thread. Start in the centre and work outwards, evenly spacing the flowers around the neckline of the t-shirt. Take care not to stretch the t-shirt fabric and distort it as you sew the flowers in place. Hide the knots of your thread between the layers of felt/fabric so they won’t irritate the skin when the t-shirt is worn.

Floral Applique T-shirt Tutorial: sewing the flowers to the t-shirt

I'd recommending washing your finished t-shirt should be hand washed in lukewarm water instead of popping it in the washing machine!

Floral Applique T-shirt Tutorial


This tutorial is for non commercial use only: you can use it to decorate as many t-shirts as you want for yourself or as gifts, but please don't make any for sale. You may borrow a couple of photos if you want to blog about this project, but remember to credit me and link back to this page on my blog, and do not reproduce my entire tutorial / share my templates on your site. Thanks!

Enjoyed this free tutorial? Buy me a "coffee" and help support my blog!

Buy Me a Coffee at ko-fi.com

P.S. Subscribe to my newsletter for a monthly free pattern and visit my crafty tutorial archive for lots more free projects.

Visit my shop to buy my printable PDF sewing patterns:


Saturday, 31 May 2014

Make All The Things! Felt Cushion / Pillow Tutorial

Last weekend my To Do list read "MAKE ALL THE THINGS!!!"

I took this a bit literally, and decided to decorate a cushion with this exact phrase ... to help me remember to make more time for being creative, to not let admin take over my schedule, to do more making and less faffing about worrying about what project I should start next... and, well, just generally to encourage myself to make all the things.

Here's the finished cushion...


... I love it! Honestly this cushion makes me smile every time I see it, it's an awesome addition to my studio. 


To make your own, you will need....

- A plain cushion (pillow) cover.  I used a canvas cushion cover bought at H&M (affordable and available in lots of different colours, hurrah!) that measures 40 x 40 cm (16 x 16 inches).

If you want to you can, of course, make the cushion cover from scratch. There are plenty of cushion-making tutorials available online or in sewing books :)

- Felt in a constrasting colour to your cushion (you'll need two or three sheets/squares of felt)
- Sewing thread to match the felt, and a contrasting shade for tacking
- A needle and pins
- Sewing scissors (I used embroidery scissors, which are great for cutting out felt shapes)
- The templates provided at the bottom of this post. If your cushion is larger or smaller than mine just enlarge or shrink the templates as needed.


To decorate the cushion...

1. Use the templates provided to cut out the felt letters. 


2. Arrange the letters on the front of the cushion cover (or the fabric you'll be using to make your cushion) and carefully pin them in place. Note how I've left space around the edge of the letters, to allow for the 3D shape of the cushion.

Take care not to pin the front and back of the cushion cover together when pinning on your letters!


3. Use a contrasting shade of thread and large stitches to tack the felt letters in place, removing the pins as you sew. The tacking stitches will hold the letters in place and make the cushion much easier to handle (no getting pricked by pins when sewing!). Make sure you don't sew through both layers of the cushion.


4. Use matching thread and whip stitch to sew the felt letters to the cushion cover. This is nice and easy if you're sewing onto fabric-to-be-turned-into-a-cushion but sewing on the front of an already-sewn-together cushion can be a bit fiddly so take your time... and, again, make sure you're sewing through just the front layer of the cushion!


5. If you're making your own cushion, now's the time to take your appliqued fabric and follow the cushion-making instructions. If you've used a ready-made cover like me, all you need to do now is add the cushion insert and ta da...


... one slightly bossy cushion to put on your sofa to remind you to make stuff! :)


Click on each template sheet to view it in another tab or window. Make sure you're viewing the image at full size, then print it at 100%.


This tutorial is for non commercial use only: you can use it to make as many crafty cushions as you want for yourself and as gifts, but please don't make any for sale. You may borrow a couple of photos if you want to blog about this project, but remember to credit me and link back to this page on my blog, and do not reproduce my entire tutorial / share my templates on your site. Thanks!

Enjoyed this free tutorial? Buy me a "coffee" and help support my blog!

Buy Me a Coffee at ko-fi.com

Subscribe to my newsletter for a monthly free pattern and visit my crafty tutorial archive for lots more free projects.

Visit my shop to buy my printable PDF sewing patterns:

Saturday, 11 October 2008

Deer Oh Deer

I'm still in a Christmas-crafting mood (I blame the cold weather we've had lately), working on lots of cute little reindeer including one special custom order in white and purple:

Wednesday, 11 June 2008

Seeing Spots (365/276)

Last night was mostly taken up by a staff meeting for my "proper job". I did manage to squeeze in a bit of sewing after dinner though, decorating another pincushion top: this time hot pink circles on grey:
I love the bright colour on the more muted background. Sometime soon I shall have a binge of sewing and stuffing pincushions - I certainly have lots of felt scraps to fill them up with!

Monday, 9 June 2008

Sewing and Selling (C365/274)

Yesterday I crashed out in the heat (gorgeous weather here at the moment) and appliqued some pincushion tops:
When they're finished, the pincushions will look like these ones. They were born out of my growing mountain of felt scraps - the small scraps are used to decorate them, and the tiny scraps used to stuff them. Felt as a stuffing material makes for a lovely firm and chunky pincushion, great for sinking lots of pins into.

I also had a small overnight flurry of sales in my Etsy shop. The UK-US time difference can be a nuisance sometimes but it is so delicious waking up and finding you've sold stuff while you were sleeping!

I sold a couple of medium poppies, no doubt because of the exposure they got from their week rotating atop the front page. In about a week I think they got around 1000 views (I don't know for sure because once they've sold the view count goes down to an unhelpful 1) and my shop seems to have been a bit busier than usual in terms of views, people marking it as a favourite, etc. I definitely see now why some sellers make all their listings white knockouts: the free exposure is pretty darn awesome.

Ooh, maybe I was wrong about that: turns out another of my red poppies (my poppy hairband) was on the front page last night in this lovely treasury, so maybe that was it? Mysterious mysteries...

UPDATE: My poppy design is now available as a sewing pattern! Visit my shop to see all my printable PDF patterns

Sunday, 23 March 2008

365 / 216 - Stuffing Pincushions

Ah, stuffing pincushions is such an enjoyable task! Look how chunky they are:I finished four pincushions yesterday (whilst rather gorging myself on Poirot dvds) ...
... and have four waiting to be stuffed...
My favourite is probably the navy blue & teal one, but it's so difficult to decide. Note to self: I must remember to take some pictures of the pincushions actually with pins in them! It helps so much in judging the scale of them (they're a massive 8.5cm in diameter - that's just under 3 1/2 inches). I also finished the green textile art piece, giving it a backing piece of felt and photographing it nicely for the shop. Here's a shot including my hand to give you a good idea of the scale of it:
We went out to an Easter lunch today (lovely) and I wore one of my felt brooches and chatting to someone was asked if I sell my work "oh yes, I have a little online shop" "cool, have you ever thought about listing on Etsy?", rather amusing! I am finding that more and more people have heard of Etsy, though I have yet to randomly meet another seller... no doubt that time will come!

Saturday, 22 March 2008

365 / 215 - Scrap Pincushions

Staying true to my tendancy to be easily distracted by shiny new projects, last night I temporarily abandoned the textile art to begin some pincushions...
... I'm appliqueing large circles with little circles cut from the "waste" felt from my other projects. Small scraps become circles and the teeny tiny scraps will become pincushion stuffing! I made a start on this at Christmas, but have totally neglected it and with all the felt I've cut out this week I was starting to get overrun with scraps "to be used at some point"... so it seemed a good time to get started on them.
I'm very happy with how they're turning out so far - they're just how I pictured them in my mind, and the different sizes of the scraps mean the circles are turning out pleasingly random sizes which makes for a very natural looking scatter across the pincushion top. It's lovely to be able to put all that delicious colour to some use at last.

Saturday, 16 February 2008

365 / 180 - Works in Progress and a New Workspace

Tidying is still the thing. What a mess we are making in the process! I have a new "office" space now though, which is rather nice. It's basically just some shelves under our breakfast bar - which divides our kitchen from our kitchen table (where I work) - but it's still awesome. Please excuse the bad photo, and all the surrounding mess...
Yesterday evening, resting up after much organising, re-organising and moving of furniture, I dug out some works in progress and, er, progressed them. I finished the Orange-Tip butterfly I was working on the day before, stitched a small batch of currently faceless foxes, and started some biscuit brooches because they have been out of stock for far, far too long:
Here's the Orange-Tip close-up...

UPDATE: My felt fox design is now available as a sewing pattern! Visit my shop to see all my printable PDF patterns.

Tuesday, 29 January 2008

365 / 163 - From Sketches to Patterns to Prototypes

We had a super-slow day at work yesterday and I spent rather a lot of time sneakily sketching British butterflies:
Of course, I was then so excited at how well some of the sketches had turned out that I had to try some out the moment I got home...
... the yellow one is a Brimstone butterfly, the blue one is Adonis Blue and the in-progress white and orange one is a species called Orange-Tip. I also tried out petal shapes for daisies, and (seriously thrilling) made a prototype Bluetit which is on the wrong colour background and lacking an eye! The idea for the bluetit (and, in fact, for a whole range of British garden birds) came when I was idly sketching possible shapes for a robin back in December, and it is wonderful to have fully realised the idea. Here's a shot of all the sketches I made - initial robin sketches, a sketch working out how to represent bluebird markings, and then a neater drawing to base a pattern - along with the pattern pieces and prepared felt shapes:
Then here's the final drawing and the finished applique for comparison:
He's turned out to be rather a cutie I think, and I'm very glad as the bluetit is one of my very favourite birds. The pages of my bird books will be well thumbed over the next few weeks I think as I'll be adapting the pattern for all sorts of different species....

There won't be any more 365 photos from me for a little while though, as I'm going away for a few days (leaving the boyfriend to fend for himself, haha). I shall still be blogging though, continuing my "featured crafter" series showing off some of the amazing talent in the Crafting 365 group.

PS Yay! My pansy pin got a mention in an Etsy article posted today about Colour Theory - apparently I "used the split complementary color scheme of green, purple and yellow to create a balanced color contrast". This is news to me but lovely to get the mention - particularly amongst so many lovely featured items! I have a sneaking suspicion that my pansy was on the Etsy front page with those items the other day but it sold and I missed it... ah well. Nice to see it turning up on the FP this afternoon anyway:

Wednesday, 17 October 2007

365 / 64 - some sewing and some secrets revealed!

Yesterday I was feeling tired and sleepy and a little bit grumpy so I took the opportunity to curl up with my sewing and totally ignored my to do list in favour of some soothing stitchery. I made six little plush bird brooches (the seventh you can see in the picture was made the other day, a test bird!), cut out the final finishing teeny pieces of felt for my work-in-progress moth brooches, and did most of the work on two little cherry blossom pins. Here they all are, in the bright sunshine:
The cherry blossom pins are part of the secret I have been hiding from you. My secret swap partner (who has now received her gift) was the lovely greygoat who said she liked corsages and is known to love Japanese things... so I decided to make her a Sakura (cherry blossom) branch out of felt, an appliqued corsage. It ended up so large that it has two pinback fastenings stitched on the back to keep it in place, and took rather a while to sew... but I'm really very pleased with how it turned out:As I had a few of the little pink beads left over (they really are just the perfect beads for this, lovely pale pearlescent things with dark pink insides) I decided to use my new cherry blossom pattern to make pins for my shop...
They are really enjoyable little pins to make, I love adding the beads and the little embroidered details, and making them has allowed me the chance to try out some of the alternate solutions I had for the main corsage (darker thread for the central embroidery, not stitching the darker pink felt onto the backing to make it stand out more). It's lovely to have made a flower that actually resembles a real flower instead of a stylised retro "flower-type" shape like I've made previously. I'll hopefully be finishing the in-progress pins this evening, and I am going to try and finish at least one of those darn moths! They've been sitting around unfinished for far, far too long.

Monday, 11 June 2007

I Like Your Shoes

It is ridiculously hot here. I don't want to work at all, I've just been crashed out on the sofa drinking oodles of water and keeping myself entertained by sewing more delicious Askey treats.

Just finished this one, a version of "I like your shoes"...