Showing posts with label butterflies. Show all posts

Saturday, 7 May 2022

Felt Insect Brooch Craft Kits for Hawthorn Handmade

Some lovely news - I've designed some more felt craft kits for Hawthorn Handmade!

Last year they launched wildlife brooch sewing kits and flower brooch sewing kits, then this year they've added dog brooch kits to the range... and now insect brooches, too!

There's a Bumblebee...


... a Dragonfly...


... and a Butterfly, all perched on pretty felt flowers!


I really enjoyed designing these and I am delighted with how they turned out. I've been a bit slow blogging about them so I'm thrilled to say I've already seen photos of people's finished brooches popping up online and it is an absolute JOY to see them. 

If you make some, do let me know :)


Saturday, 8 June 2019

Felt Butterfly Hair Clips Tutorial

One of the awesome things about felt crafting is how easy it is to get creative and adapt projects to make new things. Swap ribbon for a brooch clasp to turn an ornament into a brooch, stuff a pincushion with lavender to turn it into a lavender sachet, enlarge some brooch templates and use them to add an applique design to a cushion… there are always so many crafty possibilities!

Inspired by this, after working on my Year of Wreaths tutorials for The Village Haberdashery's blog I created some easy ideas for re-using the templates from some of the wreaths. I'll be sharing these ideas here on my blog over the coming months, starting with today's project: making some pretty felt butterfly hair clips using the templates from June's butterfly wreath.

Felt Butterfly Hair Clips Tutorial
 Felt Butterfly Hair Clips Tutorial
Felt Butterfly Wreath Tutorial

You will need: 

- The template sheet from the Butterfly Wreath tutorial
- Wool felt in assorted colours
- Matching sewing threads
- Hair clips
- Sewing scissors or embroidery scissors
- A sewing needle and pins
- A glue gun and glue
- A heat-proof mat for the glue gun
- Newspaper to protect your workspace from any glue drips

Felt Butterfly Hair Clips Tutorial
 Felt Butterfly Hair Clips

To make the hairclips: 

Use the templates to cut out the butterfly pieces from your chosen felt colours (I used butterflies 2, 4 and 5).

Follow step 3 of the Butterfly Wreath tutorial to sew the butterfly pieces together.

For each hairclip, cut a felt circle approximately 17mm in diameter in the matching felt colour. Sew each circle to the end of a clip using matching sewing thread, as shown. This felt circle is the base onto which you’ll glue the butterfly pieces.

Felt Butterfly Hair Clips Tutorial: attach felt circles to the hair clips

Very carefully glue the butterfly pieces to the circles. Add the wings first, adding a small amount of glue to the circle then carefully pressing the wings into place.

IMPORTANT: take care when working with the glue gun as the glue gets very hot! Always place it on a heat-proof mat when not in use, and use newspaper or other scrap paper to protect your workspace. Work slowly, squeezing the gun with care to control the amount of glue you’re using and keeping your fingers out of the way of the hot glue.

Felt Butterfly Hair Clips Tutorial: glue the wings in place

Then add a very small amount of glue to the back of each body piece and carefully press them into position between the wings.

Felt Butterfly Hair Clips Tutorial: assemble the butterfly pieces

Ta-dah! Pretty felt butterflies to wear in your hair!

Felt Butterfly Hair Clips Tutorial


This tutorial is for non commercial use only: you can use it to make as many hair clips as you want for yourself or as gifts, but please don't make any for sale. You may borrow a couple of photos if you want to blog about this project, but remember to credit me and link back to this page on my blog, and do not reproduce my entire tutorial / share my templates on your site. Thanks!

Enjoyed this free tutorial? Buy me a "coffee" and help support my blog!

Buy Me a Coffee at ko-fi.com

P.S. Subscribe to my newsletter for a monthly free pattern and visit my crafty tutorial archive for lots more free projects.

Visit my shop to buy my printable PDF sewing patterns:


Tuesday, 4 June 2019

A Year of Wreaths: June Felt Butterflies Wreath Tutorial

UPDATE: this tutorial is now available as a printable PDF pattern over on my Patreon.

Subscribe for a small monthly fee and you'll get access to a growing library of PDF patterns and tutorials, with an email whenever I add a new project. You can cancel any time.    

Click here to check out my Patreon page and sign up!

-------

This month’s wreath is an ode to two of summer’s great joys – clear blue skies, and beautiful butterflies!

yarn-wrapped wreath decorated with felt butterflies


The wreath is wrapped in some gorgeous sky blue yarn and decorated with butterflies made from wool blend felt. 

For an extra special wreath, you could use embroidery thread to decorate the butterflies’ wings or add sequins for a bit of sparkle. 

You can also use the butterfly template sheet for other crafty projects: cushions, greetings cards, hair clips, and so on.

felt butterflies


Click here for a tutorial for making felt butterfly hair clips!

Felt Butterfly Hair Clips Tutorial


Subscribe to my newsletter for a monthly(ish) free pattern and visit my crafty tutorial archive for lots more free projects.

Visit my shop to buy my printable PDF sewing patterns:


Friday, 17 August 2018

How To: Felt Butterfly Cushion / Pillow Tutorial

Today I'm sharing a tutorial for decorating a cushion (pillow) cover with pretty felt butterflies!

felt cushions

I decorated my cushion cover with 20 felt butterflies all in the same shade of aqua blue felt, but you could make every butterfly a different colour if you wanted to or create a rainbow or ombre effect with different shades across the cushion.

I love how these butterfly shapes are pretty but still quite minimal and chic. For a busier look you could always add detail with embroidery or other embellishments, using this version of the butterfly template to add a felt body as well as the outline shape. 

cushion decorated with felt butterflies
 floral cushion & butterfly cushion

The butterflies cushion is one of a series I've been making over the past few years to decorate my living room / studio space. I don't currently have a sofa in my new flat so I had to borrow someone else's lounge for these pictures... but hopefully these cushions will be adding a lovely pop of colour to my living space sometime soon!

Click here for the "MAKE ALL THE THINGS" cushion tutorial and templates. I'll be sharing the tutorial and templates for making the colourful floral cushion next week.

three cushions / pillows decorated with felt
colourful felt cushions

To make a butterfly cushion, you will need a cushion cover, some felt, sewing thread, scissors, a sewing needle, pins, and the butterfly template at the bottom of this post

1. Resize the template to suit your cushion - you'll need a bigger or smaller template depending on the size of your cushion cover and the number of butterflies you want to add. Then use the template to cut out lots of butterflies from your chosen felt colour(s). 

cutting out felt butterfly shapes

2. Arrange the butterflies on the front of the cushion cover and pin them in place. You may find a ruler helpful in getting them lined up straight. Take care to only pin them to the front of the cushion cover and not through all the layers of fabric.

pinning the felt butterflies to the cushion cover

3. Use contrasting sewing thread and large stitches to tack each butterfly in position, removing the pins as you sew each one. Make sure you only sew through the front of the cushion!

securing the shapes with tacking stitches

4. Then use matching sewing thread and whip stitch to sew the butterflies neatly.

sewing the felt butterflies to the cushion cover
felt butterflies sewn to the cushion cover

5. When all the butterflies have been sewn in place, remove the tacking threads then add a cushion insert.

finished felt butterfly cushion

For a no-sew version of this project, you could use fabric glue to attach the butterflies to the cushion cover. I'd recommend sticking one butterfly to a piece of scrap fabric first, to test how much glue you need to use and placing something like a piece of plastic or tin foil between the layers of the cushion to prevent the glue seeping through and sticking the cushion together.

Enjoyed this free tutorial? Buy me a "coffee" and help support my blog!

Buy Me a Coffee at ko-fi.com

Subscribe to my newsletter for a monthly free pattern and visit my crafty tutorial archive for lots more free projects.

Visit my shop to buy my printable PDF sewing patterns:

This tutorial is for non commercial use only: you can use it to make as many butterfly cushions as you want for yourself and as gifts, but please don't make any for sale. You may borrow a couple of photos if you want to blog about this project, but remember to credit me and link back to this page on my blog, and do not reproduce my entire tutorial / share my templates on your site. Thanks!

  three ideas for decorating cushion covers with felt

Friday, 9 March 2018

DIY Felt Butterfly Hairclips Tutorial

Update: this tutorial can now be found here on my blog! Make some felt butterfly hair clips, using the templates from my June butterfly wreath tutorial.

-----

My latest tutorial for The Village Haberdashery's blog is all about felt butterflies!

Use the free patterns and step-by-step tutorial to make some pretty felt butterfly hairclips:

Felt Butterfly Hairclips
Felt butterfly hair clips
 
This tutorial is part of a spin-off series, showing ways you can reuse some of the patterns from my A Year of Wreaths project. I originally designed the felt butterflies for June's butterfly wreath.

 Yarn-wrapped wreath decorated with felt butterflies

Click here for the butterfly hairclips tutorial!

You'll find the butterfly wreath tutorial here and you can explore all the wreaths in the series here.

12 seasonal wreath tutorials


Subscribe to my newsletter for a monthly free pattern and visit my crafty tutorial archive for lots more free projects.

Monday, 21 August 2017

June & July in Pictures: Colour & Crafting amongst the Chaos!

I spent a hectic few weeks this summer living out of a suitcase, travelling back to my flat from time to time but mostly staying with my parents and helping them prepare to move out of our family home and across the country to their new house. You might have noticed that I rather dropped the ball on the blogging front (oops!) while all this was going on... but I still managed to squeeze in some crafting and other fun stuff in between all the packing and general moving prep.

So... what did I get up to in June and July?


My friend Kate visited Bristol and we met up for a day's sightseeing and photo-taking (you can read about her trip to the city here and here). It's always a joy to show people round my favourite city, and Bristol was looking pretty darn gorgeous in the summer sunshine.


I was nearly late to meet her in the morning, though, as I was busy taking photos of this fabulous wall! (Instagrammer problems, man...).


For my birthday one of my friends surprised me with this awesome "Making Things" print and I couldn't resist taking a photo of it surrounded by some of the crafty supplies I'd been using that week.


I made things with this wonderful marbled paper (click here to see what I made with it!)...

https://www.thevillagehaberdashery.co.uk/blog/2017/one-paper-pad-eight-easy-papercraft-projects-to-try

... and made lots of felt butterflies for June's "A Year of Wreaths" Wreath tutorial (follow that link for the free tutorial). 

http://bugsandfishes.blogspot.co.uk/2017/06/a-year-of-wreaths-june-felt-butterflies.html
 http://bugsandfishes.blogspot.co.uk/2017/06/a-year-of-wreaths-june-felt-butterflies.html

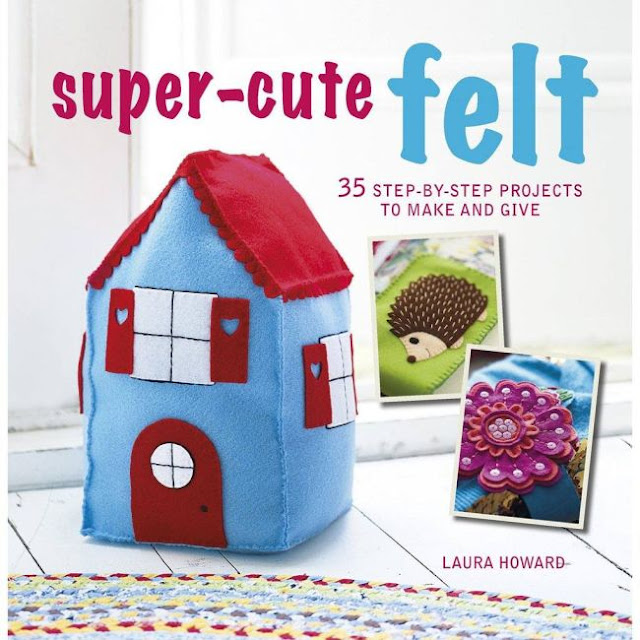
The shiny new edition of my first book, Super-Cute Felt was published (prompting an Instagram post full of feelings)...

http://bugsandfishes.blogspot.co.uk/2017/06/super-cute-felt-craft-book.html

... with a free project from the book available over at MAKEetc...

 http://bugsandfishes.blogspot.co.uk/2017/06/free-tutorial-felt-butterfly-flower.html

... and the pear needlebook tutorial (delightfully) featured in Prima Makes magazine.


I blogged about some fabulous fog, my visit to Birmingham's Jewellery Quarter, a trip to Lichfield and a magnificently quirky museum: the Birmingham Pen Museum.


I confessed to sometimes preferring unused skeins of yarn and embroidery thread to finished projects (there's just something so appealing about those soft loops of colour!)...


... and had a hilarious dream in which I went on a date... not to a bar, or a café, or the cinema, but to a giant branch of Paperchase! The way to my heart is clearly via nice stationery (or haberdashery!). Naturally, I couldn't resist obeying my subconscious and visited the big Paperchase on the Tottenham Court Road when I was in London a couple of weeks later. Mmm... so many colours...


I shared a photo of my much beloved Dorcas pin tin - which it turns out is something a lot of people have in their sewing kit, and treasure (maybe you have one too?). This tin belonged to my mum when she was at school. I also have a larger one which I inherited from my grandmother, along with the rest of her sewing box.


I do love things which are pretty but also practical... although sometimes I buy so many of them that they're not quite so practical any more. Like mugs - I definitely have way more mugs than I technically need but there are just so many lovely ones! This one is my current fave: a recent gift from a kind friend who knows just how much I love a pop of colour.


Finally, July turned into a month of colourful selfies as I visited the WALALA X PLAY installation (a maze of mirrors and bright patterns that's perfect for taking photos)... 


... then got inspired by Instagram's "Weekend Hashtag Project" photo challenge and ended up spending a chunk of a Sunday afternoon lying on the floor covered in blankets (which is a perfectly normal thing to do, right??).

That week's challenge was #whptalentshow, and I got thinking about how my creative talents are things I've inherited from my parents, and which were encouraged and nurtured by them when I was growing up. Which (naturally) led to me taking selfies while sandwiched between the blanket my mum knitted for me when I was a baby, and the blanket I'm knitting for my new flat.


(Psst - for more blanket-y lols, check out the outtakes!).

Want more colourful, crafty updates? I'm lauralupinhoward on Instagram - click here to visit my page and follow me. You'll also find me on Facebook and Twitter.