Sunday, 31 July 2016

How To: Sew Felt Ice Cream Phone Cases

Today I'm sharing a fun, summer-y tutorial: make a felt phone case decorated with an ice cream or ice lolly! 

felt ice cream phone cases

Already have a case for your smartphone, or don't own a smartphone? You could use the ice cream designs to decorate other sewing projects or greetings cards, or to make fun felt brooches.

felt ice cream phone cases

I originally designed this project for docrafts Creativity magazine, and it was stitched using felt, fabric and buttons from their range of craft supplies.

Each phone case has an ice cream on the front, and a button closure at the back.

back of felt ice cream phone cases
 felt ice cream phone cases

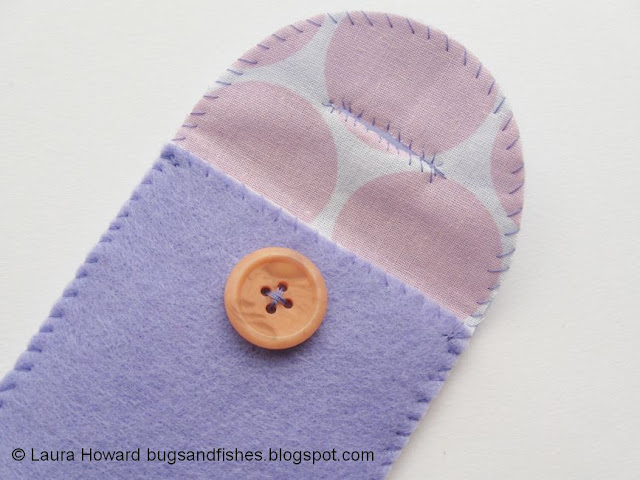
You can make the cases entirely from felt, or add a pretty fabric lining.

felt phone case button closures

To make each phone case, you will need:

- the template sheets provided at the bottom of this post
- craft felt in assorted ice cream colours
- a sheet of craft felt for the phone case
- a co-ordinating button
- sewing thread to match all the felt colours
- sewing scissors
- sewing needles and pins
- pink, white and yellow embroidery thread/floss (or other sprinkle colours)
- an air erasable marker would also be useful but you can use a soft pencil instead
- optional: co-ordinating cotton fabric, iron-on interfacing and an iron and ironing board

felt ice lolly phone cases

To make each phone case:

1. Use the templates provide to cut all the pieces from felt, using the photos as a guide when choosing colours.

Tip: on the phone case template sheet, the whole template forms the front of the case, and the section below the dotted line forms the back of the case. Cut the front out first before cutting into the template or print two copies of the template sheet. 

2. (Optional) If you're adding a fabric lining to the phone case, cut a piece of cotton fabric large enough for both phone case templates. Following the manufacturer's instructions, iron a piece of interfacing onto the back of the fabric. Then use the templates to cut out the front and back phone case pieces.

3. Pin the ice cream or ice lolly pieces to the front of the case, using the photos as a guide. Sew each piece in position with whip stitch and matching sewing thread, removing the pins gradually as you sew.

 felt rocket lolly

4. If you want to add embroidered "sprinkles" to the ice cream, stitch these using single stitches of embroidery thread (floss). Separate half the strands of the thread and switch to a larger sewing needle if needed. Sew longer stitches for sprinkles, shorter ones for 100s and 1000s

 felt ice cream in a cone
 felt ice lolly with sprinkles

5. Sew on a co-ordinating button to the back of the case, as shown in the photos.

6. Place the front and back of the case together (so the ice cream design and the button are both facing outwards) and pin them together. Use large tacking stitches to sew the layers together then remove the pins.

If you're adding a fabric lining, add these layers in between the felt so the patterned side of the fabric is facing inwards. 

7. Sew the edges of the case together with whip stitch and matching sewing thread then remove the tacking stitches.

8. Fold the flap of the case over, mark the button's position then carefully with an air erasable marker or a soft pencil. Cut a buttonhole slightly wider than the button. Finally, sew around the buttonhole with more whip stitches and finish your stitching neatly.

felt phone case button and buttonhole

This tutorial is for personal use only: you can use it to stitch as many phone cases or other ice cream themed items as you want for yourself or as gifts, but please don't make any for sale. You may borrow a photo or two if you want to blog about this project, but remember to credit me and link back to the original source, and do not reproduce my entire post or share the templates on your site. Thanks!

Enjoyed this free tutorial? Buy me a "coffee" and help support my blog!

Buy Me a Coffee at ko-fi.com

Subscribe to my newsletter for a monthly free pattern and visit my crafty tutorial archive for lots more free projects.

Visit my shop to buy my printable PDF sewing patterns:


Follow the links to view the template sheets, make sure you're viewing them full size then print at 100%. Click here for the ice cream templates. Click here for the phone case templates.


felt ice cream phone cases tutorial

Friday, 29 July 2016

Regent's Park: Queen Mary's Gardens

A few weeks ago, after visiting wonderful bookshop Daunt Books on Marylebone High Street I decided that instead of retracing my steps to Bond Street to catch the Tube home I'd walk in the other direction, taking a detour to Regent's Park en route to Great Portland Street.

I'd only ever been to Regent's Park once before, walking up the Broad Walk quite briskly on my way to the Jewish Museum a couple of springs ago. I'd been meaning to go back ever since, so finding myself nearby on a lovely sunny afternoon I thought it was the perfect time to do some more exploring!

This time round I visited Queen Mary's Gardens in the Inner Circle of the park. The main gates are rather fancy, marking both the opening of the gardens in the 1930s and the Silver Jubilee of King George V.


Queen Mary's Gardens are famous for their roses - apparently there are approximately 12,000 roses planted within the gardens, making it London's largest collection of roses. The roses are (apparently) at their best in the first weeks of June but when I visited in early July the gardens still looked and smelled amazing. So many roses! And such waves of scent!


There was also a spectacular border filled with delphiniums...
 

... and lots of interesting, densely-planted pathways to explore.


As well as the formal planting, there's also a small lake within Queen Mary's Gardens. The lake and its surrounding planting are just buzzing with wildlife - I saw so many different birds on my short visit.


At one end of the lake you'll also find a waterfall and a Japanese garden, which is actually on a little island in the lake (you know how I feel about tiny islands). The garden is looking a little bare at the moment as it's being replanted, but it's still full of character. You cross over the wisteria-covered ornamental bridge to reach the island, then follow the path round to explore.


A Japanese garden on a tiny island in an ornamental lake in a rose garden in a royal park? What a treat!

I'm so glad I decided to take a detour through the park instead of heading straight home. 

P.S. If you're a fan of Japanese gardens, there's also a lovely one in Holland Park - complete with peacocks.

Wednesday, 27 July 2016

Book Review: The Origami Home

Have you ever tried origami? I loved making origami flowers when I was a teen, and really enjoyed the origami making workshop I attended at the Handmade Fair a couple of years ago so I was delighted when the lovely folks at Jacqui Small sent me a copy of The Origami Home to review.


Jacqui Small publish really beautiful creative books - like Sewing Made Simple, Quilt Love and Made by Yourself. Whenever you see one of their books you just know it's gonna be a lovely object... and The Origami Home is no exception!


It's a gorgeously chunky hardback featuring 30+ miniature pieces of furniture to make from paper.

The book also includes 55 sheets of specially printed papers in fabric and wallpaper designs from the likes of Little Greene and Mini Moderns so you can perfectly recreate the projects in the book.


The origami patterns are organised by room, so you can make little room sets to display on a bookshelf (so cute!).


There's an introductory section that covers the folding process and the symbols you'll encounter throughout the book.


Each chapter begins with a photo of the finished room set, then one by one it takes you through the steps you need to make each piece of furniture. There's a living room, modern-retro dining room, workspace, bathroom, terrace and more.

The step by step diagrams are illustrated with the same patterns as the paper used to make the piece. Although it's helpful to clearly see which is the decorated and which the plain side of the paper when folding, I have to admit that I found the addition of the pattern on top of the fold lines, arrows, etc. shown on the diagram rather distracting.

I'd definitely recommend starting with some of the designs that have been made from plain paper - and thus have less visually cluttered illustrations - so you can really clearly see the instructions while you're getting to grips with the techniques.


The Origami Home would be a great addition to your bookshelf if you have a passion for all things interiors-related, or if you're just interested in origami and want to try making something different to the usual animals and flowers.

The inclusion of the paper pack also makes this an ideal book to give as a gift as you can get crafting straight away!

The Origami Home by Mark Bolitho (chair of the British Origami Society) is published by Jacqui Small. RRP £20. It's available from Amazon, the Book Depository and many other bookshops.

Please note: I was sent a free review copy of this book. The Amazon links in this post are affiliate links.

Monday, 25 July 2016

A Wonderful Bookshop: Daunt Books

A few weeks ago I visited a very special bookshop: Daunt Books on Marylebone High Street.


I can't believe I'd never visited before, especially as it's so central - just a ten minute walk from Bond Street tube station.

The Edwardian shop at 83 Marylebone High Street was orginally an antiquarian booksellers, but for over 25 years it's been the home of independent booksellers Daunt Books (who have since expanded the store into no. 84, next door).

 
I do love a nice indie bookshop, and this one is especially lovely. This is the main room:


Talk about swoonworthy!

As well as being a beautiful shop, Daunt Books has a quirky twist: most of their books are arranged not by category but by country. Interested in Russia, for example? You'll find Russian travel guides, poetry, history, novels and biographies all shelved together.

This makes for a really novel (pun totally intended) browsing experience. They also have a more conventionally shelved fiction section, lots of art and cookery books and a children's section.


I will definitely be popping in here in future to browse and buy books on my London trips.

Visit the Daunt Books website for more info and opening times.

Saturday, 23 July 2016

Four Fun Felt Projects for Mollie Makes #69

I got an exciting bit of post this week - a copy of this month's Mollie Makes magazine.
 

Why am I so excited about the arrival of this magazine, you ask?

Well, a familiar face makes an appearance this issue...


... yup, you guessed it, it's me! Yay! :)

The cover gift that comes free with Mollie Makes #69 is a kit for making a fabulous felt pom pom necklace, designed by Yoko Minemura Vega.

 
You also get a little booklet that contains three bonus projects: alternative ideas for using the materials in the kit... and those three projects were designed by me! (Double yay!)


I had loads of fun making these projects a few months ago, it's so nice seeing them styled so gorgeously by the Mollie Makes team.

You can choose from three home decor projects. A felt bouquet...


... a mini mobile...


... or a Scandi-inspired cushion.


I also designed a fourth project - a scalloped necklace. The necklace didn't fit in the printed booklet, so the lovely folks at Mollie Makes have shared it as a free project over on their blog. (Triple yay!).
 
http://www.molliemakes.com/craft-2/diy-jewellery-scalloped-felt-necklace/


Issue 69 of Mollie Makes is out now in the UK and is available in all good newsagents, supermarkets and independent craft shops, or from the official online store.         

Thursday, 21 July 2016

A Trip to Seville: The Alcázar

My mum and I spent a few days in Spain a couple of years ago, exploring the city of Seville. I was slightly overwhelmed by how beautiful the city was and took a lot of photos. I finally edited them a few months ago (to make a photo book for my mum) and am slowly blogging about all the wonderful stuff we saw on our trip.

Today I'm sharing some photos from our visit to the Real Alcázar - a palace that's a World Heritage Site but still in use today by the Spanish royal family.


Parts of the palace were built in the 1300s, and it's been added to over the centuries. Between the gorgeous buildings and courtyards of the palace itself and the extensive gardens there is so much to see!

   
This is one of those places where you keep saying "wow" under your breath every time you enter a room, or turn a corner. The palace is filled with beautiful detail...


... and the gardens overflow with lush greenery.


If you're a Game of Thrones fan, you might recognise the Alcázar as one of the locations used in one of the recent series!

You can see why they chose it, can't you? It's like something straight out of a storybook.


It was really wonderful exploring the rooms, courtyards and gardens of the Alcázar and imagining all the people that have lived in and visited this special place over the centuries.

My photos hardly captured how gorgeous it was, and just looking at them again is making me want to book another flight to Seville.


Want to read more about my trip to Seville? Check out my posts about visiting the Metropol Parasol (aka "the mushrooms") and the Plaza de España.