Showing posts with label colour. Show all posts

Saturday, 30 May 2020

Lots of Fabulous Felt Bundles!

One of my big projects this week has been turning a pile of wool blend felt squares into some lovely colour-themed felt packs.

The felt delivery arrived on Monday, I sorted them into colour order on Tuesday, wrapped them all up neatly with ribbon on Thursday, then got them photographed and in my shop yesterday - hurrah!

The Soft Pastels pack includes 12 pretty pale and pastel shades:

https://www.lauralupinhoward.com/category/supplies-felt

Then there's Pinks & Purples...

https://www.lauralupinhoward.com/category/supplies-felt

... Blues & Greens...

https://www.lauralupinhoward.com/category/supplies-felt

... and Fire Tones (thus named because Reds, Oranges, Yellows, & Peach/Coral Pinks was just too much of a mouthful!).

https://www.lauralupinhoward.com/category/supplies-felt

If you want a wider mix of colours, you can choose from the Bright Rainbow...

https://www.lauralupinhoward.com/category/supplies-felt

... and the Bold Rainbow, which has much deeper, richer tones though I'm not sure I've fully captured the difference between these packs in these photos! I think I may need to take a photo of the two rainbow packs together for really clear comparison. *Adds that to the To Do list*

https://www.lauralupinhoward.com/category/supplies-felt

I've also put together a pack of squares inspired by the British coast, which I'm calling Coastal Walk:

https://www.lauralupinhoward.com/category/supplies-felt

Then the last pack is Useful Neutrals, which is currently only 10 squares (unlike the other packs which all have 12) because my stockist is out of stock of white and ivory felt and I'm planning on adding those to this bundle as soon as I can get hold of some.

https://www.lauralupinhoward.com/category/supplies-felt

As well as the felt bundles, I've also added a few new crafty supplies to the shop this week. It's been a fun challenge working out the best ways to photograph everything!

There are lots of different buttons...

https://www.lauralupinhoward.com/category/supplies-sewing-embroidery
 https://www.lauralupinhoward.com/category/supplies-sewing-embroidery
https://www.lauralupinhoward.com/category/supplies-sewing-embroidery
 https://www.lauralupinhoward.com/category/supplies-sewing-embroidery

... some lovely metallic pencils...

https://www.lauralupinhoward.com/category/supplies-paper-stationery

... and vanishing fabric marker pens. I use one of these pens regularly in my projects, especially when I'm working with felt and want a guide line for something like a cute smiley face. If I mention an "air-erasable pen" in a tutorial, this is the kind of pen I mean! Some pens in this style only write well on fabric but this felt-tip-style pen is great for fabric and felt, I highly recommend it.

https://www.lauralupinhoward.com/category/supplies-sewing-embroidery

I've also added some gorgeous 15mm wide rainbow ribbon to the shop - the 6mm ribbon was proving so popular I thought I'd get some of this in, too. I'm now selling both ribbons by the metre or in 10 metre reels.

https://www.lauralupinhoward.com/category/supplies-sewing-embroidery

Finally, one of the other tasks I ticked off this week was buying some packaging to use when posting my shop orders. I bought envelopes, etc, of course, but I also stocked up on pretty stripey paper bags. They're so lovely I've popped some in the shop. They're available in blue or sunny yellow, and I'm selling them in bundles ranging from 10 to 100 bags.

https://www.lauralupinhoward.com/category/supplies-craft-books

As I've mentioned before, my shop is currently set up just to accept orders within the UK because of the effect COVID-19 is having on the post. However, if you're based elsewhere and are happy to wait for your order to arrive, please do get in touch and I can give you a quote for postage and sort the payment out via Paypal.

Thursday, 31 January 2019

Creating Patchwork Cross Stitch from Leftover Embroidery Threads

Look what I finished!!

Scrappy Patchwork Cross Stitch Textile Art

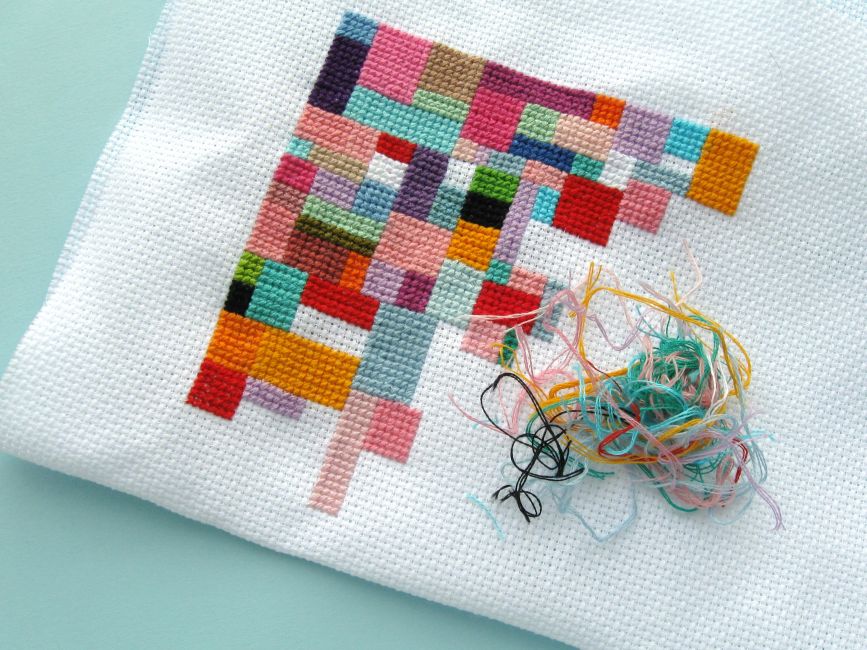
I started this patchwork cross stitch project way back in 2014, as a way to make use of those scrappy bits of leftover embroidery thread (floss) which aren't quite big enough to be worth keeping and winding back on the bobbin but which still have a few stitches left in them.

I saved up the threads in a compartment in my embroidery thread storage box, then would sit and do a whole batch of stitching in one evening - slowly building up the patchwork design in blocks of colour. It was a super relaxing process!

Scrappy Leftover Embroidery Threads
 Scrappy Patchwork Cross Stitch Textile Art

As I wrote when I blogged about this project last year, "I guess I could add a block at a time, each time I have a piece of leftover thread, but I quite like spending a few relaxing hours working on this from time to time. Plus, adding a bunch of colours at once helps me make the randomness of this project more of a controlled randomness - I can spread out the colours more easily, and get a more pleasing mix of tones and shapes than I think I would end up with if I added a block each time I had a scrap of thread to use up.

I like the randomness of this project and how the colour palette (and the speed at which it's growing) is entirely dictated by what other projects I'm working on, and the luck of what size thread scraps I'm left with... but I also want it to be something I love the look of when it's finished!"


To read more about how this piece has developed, click here to read all about how the project has progressed over the years and see lots of in-progress photos.

I'm really pleased with how the finished piece has turned out - someone pointed out that it looks like a tiny quilt, and it totally does! It's about 6 inches (15 cm) square and absolutely jam-packed with colour. Loads of happy hours of stitching have gone into it, but it also represents even more hours of stitching as, of course, these are all just the leftovers from other projects!

Scrappy Patchwork Cross Stitch Textile Art
Geometric Cross Stitch Textile Art

And - to think! - all those threads would otherwise have just gone to waste. It's going to be really hard breaking the habit of keeping my scrappy bits of thread now... maybe I'm going to need to start another leftovers-themed project? Hmm...

Want to make your own patchwork design from leftover threads? Simple! Just start keeping your own leftover threads, stitch them in blocks and just keep on going until you've slooooowly filled up a whole square with colour.

A patchwork design like this is also a great way to use up a whole bunch of embroidery threads from your stash, you don't specifically need to be using leftover threads. Just have fun playing around with colour combinations and shapes!

Last year several people asked me for the pattern for this design, which isn't really something I can properly share as I've used to many random colours making this piece. BUT, I have drawn out a chart of how my design ended up, in case you like how the arrangement of blocks look and fancy replicating it. You can use my photos as guide when picking colours and/or use felt tips or coloured pencils to colour in your printed chart to help guide your stitching.

Click here to view the chart in a new window or tab, make sure you're viewing it full size then print.

Patchwork Cross Stitch Chart

P.S. For even more scrappy goodness, check out my Patchwork Mini Squares blanket, knitted from yarn left over from many years worth of knitting projects.

Subscribe to my newsletter for a monthly free pattern and visit my crafty tutorial archive for lots more free projects.

Visit my shop to buy my printable PDF sewing patterns:


Tuesday, 22 January 2019

Send Happy Snail Mail With Vintage Stamps & DIY Envelopes!

One of my New Year's Resolutions for 2019 is to make time to send more snail mail to my friends and penpals. Maybe that's something you'd like to do more of, too? In this post you'll find two fun and easy ways of making the snail mail you send extra special...

Did you know you can use old-but-not-used Royal Mail postage stamps for sending your post here in the UK? I recently bought a big bundle of old mint stamps for my letters, and using them is proving to be an absolute joy!

colourful envelopes decorated with vintage postage stamps

I bought a big bundle of stamps, giving me lots of different designs and values to choose from when making up the correct postage value and saving me money, too (always a good thing when you send a lot of post - snail mail is wonderful but stamps are rather pricey these days!). I bought my stamps from here.

Sorting through the bundle when it arrived was a huge amount of nerdy fun. So many lovely old stamps! And so many possibilities for getting creative with my letters!

lots of vintage postage stamps

Even if you just selected any old stamps to make up the correct postage the result would be pretty cool: a handful of quirky old stamps (some with ha'penny values!) are always going to be more exciting than just a single modern one. But of course (OF COURSE) I've been playing with colour and themes when putting together the stamp selections for my mail.

Carefully selecting the stamps can be rather a time suck but totally worth it, I think! I described this as "a bit of a waste of time" to a friend recently but, as he immediately pointed out, actually it's not a waste of time at all: I've been enjoying it as a relaxing task while watching TV in the evenings, and the end results can be rather wonderful.

This week I've been playing with colour, matching stamps to a set of fabulous notecards I got for Christmas.

 colourful notecards and coordinating rainbow postage stamps

In case you're admiring the notecards (and why wouldn't you be?), they're the "Pen to Paper Notecards" set by Present & Correct for Chronicle Books. Mine were bought from Waterstones here in the UK, but those of you in the US can buy them direct from Chronicle Books.

Here's a closer look at the cards and the stamps I've used:

colourful notecards and coordinating postage stamps
colourful envelopes and coordinating postage stamps

All that lovely colour makes me very happy indeed.

The second thing I've been doing recently to jazz up my post is making my own handmade envelopes. I've made some from coloured paper, but I've also been making lots from a book of maps and a gorgeous book of British wildflowers.

making DIY envelopes from old books

When you use book pages to make envelopes the end results are so pretty, and totally unique! Oh, and the books only cost me about a quid each at my local charity shop so they're a bargain, too.

If you've never made an envelope before, don't worry: they're so easy to make that you'll wonder why you never tried it before.

Just unfold an envelope that's the size you need (or download and print a free template from the internet - there are loads available), stick it to a bit of card and trace the shape onto the back of whatever nice paper you want to use. Then cut, fold and stick (with glue or double-sided tape) the envelope together and add a plain label for the address when you're ready to send it. Remember to position your template so the paper will be the right way up on the front of the envelope!

Cheap second hand books are perfect for making envelopes, though you may need to use different size envelope templates depending on the size of the pages. If you need to make envelopes of a specific size, simply take the template with you when you go browsing for books to use.

I also love making envelopes from leftover gift wrap and colourful magazine pages. Sometimes my stamps used to fall off my letters en route when I sent "magelopes" as a teen, but with modern postage stamps being like stickers it's much easier to use shiny paper for making your envelopes without worrying about the stamps going AWOL.

I won't be combining these two happy post ideas and using a selection of vintage stamps with my book envelopes - I think the effect would be a little visually cluttered and I'd hate to cover up those lovely flowers and maps! Instead I'll be keeping my eye out for some suitably lovely Special Stamps, or using some of the pictorial definitives, either of which are much prettier options than standard 1st/2nd class stamps, if you care about that sort of thing (which, as you've probably gathered by now, I totally do). 

Monday, 18 June 2018

Scrappy Patchwork Cross Stitch: Another Colourful Work-in-Progress.

As well as having an actual patchwork quilt in progress, one of my other UFOs (UnFinished Objects) is a cross stitch homage to patchwork quilts: a colourful patchwork of blocks stitched from Xs of thread instead of fabric.


I started this cross stitch back in 2014, as a way to make use of those scrappy bits of leftover embroidery thread which aren't big enough to be worth keeping but still have a few stitches left in them.
 
By March 2015 I'd stitched 23 little blocks of colour...


... and by June that year it had grown to 40-something blocks and looked like this:


I've been working on this in stops and starts over the years. I save up thread scraps when I have them, then sit down to add a little batch of blocks when I've got a decent amount of thread saved up.

I guess I could add a block at a time, each time I have a piece of leftover thread, but I quite like spending a few relaxing hours working on this from time to time. Plus, adding a bunch of colours at once helps me make the randomness of this project more of a controlled randomness - I can spread out the colours more easily, and get a more pleasing mix of tones and shapes than I think I would end up with if I added a block each time I had a scrap of thread to use up.

I like the randomness of this project and how the colour palette (and the speed at which it's growing) is entirely dictated by what other projects I'm working on, and the luck of what size thread scraps I'm left with... but I also want it to be something I love the look of when it's finished!   

By October 2015 it looked like this...


... and it grew a little in July and August 2016.


I didn't photograph it for a while, just quietly collected leftover threads...


... and added blocks in little batches, until it December last year when it looked like this:


That photo ended up being really popular on Instagram after it got featured by A Beautiful Mess (very exciting!) and quite a few people asked me for the pattern. I don't think this is something I could really do a proper pattern for, though, as I'd have to find matching colours for soooo many random bits of thread.

I am thinking about drawing a chart of the blocks when it's finished (in case anyone wants to copy the exact pattern of shapes I've chosen) but really the best way to replicate this project would be to use your own leftover threads from your stitching projects and make your own unique patchwork piece. I find it a really relaxing project to work on, and it's hugely satisfying creating something so colourful from scraps that would otherwise have just been thrown away.

At the moment it looks like this:


As you can see, I've decided to make this piece a square one instead of filling the whole of the fabric. This is because a) I think it looks great as a square (and it'll look fabulous when its framed) and b) I wanted to reign it in a little so I don't end up cross stitching little coloured blocks forever.

Now there's a limited number of spaces left to fill up, the end is in sight... but who know how long it will take me to actually have the scraps (and the time) to fill them and get this piece finished!

Monday, 14 May 2018

The Evolution of a Rainbow Blanket

Blogging about my mini patchwork squares blanket last month made me realise that I never got round to properly photographing my rainbow blanket when I finished it a couple of years ago. I blogged about it being almost finished, and said I'd take photos of it finished "sometime soon" but, alas, never found the time and here we are two years later already.
 
I love my rainbow blanket, and really enjoyed making it so (as with the mini squares blanket last month) so I'm taking a look back at how it's developed over the years before having a "yay! finished blankets!" photo session.


In my teens I knitted a couple of blankets as gifts for my family, and also knitted a whole bunch of squares that never got used for anything. I rediscovered them in my 20s and began very slowly knitting more squares so I could finally turn them into a finished blanket. Or, rather, two blankets, because teen me (by accident? or by design??) had been knitting two different sizes of squares!

I finished the first blanket in 2013 (click to see pictures!), and in 2014 was busy knitting squares in assorted bright colours to add to the second blanket. All the squares were knitted in plain garter stitch, using double knit acrylic yarn and UK size 8 (4mm) knitting needle, casting on 30 stitches to make squares measuring approximately 14cm. 

At this point I had a whole bunch of dark grey squares in the mix (knitted with yarn left over from my sky blanket) and was thinking about putting the squares together in a block design similar to the one I was using for my mini squares blanket.
 

I wasn't totally happy with this layout, though, so I just focused on knitting squares from the yarn I already had and added in a few more colours I thought would blend in well.


In October that year I took out the darker squares and arranged the others in colour order and they just POPPED so the grey definitely had to go (I unravelled them and re-knitted them as mini squares for my patchwork blanket). 


By July 2015 I had 70 squares knitted, but the colour mix was looking a bit imbalanced.


I thought about just adding in some greens to balance out the "hot" reds and pinks, but decided to go for the full spectrum and cram in as many bright, happy colours as possible. So I bought a few more balls of yarn in zingy shades and continued slowly knitting more squares.
    

Frustratingly, when playing around with possible layouts for the blanket, I realised that a whole bunch of the squares were too big! (I guess I must have muddled up my knitting needles at some point?) I unravelled them all and started re-knitting them the correct size in the summer of 2015.


I spent the autumn of that year knitting a lot of blanket squares...


  ... and by November my stash of squares looked like this:


In December 2015 I finally sat down and planned the final layout. I'd been building up my rainbow spectrum stash without any real plan and was very pleasantly surprised by how easy it was to fit all the squares together; I just needed some more green!


I started stitching the outer sections of the blanket together...


... bought a final ball of bright green yarn, and began knitting green squares.
 

I finished knitting the very final square while watching Eurovision in May 2016 (I love Eurovision), then immediately started adding the remaining squares to the blanket.


I couldn't stop smiling while weaving the in the last few yarn ends; those colours just burst with happiness!


I wove in and trimmed the last of the yarn ends on May 25th 2016.


I've used the blanket a lot since then (I'm actually sitting on it right now as I type this) and it brings me joy on a daily basis. I hope I'll have a chance to take lots of snaps to capture that rainbow joy and properly show it off in another blog post sometime soon!

In the meantime... for more blanket-y goodness, follow the links to read about the making of my patchwork mini squares blanket, or my sky blanket.