Showing posts with label take to the sea. Show all posts

Monday, 13 August 2018

TAKE TO THE SEA Hoop Art Tutorial

UPDATE: this tutorial is now available in my Patreon pattern library.

Subscribe to get instant access to a growing library of PDF embroidery patterns and craft tutorials, and updates when I add something new!

---

July's freebie for my newsletter subscribers is a step-by-step tutorial for sewing some nautical embroidery hoop art!

http://eepurl.com/dvfYO1

I took a break during July itself, so I'm catching up this month by sending out two patterns. I'm sending out the offical (albeit slightly belated) July edition of my free pattern newsletter to subscribers today... but if you're not yet signed up, there's still a chance to grab this pattern.

I hate the idea of people signing up slightly too late to receive one of my monthly patterns, so in each free pattern email I send I'm including the link to download the new pattern and the previous month's project. So, if you sign up before August 25th you'll get the link to download the TAKE TO THE SEA Hoop Art tutorial as well as August's floral project. Hurrah!

http://eepurl.com/dvfYO1

The TAKE TO THE SEA tutorial includes templates and a step-by-step guide for sewing the felt version of this design, plus an embroidery pattern in case you fancy replicating my original project or putting your own stitchy twist on it.

http://eepurl.com/dvfYO1

Click here for more information about my newsletters and to subscribe!

Click here to visit my tutorial archive for lots more free crafty projects.

Monday, 30 July 2018

Long Time No Blog!

Things have been a bit quiet on my blog this summer, but I've been busy behind the scenes planning lots of fun new stuff that I can't wait to share with you guys.

Because of my break, if you're signed up to my monthly free pattern newsletter you'll get two emails in August with two free projects.

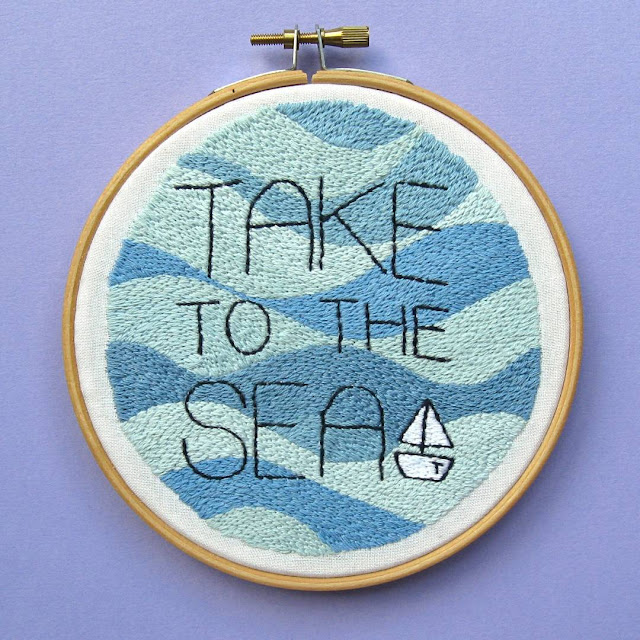
First up: I'm working on a felt version of my "Take to the Sea" hoop art.

http://eepurl.com/dvfYO1

I stitched this for a friend a couple of years ago and, as an embroidery project, it was pretty labour intensive! I've been thinking about making a simpler felt version of this design for ages and this seemed like the perfect opportunity to give it a try.

http://eepurl.com/dvfYO1

I always include a link to the previous month's freebie in each of my free pattern newsletters, so no matter what time during the month you sign up you'll definitely receive that month's pattern.

(Actually, when I send my "July" newsletter, you'll get the links for June's rag doll project AND May's felt flowers tutorial because I got so distracted worrying about the formatting of my June email having switched email providers that I forgot to share the previous month's link as usual - oops!).

Not yet subscribed? Click here for all the details! For more crafty goodness you can also subscribe to my weekly crafty newsletter, or updates about new patterns in my shop and special offers.

Monday, 22 August 2016

Take to the Sea: a Nautical Embroidery Project

UPDATE: this embroidery pattern is now available in my Patreon pattern library.

Subscribe to get instant access to a growing library of PDF embroidery patterns and craft tutorials, and updates when I add something new!

---

I finally finished my "Take to the Sea" embroidery! Hurrah!


I had so much fun stitching this project, and I'm really pleased with the (slightly wonky) end result. Brace yourself for an avalanche of photos...

Back in early July I decided I wanted to stitch something in celebration of the late, great website The Toast - as a gift for a Toast-loving friend.

I started with a sketch: one of the unofficial mottoes of The Toast - "take to the sea" - plus some abstract waves and a little boat with a T (for Toast). I wasn't sure how I wanted to stitch it (or even what materials to use) but eventually settled on embroidery.


I traced the design in pencil onto some white fabric and stretched it in an embroidery hoop. I started with the motto, sewing the letters and the outline of the boat with backstitch and half strands of very dark blue embroidery thread (floss). I then began slowly stitching the waves.


I used half strands of blue embroidery thread for each wave, sewing curving lines of backstitch to gradually fill the space.

I started at the top of each wave and worked downwards. When I got near the bottom of a wave I'd sew the top line of the next one to make sure I could then sew right up to the new colour.


I have to admit that I got slightly addicted to working on this, and stayed up late several nights in a row working on it!


It took a lot of hours of stitching to complete all the waves, but it was such a relaxing process - and so satisfying seeing the piece develop. 


I ran out of thread a couple of times and had to stitch some of the waves in two similar shades. When this happened I made sure to make the dividing line between each block of colour a nice organic wave shape to fit in with the rest of the design.


Sadly my chosen hoop wasn't tight enough and the fabric got pulled about a bit as I stitched so the original circle shape got a bit distorted, but who cares?


Okay so the perfectionist part of me is kinda bothered by this, but for a first attempt stitching something this detailed I'm very pleased with how it turned out. And this is the joy of personal projects (as opposed to things with deadlines and paychecks) - you get the chance to experiment with new things and it doesn't matter so much if they don't turn out 100% "on brief".

Once I'd finished the waves, I used white embroidery thread to "colour in" the little boat and its sail.


This is what the back looked like when the whole piece was finished: so much thread!


After the excitement of finishing the embroidery it took me a couple of weeks to get round to tidying up the hoop, trimming the excess fabric and finishing the back neatly with a circle of felt to cover all the mess.


Here's how it looked before I packed it up and popped it in the post...


A little different to the original sketch, but close enough!


 I love the texture of all that dense stitching. Lots of work, but totally worth it. 


I kind of want to spend all my spare time embroidering things now! Mmm... embroidery...

Fancy a stitchy project of your own? Click here to find all the free embroidery patterns I've shared on my blog.

Monday, 11 July 2016

Take to the Sea: a New Project in Progress!

UPDATE: this pattern and a matching felt project are now available in my Patreon pattern library!

Subscribe to get instant access to a growing library of PDF embroidery patterns and craft tutorials, and updates when I add something new!

-------

I have so many things in my "work in progress" pile, but what did I do this weekend? Yup, you guessed it: I started something new.

It's a gift for a friend who loves (or, should I say loved) the now-shuttered website The Toast. I wanted to stitch her a little something with one of the Toastie mottoes - Take To The Sea - and after an evening's doodling I eventually settled on a design with lots of waves and a little boat (with a T for The Toast, of course!).


I wasn't 100% sure how I was going to stitch the waves, so yesterday I made a start on embroidering the lettering and thought "well, I'll just see how this goes!"

The words and the boat are stitched with a very dark blue embroidery thread (floss) and backstitch. I'm a bit annoyed by that wonky T in the top line, but I am also trying to be a bit less of a beat-myself-up-about-tiny-mistakes perfectionist with my crafting so let's just ignore that and move on...


I tried out a couple of different options for the waves and decided to go with the most labour-intensive: filling in all the white space with backstitch in shades of blue.

This is gonna take a looooong time and use a lot of thread, but I'm really pleased with how it's looking so far. The text seems to be standing out nicely from the surrounding colour and I love the texture of the waves.


I'm not sure what colour(s) I'm going to use for the boat yet - maybe just white? We shall see. I've got a lot more waves to stitch before I have to make a decision about that anyway.

It's going to take me many, many evenings to finish this piece. Luckily the process is a very relaxing one! I'll be blogging about my progress and posting lots of pics over on my Instagram.