UPDATE: I'm gradually turning my bird designs into sewing patterns! My poppy pattern is available, too! Visit my shop to see all my printable PDF patterns:
Sunday, 30 November 2008
Lazy Days
I have a big pile of sewing I ought to be attending to today, including a whole tin full of birds and poppies... ... but instead I am feeling all Christmas-y and have been wrapping a few presents, doing a bit of Christmas crafting and curling up under a pile of blankets drinking tea and eating lots and lots and lots of yummy Lebkuchen:
UPDATE: I'm gradually turning my bird designs into sewing patterns! My poppy pattern is available, too! Visit my shop to see all my printable PDF patterns:
Saturday, 29 November 2008
Pssst
I'm rather busy today, so no time for a proper blog post (sorry!) but I wanted to mention that I am (rather excitingly) only one sale away from hitting 1,400 items sold in my Etsy shop (yay!).
To celebrate such a big number the person who buys the 1,400th item will be getting a big bundle of freebies with their order :)
Friday, 28 November 2008
Floral Treasures
Look what I got!
I fell in love with this vintage crockery I spotted in a charity shop a couple of weeks ago, mentioned it to my boyfriend and lo it appeared in our kitchen:
(that's my parcel packing station, aka our kitchen table, in the background). The boyfriend (who is very long suffering) reports that he can't stand the pattern and thinks I am quite mad for liking such things, but I am just in love with that orange: so springlike and cheerful and fresh! I can picture the teaparties already...
I also got another lovely parcel in the mail today, this time from FlowerPress - two lovely 'Filigree' teatowels:Gorgeous additions to my kitchen linen, and the packaging is rather nice too! They're printed with environmentally friendly inks, and are available in lots of awesome colourways (I had such a hard time choosing). They're also on sale at a discount price until December 2nd to celebrate the first year of Flower Press.
Susie's blog is the newest addition to my blogroll, described as "a mix of art, design, inspiration, horticulture... and other stuff" it makes for a lovely flower-infused read - and I'm not just saying that because she was sweet enough to blog about my Christmas giftwrap ideas, I swear! :)
Thursday, 27 November 2008
Hopelessly Addicted
I just couldn't resist ordering some more delicious fabric from Summersville, not when I have Christmas presents to sew and there are oh-so-lovely new colourways like purple and teal:Gorgeously wrapped as before...... that lot should keep me busy for a while!
If like me you're a fan of Lucie's patterns but unlike me have no inclination or excuse to buy her fabric, don't despair! She also sells lots of items ready-made with her screen-printed designs including these super stylish Christmas ornaments:
Labels:
christmas,
colour,
inspiration,
lovely things,
shopping,
supplies
Wednesday, 26 November 2008
Guest Blogging + Coming Soon...
As I mentioned briefly yesterday, I'm really excited to have been invited to be a guest blogger over on the awesome Paper and Stitch blog. My giftwrapping posts will be reappearing over there during the next few weeks and it will be fun (for me at least!) to see my words on someone else's blog... Those of you who have already been following my tutorials will be familar with them already but if you're interested you can read the mini introductory interview posted today, chatting about my work and my blog and things like that.
I have a few more crafty Christmas ideas brewing in my brain and I'll be posting them over the next couple of weeks as we creep ever closer to the day itself - some more ideas for giftwrapping, ideas for making simple xmas decorations PLUS patterns & instructions for making cute lavender sachets from felt & fabric:
(The adorable house fabric is Avenue by Summersville). I'm making rather a lot of these this year so I hope not everyone I know reads my blog!
PS if you're looking for a quick crafty idea for stocking stuffers you might be interested in my very first tutorial from way back in July for simple felt flower hairpins:
Labels:
blogging,
christmas,
fame and glory,
tutorials
Tuesday, 25 November 2008
Juvenalia
I went to visit my parents today so haven't had time for a proper blog post, but just wanted to share this quick snap of an early bit of my applique work proudly displayed in my parents' living room....
... a cushion-cover I made for a GCSE Textiles project when I was about 15 :)
Also, I am quite excited about THIS. I've never been a guest blogger before...
... a cushion-cover I made for a GCSE Textiles project when I was about 15 :)
Also, I am quite excited about THIS. I've never been a guest blogger before...
Monday, 24 November 2008
Gift Wrap Ideas # 5: Snowflakes
Today's gift-wrap idea is sweet and simple - decorate your parcels with paper snowflakes!
Start with a nice plain parcel or three...
I used brown paper / kraft paper (far right), lovely gold paper for a festive feel (gold and red are such classic warm Christmas colours), and faux bois vinyl for a modern twist (I can't get enough of it this Christmas!)
To make your own faux bois wrapping paper, cut out a piece of brown or other plain paper slightly larger than the size you need for your gift plus a matching piece of adhesive wood-effect vinyl (aka sticky back plastic, or contact paper). Then apply your vinyl with great care to the brown paper, trim off any messy edges and hey presto: woodgrain giftwrap! It's obviously a bit stiffer than normal wrapping paper but great for wrapping boxes or books or other easy shapes.
Now make some paper snowflakes! You can find some simple instructions here complete with photos (though I never draw my shapes on with pencil, I just cut out freehand). The more pieces you cut out the more detailed your snowflake will be but remember that this will also make them more delicate. For a trendy variation on this, you could skip this stage and buy some fancy paper doilies instead.
When you've got an assortment of snowflakes ready, apply glue to one side (I used prittstick for this which was a bit fiddly, some sort of spraymount would be ideal) and carefully stick them to your waiting presents - I carefully positioned the snowflake to cover the wrinkles I made when sticking the wood vinyl! My gifts were quite small so I just used one off-centre snowflake for each gift, but for a larger item you could create a whole snowstorm.
As a final finishing touch I tied all three gifts together in a stackusing red yarn instead of ribbon (for a nice bit of colour) and attached a woodgrain tag (and then forgot to take a photo, sorry). It's very easy to use leftover bits of vinyl or other paper to make matching tags, and you could even make mini snowflakes for the tags...
Please feel free to borrow photos if you want to blog about this project, but remember to credit me and link back to the original source, and do not reproduce my entire tutorial on your site. Thanks!
Enjoyed this gift wrapping idea? Buy me a "coffee" and help support my blog!
Subscribe to my newsletter for a monthly free pattern and visit my crafty tutorial archive for lots more free projects.
Visit my shop to buy my printable PDF sewing patterns:
Start with a nice plain parcel or three...
I used brown paper / kraft paper (far right), lovely gold paper for a festive feel (gold and red are such classic warm Christmas colours), and faux bois vinyl for a modern twist (I can't get enough of it this Christmas!)
To make your own faux bois wrapping paper, cut out a piece of brown or other plain paper slightly larger than the size you need for your gift plus a matching piece of adhesive wood-effect vinyl (aka sticky back plastic, or contact paper). Then apply your vinyl with great care to the brown paper, trim off any messy edges and hey presto: woodgrain giftwrap! It's obviously a bit stiffer than normal wrapping paper but great for wrapping boxes or books or other easy shapes.
Now make some paper snowflakes! You can find some simple instructions here complete with photos (though I never draw my shapes on with pencil, I just cut out freehand). The more pieces you cut out the more detailed your snowflake will be but remember that this will also make them more delicate. For a trendy variation on this, you could skip this stage and buy some fancy paper doilies instead.
When you've got an assortment of snowflakes ready, apply glue to one side (I used prittstick for this which was a bit fiddly, some sort of spraymount would be ideal) and carefully stick them to your waiting presents - I carefully positioned the snowflake to cover the wrinkles I made when sticking the wood vinyl! My gifts were quite small so I just used one off-centre snowflake for each gift, but for a larger item you could create a whole snowstorm.
As a final finishing touch I tied all three gifts together in a stackusing red yarn instead of ribbon (for a nice bit of colour) and attached a woodgrain tag (and then forgot to take a photo, sorry). It's very easy to use leftover bits of vinyl or other paper to make matching tags, and you could even make mini snowflakes for the tags...
Please feel free to borrow photos if you want to blog about this project, but remember to credit me and link back to the original source, and do not reproduce my entire tutorial on your site. Thanks!
Enjoyed this gift wrapping idea? Buy me a "coffee" and help support my blog!
Subscribe to my newsletter for a monthly free pattern and visit my crafty tutorial archive for lots more free projects.
Visit my shop to buy my printable PDF sewing patterns:
Labels:
cards and wrap,
christmas,
gifts,
lovely things,
tutorials,
winter
Sunday, 23 November 2008
A Craftier World
Yay, the latest issue of Craftier has been published! I do like a nice crafting magazine - especially a free one like Craftier - but I'm particularly excited about this issue because they interviewed me!So exciting seeing my teacups photo on the contents page...
... and I get a whole double-page spread all to myself & am introduced as "one of the crafting world's hottest felt designers". Heehee! Blushing now.
You can view or download the whole issue here - be sure to check out the fab crafty tutorials throughout, especially the cute recycled paper ornaments and bows (I'm definitely going to have to give those a try when I wrap some more presents).
Saturday, 22 November 2008
Best Hugs in Show?
Here's a quick and slightly grainy snap of the rosette brooches I made last night...
... available on Etsy and now on Folksy, too. All that pink is very much cheering me up during these grey and wintery days and I've also been greatly entertained thinking of things you'd have to win to get awarded one of these...
Friday, 21 November 2008
Gift Wrap Ideas # 4: Vintage Stamps
If you're attracted to the "brown paper packages tied up with string" look because you yearn for an old-fashioned Christmas, you can add an extra special retro feel to your parcels with some vintage stamps...
The simplest option, as always, is just to decorate your tags - you could use luggage tags or make your own like I did by sticking brown paper to scrap pieces of card:
A single special stamp (I adore those little birds!) can be enough for a smaller parcel, but for larger tags try repeating the same stamp or using matching sets.
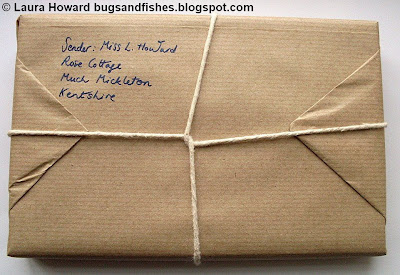
For some real crafty fun though, transform your plain brown paper package into a vintage-looking parcel:
Essential ingredients of this look are:
- lots of stamps, with added postmarks
- a piece of string, the older and more well used the better
- and a nice fake Agatha Christie style address written with a fountain pen. All your friends can be Lords, Ladies, Colonels, Majors, etc living in an assortment of invented English villages!
When you wrap your parcel, use double-sided tape if you can to give the illusion that it is the string alone which is holding your parcel together:
You can easily scale down this idea and make fake letter tags instead:
I used a small brown envelope with the flap glued down, but you could make your own using a small template like this one.
I'm a total stamp nerd so I had plenty of stamps on hand for this project, but you should be able to pick up a mixed bag of stamps pretty cheaply or you could just be very nice to any stamp collectors you know! (they usually have an abundance of Christmas stamps simply because of the sheer volume of Christmas cards people send).
Oh, and whatever you do don't try and actually post your parcels! Not without wrapping them in another layer and putting valid stamps on them first, anyway :)
Please feel free to borrow one or two photos if you want to blog about this project, but remember to credit me and link back to the original source, and do not reproduce my entire tutorial on your site. Thanks!
Enjoyed this gift wrapping idea? Buy me a "coffee" and help support my blog!
Subscribe to my newsletter for a monthly free pattern and visit my crafty tutorial archive for lots more free projects.
Visit my shop to buy my printable PDF sewing patterns:
Labels:
cards and wrap,
christmas,
gifts,
tutorials,
vintage
Thursday, 20 November 2008
Doing It Yourself
Wow, I am so delighted with the reaction to my gift-wrap tutorials! Thanks so much to everyone who has left a comment here or over on my Flickr... and to the lovely people at Craft for giving my Faux Bois wrapping a mention. I also spotted one of my parcels over on Apartment Therapy (eee! so exciting!) in a nice little article about alternatives to expensive giftwrap.
I'm definitely picking up on a do-it-yourself, thrifty-but-chic vibe around Christmas this year. Not everyone wants to make homemade jam, or can knit everyone scarves, or has friends that want that sort of thing (I know my dad for one would be very unamused if I presented him with a badly knit scarf or a felt badge instead of a nice book!) ... but I've heard a lot of people talking about giving one or two special gifts instead of the usual pile, and about saving a bit of cash on the wrapping paper.
So many people seem to be opting for the simple brown paper look for their gifts - one person mentioned white Kraft paper, which sounds amazing and achingly chic - but I think there's a lot to be said for getting a bit Blue Peter and having the sort of crafty fun I've been having with my parcels! I think the extra time and love you put into your giftwrapping can really help make the gift-giving special, just like how making a birthday card for someone feels much more personal than just spending £2 in WHSmiths. 'Tis the thought that counts, after all...
Oh and if you were wondering why there have been so few of my usual crafting photos recently, don't worry I'm still sewing - I'm busy behind the scenes with a mix of custom orders and top secret Christmas presents, shhh!
A totally unrelated PS, check out the awesome vintage tablecloth I picked up from a charity shop this week, with tea-themed embroidery in each corner (I especially adore the teapot)
Labels:
blogging,
christmas,
fame and glory,
gifts,
lovely things,
shopping,
tea,
vintage
Wednesday, 19 November 2008
Gift Wrap Ideas # 3: Faux Bois
There's no escaping this year's woodland trend, with oak leaves, acorns, squirrels, deer, tree stumps and of course good old faux bois (fake wood grain) popping up all over the place. You may even be buying some Christmas gifts with a forest-y feel to them, so why not extend this trend to your parcel wrapping?
The key ingredient to get this look is a roll of dark wood-effect sticky back plastic / self-adhesive vinyl / Fablon / whatever else it might be called in your part of the world! I was lucky enough to find a roll for the princely sum of 49p in a local charity shop (amazingly this find happened the very day I thought of this idea, like some sort of charity shop magic) but you should be able to get a roll quite cheaply from your local DIY emporium:
Start with a nice plain parcel, wrapped in brown paper:
Measure round your parcel, cut a piece of the vinyl to fit the way you want (I opted for a large decorative band around the width leaving the folded ends free for easier unwrapping) and apply it very carefully:
You might want to try applying a test piece to get your technique right before trying it out on your real parcels. Also remember to cut enough to have a bit of overlap and to start on the back of your parcel so the join is hidden and so it won't matter if you don't stick it exactly straight...
If you are a true minimalist this may be enough for you, but if not you'll need a bit of yarn or ribbon or rustic-looking twine...
... I only had a small bit of this and had to cheat and stick the ends to the underneath of the parcel with sticky tape (tsk tsk) but ideally you want to tie your knot on top of your parcel leaving a few inches of string left for securing your leaves.
The leaves are simple brown paper oak leaves, like the ones from yesterday's garland how-to (leaf templates included) but with a hole punched in each of them. These are a great way of re-using old brown envelopes, and using a mix of envelopes will give a great mix of browns and different paper textures. For each parcel you'll need three or four leaves in an assortment of sizes plus one large leaf to use as the tag.
Glue the large leaf to some thin card, cut it out and (if you want to) draw on some detail with a black biro or marker pen. Then punch a hole near one end - you can attach some string as I've done here
- or attach the tag directly to your parcel with the string already tied round it. Tie the tag and the other leaves to your parcel in a bunch. If you wanted you could draw the vein detail onto all your oak leaves but I quite like how the tag stands out here:
A simple oak leaf tag like this would make a sweet addition to a more traditional Christmas parcel, or you could make simple woodgrain tags with leftover pieces of your vinyl. Stick your leftover section to a piece of card (I used a cardboard box from some shortbread we scoffed this week) ...
... then draw your shapes on the card in pencil, cut them out, punch a hole and attach some string and voila! Terribly fashionable faux bois tags:
PS, can't get your hands on any wood-effect paper? For a lo-fi, DIY version you could always just take a marker pen to some brown paper and make your own woodgrain giftwrap - just remember to do this before you wrap your parcel so the marker doesn't seep through to your gift!
Please feel free to borrow one or two photos if you want to blog about this project, but remember to credit me and link back to the original source, and do not reproduce my entire tutorial on your site. Thanks!
Enjoyed this gift wrapping idea? Buy me a "coffee" and help support my blog!
Subscribe to my newsletter for a monthly free pattern and visit my crafty tutorial archive for lots more free projects.
Visit my shop to buy my printable PDF sewing patterns:
Labels:
autumn,
cards and wrap,
christmas,
christmas tutorials,
faux bois,
gifts,
lovely things,
oak leaves
Tuesday, 18 November 2008
Paper Leaf Garlands - a quick 'how to'
While working on some woodland-themed gift-wrap ideas this week I got totally distracted making garlands instead...
I had Christmas in mind when I first made these and I think the brown oak leaves would look lovely strung along a mantlepiece and combined with more traditional Christmas colours like baubles and ribbon in red and gold... but they're also obviously suitable for autumn decor.
First you need to make some leaf templates - you can gather your own leaves and draw round them onto card, or print & cut out the sketches at the bottom of this blog post.
Now draw round your templates with a soft pencil onto brown paper (you could reuse old envelopes for this) - I just used my oak leaf templates for this -
or bright sugar paper (construction paper) in autumnal shades: Once you've cut out lots of leaves (it takes time but it's well worth it!), sew them together using an ordinary sewing needle and a length of brown thread. Sew one short stitch at the end of your first leaf, then a long stitch along the back, and another short stitch... then repeat until you run out of leaves! You can use a bit of sticky tape to hold your thread ends in place, and then a small bit of bluetack will support your garland as the leaves are so lightweight. You could also try stringing small lengths of leaves together and hanging them vertically: they spin beautifully!
Here are the leaf templates - double click them to view full size and print. When you cut them out ignore some of the detail and aim for an easy-to-cut shape. If you wanted to add some more detail to your garlands use a marker pen to copy the vein patterns onto your paper leaves:
This template is for non commercial use only. Please feel free to borrow photos if you want to blog about this project, but remember to credit me and link back to the original source, and do not reproduce my entire post on your site. Thanks!
Monday, 17 November 2008
I Take it all Back...
... I hate autumn! Well, I hate the dark dingy days that mean I can't take photos at any rate :(
I have a lovely crafty project ready and waiting to show you and it will have to wait until I have better light to take photos ... so frustrating! Ah well.
In the meantime I've been greatly cheered by lovely mentions of my gift-wrap ideas over on the Craft blog (hello to anyone visiting from there!) and some of my tea badges on Wee Birdy - as a conclusion to her fab tea-themed week of posts (as you know, I do like a nice cuppa).
PSST: if you're an Etsy member you can go vote for me in their "holiday ornament" contest this week. I won't be mad if you don't vote for my holly ornament, I promise! :D
Labels:
christmas,
competitions,
fame and glory,
photography,
tea
Sunday, 16 November 2008
The Joys of Autumn
Crisp misty mornings! Kicking up leaves! Shiny conkers! Stripey scarves!
I am totally in love with autumn at the moment, and have been choosing my projects to match... including finishing a couple of conker brooches for my Etsy shop...
... and working on some fun crafting ideas inspired by autumn leaves (coming soon!)
I am totally in love with autumn at the moment, and have been choosing my projects to match... including finishing a couple of conker brooches for my Etsy shop...
... and working on some fun crafting ideas inspired by autumn leaves (coming soon!)
Subscribe to:
Posts (Atom)