Showing posts with label thread. Show all posts

Thursday, 14 February 2019

DIY Upcycled Sewing Thread Reels Wreath

Today I'm sharing a tutorial for making a fun crafty wreath from your old empty reels of sewing thread!

Colourful yarn wreath decorated with upcycled sewing reels
 Yarn-wrapped wreath decorated with upcycled sewing reels
Yarn-wrapped wreath decorated with colourful upcycled sewing thread reels

ADVERTISEMENT: This tutorial is sponsored by Bostik, and is part of a series of crafty projects I'm sharing to promote their range of adhesives. Click here to see all the posts in the series!

I'm never sure quite what to do with my leftover thread spools - they don't really have an obvious purpose but I still can't quite bring myself to throw them away. "I'm sure these will be useful for something" I think to myself, sticking them in a box of craft supplies... and then never actually doing anything with them. I bet you guys have a bunch of stuff you keep like this, too, right?? You just never know when stuff might come in useful for crafting!

empty sewing thread reels

So, when the team at Bostik asked me to come up with a project to try out their new Fix & Flash glue I thought this would be the perfect opportunity to get out my stash of empty spools and actually make something with them.

 Bostik Fix & Flash glue

Making this wreath I also got to use up a bunch of scrappy bits of leftover yarn I'd been saving for ages AND I saved a bit of cash by making my own wreath base from a cardboard box instead of buying one. Essentially I felt like a crafty upcycling genius working on this project.

Colourful yarn-wrapped wreath decorated with upcycled sewing reels

Tip: if you don't have any empty thread reels but like idea of making one of these wreaths for your craft room, you could also make this project using a box of cheap sewing threads or those thread colours in your stash that you somehow have loads of but never actually sew with.

You will need:

- Bostik Fix & Flash (which I'm reliably informed is available at Hobbycraft) or other suitable strong glue
- Empty sewing thread reels
- A wreath base or a large piece of sturdy card (e.g. from a big cardboard box)
- Yarn for wrapping the wreath
- Leftover bits of yarn in assorted colours (or bits of felt, fabric or coloured paper)
- A sewing needle with a large eye
- Sewing scissors

If you're making your wreath base from card instead of using a shop-bought one you'll also need sturdy craft scissors, a pencil, and things to help you draw the wreath shape (I used a compass, a ruler and a large dinner plate). You will also need some PVA or other craft glue if you're decorating your reels with felt, paper or fabric.

To make the wreath:

1. If you're making your own wreath base (instead of just buying one from a shop), you'll need to cut a large ring shape out of sturdy cardboard.

I used a large dinner plate (approx 26 cm wide) for the outer circle, drawing around it with a sharp pencil. I then used a ruler to find the rough centre point of the large circle, and used a compass to draw the inner circle (approx 12.5 cm wide) around that central point.

It doesn't matter exactly what size wreath base you make or use, just ensure you've got enough space to add all your sewing thread reels!

 use a large plate to draw the wreath shape
cut out the wreath shape from strong card

2. Use some brightly coloured yarn to wrap your wreath base. Knot the end of the yarn around the ring shape, tying it securely so the knot will be at the back of your finished wreath. Then gradually wrap the whole of the wreath with yarn until the shape is evenly covered and there are no gaps for the base to peek through. When you're happy with how it looks, cut the yarn end and knot it securely at the back of the wreath.

This step is quite time consuming, but it's a lovely relaxing task to do on the sofa in the evening while watching a bit of telly!

wrap the wreath base with yarn

3. Now it's time to decorate your empty thread reels. Leftover bits of yarn are perfect for this, but you could also use pieces of felt or even colourful paper or fabric to wrap around the empty spools - just cut the colourful scraps to size and glue them in place with the appropriate craft glue.

When choosing colours you could stick to a strict colour palette for your reels, create a riot of different colours, or even create a rainbow effect across the wreath. I had lots of bits of leftover yarn in pink and other warm tones, so I chose a selection of those.

Tip: if you want a rainbow or another sweep of colour across the wreath, plan ahead and work out how you're going to position the reels before you start adding colour to them so you know which reels to add which colours to. I'd recommend using a large piece of paper and a pencil to mark out the positions of each reel, which you can then refer to as a guide when attaching them to the wreath. 

Wrap each empty reel with some leftover yarn, knotting the ends securely and trimming them neatly. Make sure both knots are on the same side of the reel, so you can hide them when you stick the reels in position! I hid the first end of my yarn under the rest as I wrapped it around the reel and used a sewing needle to help me loop the second end into the rest of the yarn to secure it.

wrap the empty reels with leftover bits of yarn
old sewing thread reels wrapped with colourful yarn

4. Once you've decorated all your spools, it's time to get out the glue and add them to your yarn-wrapped wreath base. I'd usually use a glue gun when sticking stuff onto wreaths but I often find glue guns quite awkward to work with and occasionally a bit messy (all those trailing strands of glue! and great squidges of glue that squeeze out from behind the thing you've just stuck in place!)... so I was really interested to try Bostik's new Fix & Flash glue.

using Bostik Fix & Flash glue to make an upcycled wreath

It turns out that using this stuff is half like being in a sci-fi film set in the future, and half like pretending to be a wizard because the glue sets like magic with a beam of light!

First use the fine nozzle to apply the clear glue to the back of one of the sewing reels, where it'll touch the wreath base. I'd definitely recommend test glueing something to start with as I managed to splurge glue everywhere as it was much more liquidy than I'd been expecting. Carefully position the reel and press it in place for a few seconds to create the initial hold.

attaching the first thread reel to the wreath

Then use the UV bulb at the other end to shine a beam of light for fifteen seconds onto the edges of where you've glued. And that's it! The glue has set.

using the Fix & Flash UV light beam

Make sure you follow the safety instructions when using the Fix & Flash (both the glue and the UV light), and gradually add all the reels to your wreath base. I set a little timer on my phone for 17 seconds so I could just tap that and easily time the amount of light needed. 

decorating the wreath with the upcycled thread reels

I will confess that I managed to get a bit of glue on my fingers when working on this project (oops) because I am quite clumsy and really ought to always wear latex gloves when using strong glue (because of the aforementioned clumsiness) but otherwise I was really pleased with how easy this stuff was to use. I definitely felt like I had more control over it than using a glue gun, and you can use Fix & Flash to glue loads of different materials.

I would never have tried this without Bostik asking me to create this tutorial, but I'm glad I did as I think this will be a really useful addition to my craft supplies stash!

Once you've added all the reels to your wreath it should look something like this:

finished yarn-wrapped wreath decorated with upcycled sewing thread spools

Hang the wreath from a hook or nail using more of the same yarn you used to wrap the wreath base earlier.

DISCLOSURE: this post is sponsored by Bostik, who also provided the Fix & Flash I used to make the wreath. 

P.S. Fancy some more free crafty goodness? Subscribe to my newsletter for a monthly free pattern and visit my crafty tutorial archive for lots more free projects.

Make a colourful yarn wreath for your craft room

Wednesday, 25 October 2017

Gift Wrapping with Yarn & Embroidery Thread

Today's gift wrapping ideas are all about yarn and colourful threads.

Yarn.  

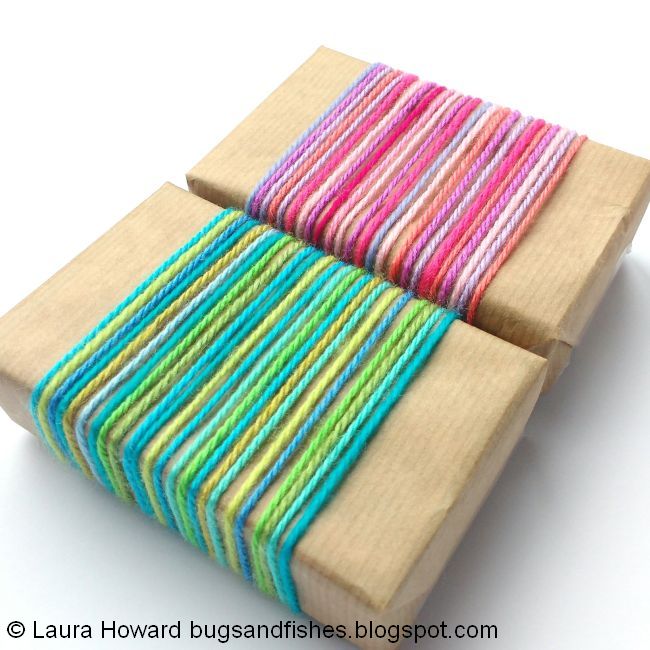
This is a really fun way to use up leftover yarn from your knitting and crochet projects! It works best for small parcels (so you can use up shorter scraps) but if you've got whole balls of yarn left over you can wrap larger gifts this way as well.


For this project I selected some colours from my stash that went together (fresh blues and greens, and bright pinks and purples), then tied lots of yarn pieces of around a couple of small parcels to form bands of colour.


Use one length of yarn to test out how long a piece you need to reach around the parcel and tie the yarn securely, then use this bit of yarn as a size guide when cutting the other pieces. Add the yarn pieces gradually, mixing the colours to create a pattern or a nice blend of shades.

Position the yarn so it's all in a neat block in the centre of the package then trim any excess yarn so the underneath of the parcel is nice and neat. You may also want to add a bit of sticky tape to the bottom of the parcel to hold the strands in place if you'll be transporting the parcel.

Woven Threads.

This idea is a lot more subtle than some of my gift wrapping suggestions, but I kinda love it anyway.


For this look, you'll need some embroidery thread (or yarn or narrow ribbons). I used two colours but you could use all one colour or combine lots of different shades (e.g. if you're using bits of yarn or thread left over from other projects).


Cut a length of thread and tie it horizontally across the parcel, with the knot hidden underneath. Trim any excess thread and secure the knot in place with a piece of sticky tape. Repeat to create several horizontal lines across the parcel. If you're using ribbon, secure each end of the ribbon with sticky tape instead of knotting it so the ribbon lies totally flat against the parcel.

Then repeat this process with the second colour, creating vertical lines. This time, weave the thread between the horizontal threads (over, under, over, under, and so on) before securing it. Ta-da! One woven parcel.

Enjoyed this gift wrapping idea? Buy me a "coffee" and help support my blog!

Buy Me a Coffee at ko-fi.com

Subscribe to my newsletter for a monthly free pattern and visit my crafty tutorial archive for lots more free projects.
Visit my shop to buy my printable PDF sewing patterns:

Monday, 29 February 2016

Work In Progress: Sewing, Knitting, Mending & Sorting

As always, I've got lots of projects in progress...

This weekend I spent several relaxing hours sewing felt flowers onto this cushion cover, which I last worked on in November (!!).


Back in November I'd got so close to finishing this but it's been sitting in crafty limbo ever since.  All the flowers I'd pinned and tacked in place back then have now been properly stitched in position and I just need to add a few more small flowers at the edges to fill in the remaining gaps.

I've also re-started a much-neglected knitting project (visiting a knitting festival does tend to put one in the mood to knit!).

Let's not talk about how I was determined to get this finally finished in time for Christmas 2015 and it's now February 2016, okay??? Shhh, it can be our secret.


This weekend I've also been mending my much-beloved vintage coat. After sewing on a missing button, I'm now mending some tears in the lining and holes in the pockets. Not at all exciting - and sewing black on black is such a pain - but important!


Does a project count as "in progress" if you've just bought the materials for it? Because I think this one might technically be a new project as I've yet to start it (or even make a real plan for how I'm going to make it) but I have bought the fabrics and washed/ironed them.

Semantics aside, these lovelies are going to be a small quilt for summer picnics and (of course) trips to the beach.


I'm also continuing my ongoing "sort out everything in my studio" project. Everything is looking so neat and organised, it's quietly thrilling.

One of this weekend's tasks was to sort through my stash of sewing thread - you probably can't tell from this photo that this is the "after" photo but it is!


My most-used colours (which match the felt shades in my stash) are in the drawer on the left, and the rest are in the drawer on the right. Not the most complicated system, I'll grant you, but a system nonetheless :)

Meanwhile, the urge to sort and declutter is contagious and my mum has been bitten by the bug. I've been helping her clear out assorted cupboards and take things to charity shops... and I've ended up with some new/old things that she's decluttered!

I've inherited a few bits of vintage crockery that belonged to my grandparents, including these pretty dishes (one Poole, one Carlton Ware). Aren't they lovely?


I'm also now the proud owner of some craft supplies which were left over from our childhood crafting sessions, then forgotten about in the back of a cupboard. These tubes of glitter will be an especially useful addition to my crafty stash!
 

Right, that's enough waffling about WIPs... I'm off to make the most of my "extra day" by doing something crafty :)

Friday, 17 May 2013

Photos From This Week - Craft Supplies & Cats

Crikey, this week has been super busy! I have been ticking things off To Do lists like crazy, but I've mostly been working on secret stuff I can't show you guys yet though (boo). I can show you some of the yummy, colourful supplies I've been using though :)

Pretty glass beads (I especially love those turquoise blue ones, so lush) ...


... and lovely spring shades of thread. Pink and orange together? Yum!


Thanks to the bad weather we've been having, our cats have been spending lots of time snoozing indoors and keeping us company this week.

Our big cat likes sleeping on the sofa while I'm working in the lounge (how he manages to sleep upside down like that, I have no idea). He is sitting next to me on the sofa as I type this, actually! He likes having a whole seat of the sofa all to himself and gets very grumpy if he finds a person sitting in what he regards as "his" seat.


And our small cat is always very happy to find me sitting on the sofa with the laptop as it means she can yowl at me until I put the laptop down and let her sit on my lap instead :)


She doesn't always choose the most convenient times (pesky kitty!) but I think being able to rearrange my workday around "kitty cuddle breaks" has to be one of the great perks of being self-employed.

Monday, 28 January 2013

More Threads, More Scraps

I'm still working on a whole bunch of projects behind the scenes that I just can't show you yet... so here are yet more photos of felt scraps and sewing threads. I love the oranges and turquoise together, so pretty.


In other news, I had a very stressful afternoon over the weekend when I turned on the computer and... well, it just didn't turn on. Ugh. I eventually managed to get it started a few hours later (phew!) and backed up all my most recent files but, eek, that was NOT a fun few hours... especially as I am currently on a deadline! These things always seem to happen when you're already super busy and a bit stressed out, don't they?

Also, I can hardly believe it's going to be February later this week. This month has just zipped by!

You've got a few more days to enjoy the mega low prices in my January sale and it's also your last chance to grab a bargain ad space on my blog, as the 50% discount code will expire at the end of the month. If you're interested in buying an ad, click here for all the info.

Saturday, 12 January 2013

More Threads

I continue to be working on some bits and bobs I can't blog about yet... so, yet again, here are some snaps of some of the threads I've been using. The threads are from several different projects but actually I think they look rather nice together!

Reels of sewing thread...


Bobbins of Embroidery thread...


... and some leftover bits of thread, post-stitching:


(Note to self: Laura, please remember to come back to look at these photos and design something using this colour palette, it is awesome).

Tuesday, 8 January 2013

Stitching

After sketching, comes some stitching... and a whole assortment of leftover pieces of thread.


Thursday, 3 January 2013

Scraps and Supplies

I've been working on some colourful new things... here are some of the leftover scraps:


I can't show them to you yet, but I thought you'd like to see some of the bright supplies I've been using to make them. 

Embroidery threads...


... sewing threads...


... and (of course) lots of colourful felt:


P.S. I scheduled a few posts in advance this week and for some reason Blogger posted this one a few days too early! Oops! Apologies to anyone who has already had this post pop up in their blog reader / email / etc, and sorry if you left a comment on the earlier post that has now vanished. Not the most organised way to start off the year, huh? :)

Thursday, 11 October 2012

Threads and Glitter

I'm still feeling a bit ill (pesky germs!) so I've been trying to balance the demands of my to do list with the need to rest / put my feet up / generally take things easy so I can get well soon. This can be quite tricky at this time of year, but luckily things like sewing can be done while curled up on the sofa.

Also very luckily, my dad can be bribed to go to the Post Office for me (so all my shop orders are going out as normal) & to give me a lift to the local craft shop when I need to pop out to buy some emergency supplies.

I needed to buy some sewing thread...


... and I also picked up some silver & gold embroidery thread and some glitter, for a few festive projects that I'm working on at the moment.


I'm looking forward to making lots of very sparkly things this winter!

Thursday, 4 October 2012

Something New: Cards!

Do you remember back in the summer I posted a quick snap of something new I was working on?

Well, it turned into a design for the first ever batch of  "Lupin Handmade" Christmas cards...


What do you think?

I'm really pleased with how the design turned out (I can't wait to send some of these to my friends this Christmas!) and the "taking a photo of my work and getting it printed on cards" process went okay for a first try.

When I got the cards back from the printers I unfortunately spotted a small bit of fluff that was sitting on the design when I photographed it (oops!). It's pretty small but still, I'd never want to sell anything at full price that wasn't 100% perfect so I'm listing this first batch of cards in my shops at bargain prices.

Single cards are available over in my Big Cartel shop for £1.50 each, and sets of 4 cards are available from my Big Cartel shop and my Etsy shop for £4.50. 


While I was ordering the 'Winter Robins' cards, I thought it would be a good opportunity to finally get round to something that's been on my "to do at some point" list for simply ages - get some cards printed with some snaps of some of the gorgeous haberdashery bits and bobs from my grandmother's sewing box (inspired by this photo).

One card features some gorgeous vintage spools of thread...


... and the other features an assortment of scissors & shears:


As with the Christmas cards, the first batch of these unfortunately aren't 100% perfect. In this case, the images printed out a bit darker than I'd expected (the background is more grey than white). I'll be tinkering with the images and getting them reprinted, but in the meantime these prototypes can be found in my shops at the same bargain prices as the Christmas cards.


Single scissors and threads cards can be found in my Big Cartel shop, and mixed sets of 4 cards (2 scissors, 2 threads) can be found in my Big Cartel shop and my Etsy shop.
