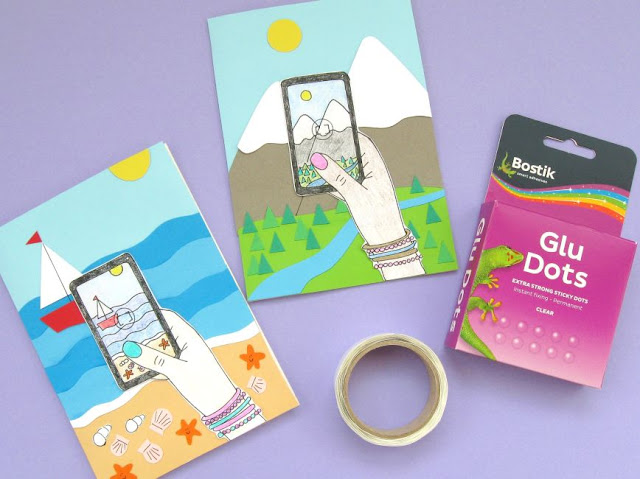
Showing posts with label #BostikCrafts. Show all posts

Friday, 17 May 2019

Cutting Out Small Felt Shapes... With Blu Tack!

If you've ever had trouble cutting out small and fiddly pattern pieces from felt then today's blog post is for you!

Cutting Out Small Felt Shapes With Blu Tack

ADVERTISEMENT: This tutorial is sponsored by Bostik, and is part of a series of crafty projects I'm creating to promote their range of adhesives. Click here to see all the posts in the series!

This is the third post I've shared using Bostik's products this week. On Monday I made fantastic festival hairbands using Bostik's Power Repair glue, then on Wednesday I made fun travel-themed notecards using their PVA Glue, Glu Dots and Micro Dots.

Today I'm sharing a Blu Tack Hack: a new way to use that sticky blue stuff we all love using to put up posters!

Cutting Out Small Felt Shapes With Blu Tack

When you're using a small paper template to cut out a tiny felt shape, I always recommend cutting out a bit of felt slightly bigger than the template. This is much easier to work with than handling a large piece of felt.

Cutting Out Small Felt Shapes With Blu Tack

When you go to cut out the shape though, how do you hold the template in place?

For larger pattern pieces you could use pins, but not for a little shape like this. You can hold the paper onto the felt with your non-dominant hand, but this takes practice and the paper can slide about a bit as you're cutting and make your finished shape much less accurate.

I've sometimes recommended using a bit of clear sticky tape to hold shapes in position but, of course, your scissors will get sticky from cutting through the tape and you can't re-use the template more than a couple of times before it'll start getting bulky from too many layers of tape.

So... why not try using a tiny piece of Blu Tack to hold the paper template in place?

Make a little ball of the Blu Tack...

Cutting Out Small Felt Shapes With Blu Tack

... then press it as flat as possible onto the back of your pattern piece, making sure that none overlaps the edge of the shape. 

Cutting Out Small Felt Shapes With Blu Tack

Press the template firmly onto the piece of felt...

Cutting Out Small Felt Shapes With Blu Tack

... and the Blu Tack will hold the template in position as you cut around it!

Cutting Out Small Felt Shapes With Blu Tack
 Cutting Out Small Felt Shapes With Blu Tack

I always use embroidery scissors for cutting out small felt shapes: look how much smaller and narrower the blades of the small scissors are compared with my sewing scissors! Using embroidery scissors will give you a lot more precision and control when cutting small or detailed shapes.

 Cutting Out Small Felt Shapes With Blu Tack

Once you've cut out the shape, peel off the template then carefully remove the Blu Tack and discard it. Easy peasy!

Cutting Out Small Felt Shapes With Blu Tack
 
If you're worried about the Blu Tack leaving an oily mark on your felt or pulling away a few of the fibres as you remove it, simply add the Blu Tack to the front of the template so it'll be attached to what will become the back of your cut out felt shape.

DISCLOSURE: this post is sponsored by Bostik, who also provided the Blu Tack for my #BluTackHack.

P.S. Fancy some more free crafty goodness? Subscribe to my newsletter for a monthly free pattern and visit my crafty tutorial archive for lots more free projects.

Cutting Out Small Felt Shapes With Blu Tack

Wednesday, 15 May 2019

Smartphone Snaps: DIY Travel Notecards Tutorial

Today's crafty project is inspired by travel and all the holiday snaps we take on our phones then share online!

Smartphone Snaps: DIY Travel Notecards Tutorial
 
ADVERTISEMENT: This tutorial is sponsored by Bostik, and is part of a series of crafty projects I'm creating to promote their range of adhesives. Click here to see all the posts in the series!

This is the second of a trio of Bostik-themed posts I'm sharing this week. On Monday I made fantastic festival hairbands with Bostik's Power Repair glue, on Friday I'll be getting creative with Blu Tack... and today I'm making cards with PVA Glue, Glu Dots, and Micro Dots.

 Smartphone Snaps: DIY Travel Notecards Tutorial

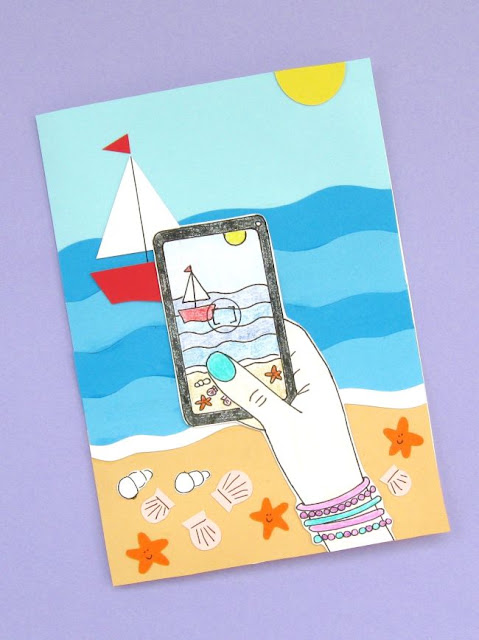
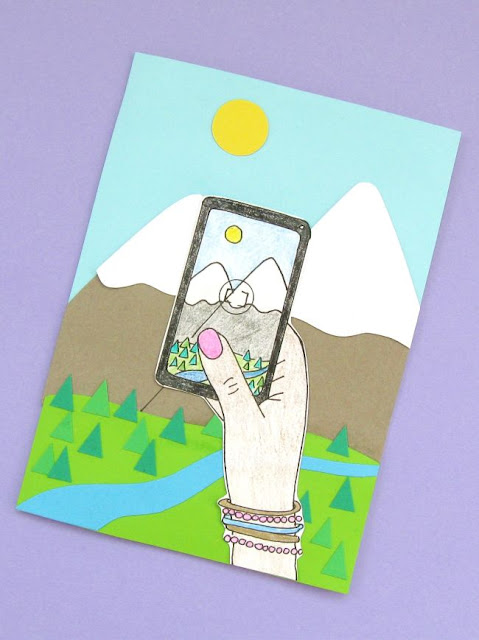
These fun travel-inspired cards would be great for sending to your social media loving pals! You can use the templates and printable provided to replicate my beach and mountain scenes or design your own travel scene then use the blank phone printable to sketch a mini version.

As well as making notecards, these designs would also be great for decorating a notebook cover to make a travel diary. You could also easily adapt this project to feature one of your own holiday photos! Simply print out a full size picture for the background, then trim a smaller version to fit the phone screen.

You'll find the links to the PDF templates and printable at the bottom of this post. The templates are designed to be used with 5 x 7 inch card blanks. You can make bigger or smaller cards, of course, by printing the templates at different sizes, but remeber that you'll need to stick to the same proportions.

Summer Holiday Beach Scene Notecard Tutorial
Summer Holiday Mountain Scene Notecard Tutorial

To make the cards: 

1. Use the templates provided to cut out all the pieces from coloured paper or card, using the photos as a guide when choosing colours.

Turn each paper template over and draw around it with a pencil. Once you've cut out the shape flip that over so the pencil marks will be hidden at the back.

For the very small pieces (the shells, the starfish, the flag, and the trees) just use the drawings on the template sheet as a guide and draw your own shapes directly onto the coloured card/paper.

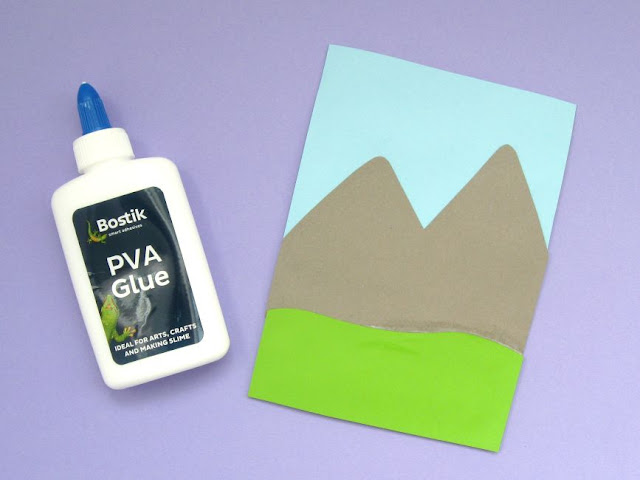
2. Begin building up the picture by sticking the largest pieces in position with PVA glue. Apply the glue evenly on the back of each card/paper shape and press them down firmly. PVA is quick and easy to apply and will allow you to reposition each paper piece slightly before the glue sets so you can make sure the edges line up neatly with the sides of the card.

For the beach scene, add the sky and the sand...

Smartphone Snaps: DIY Travel Notecards Tutorial

... then all the overlapping wave pieces, working from the top downwards. Use the photo as a guide when positioning these pieces.

 Smartphone Snaps: DIY Travel Notecards Tutorial

For the mountain scene, add the sky...

Smartphone Snaps: DIY Travel Notecards Tutorial

... then the mountains...

Smartphone Snaps: DIY Travel Notecards Tutorial

... then the grass.

Smartphone Snaps: DIY Travel Notecards Tutorial

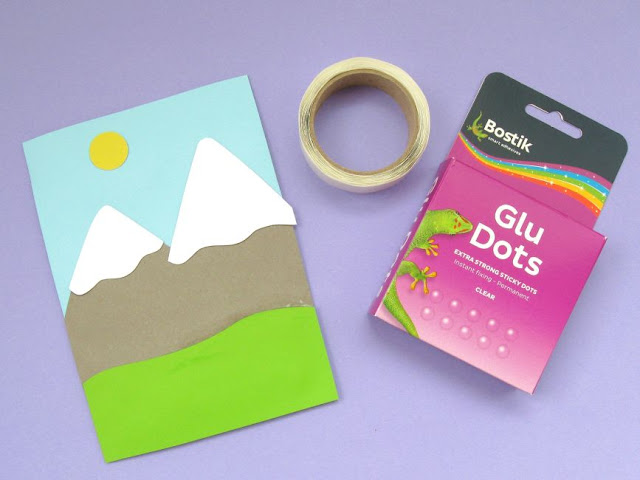
3. To attach the next set of shapes, I used Bostik Glu Dots. These mess-free permanent sticky dots come on a little roll  and create a firm hold when they're pressed into position.

Because the edges of these card/paper pieces won't be stuck down (as they would be if you'd stuck them in place with glue) this helps give a sense of depth to the card.

Add the sun, boat and sail to the beach scene...

Smartphone Snaps: DIY Travel Notecards Tutorial

... and the sun and snow pieces to the mountain scene.

Smartphone Snaps: DIY Travel Notecards Tutorial

4. Now it's time to add the smallest pieces! For these I used a sheet of Bostik Micro Dots. You peel off the top sheet of plastic and press your shape onto the dots and then when you lift it off again it's become like a little sticker. Magic!

On the beach scene, add the flag of the boat and several shells and starfish to the sand...

Smartphone Snaps: DIY Travel Notecards Tutorial

... then add the river and an assortment of triangle trees to create a little mountain forest.

Smartphone Snaps: DIY Travel Notecards Tutorial

Your two cards will now look something like this:

Smartphone Snaps: DIY Travel Notecards Tutorial

5. Use a fine-tipped black pen and a ruler to add the mast of the sail boat and the line dividing the two mountains. Also add details to the shells and (if you want) little smiley faces to the starfish. Then turn the cards over and carefully use craft scissors to cut away any excess paper/card overlapping the edges (take care during this step - I accidentally cut away too much from the side of the beach scene! Oops!)

Smartphone Snaps: DIY Travel Notecards Tutorial

6. Next, use colouring pencils or felt tip pens to colour in the hands and phones. Make sure the colours on screen match up with the scenes on the cards.

Smartphone Snaps: DIY Travel Notecards Tutorial

7. Finally, carefully cut out the pictures (I left a very small bit of white all around each drawing so the outlines remained clear) and stick them in place on the cards. I stuck my paper pieces straight onto the cards with lots of Glu Dots but if I made these again I think I'd use the PVA Glue to stick them to some white card first to make them a bit sturdier, then cut them out again and use the Glu Dots to stick them in position.

Smartphone Snaps: DIY Travel Notecards Tutorial

And you're done! 


DISCLOSURE: this post is sponsored by Bostik, who also provided all the adhesives I used to make the cards.

P.S. Fancy some more free crafty goodness? Subscribe to my newsletter for a monthly free pattern and visit my crafty tutorial archive for lots more free projects.

Smartphone Snaps: DIY Travel Notecards Tutorial

Monday, 13 May 2019

DIY Fantastic Festival Hairbands Tutorial

Today I'm sharing a fun and easy DIY project: decorating plastic Alice bands!


ADVERTISEMENT: This tutorial is sponsored by Bostik, and is part of a series of crafty projects I'm creating to promote their range of adhesives. Click here to see all the posts in the series!

This post is actually the start of a whole week of Bostik-themed craftiness here on my blog. I'll be sharing creative ideas using all these different products:


I'll be using the PVA Glue, Glu Dots, Micro Dots and Blu Tack later in the week (on Wednesday and Friday), but today I'm getting crafty with Bostik's Power Repair glue.


According to the packaging, Bostik Power Repair Ultimate Strength Glue "provides a long lasting bond for just about anything - glass, wood, stone, metal, leather, rubber, plastics, ceramics and much more!" It "resists knocks and drops, is waterproof and works in extreme temperatures."

It's ideal for small repairs around the house, basically, but did I want to use it to repair something around the house? No I did not. I wanted to use it to make something fun and joyful and to test it out on a project that I'd normally use a glue gun for because I'm always interested in alternatives to worrying that I'm going to burn myself with hot glue.

So, I decided to decorate some plain plastic Alice bands and turn them into fun accessories to wear to parties, gigs, or festivals this summer.

 
To make your own headband, you'll need a plain plastic band to use as your base (the wide plastic ones are particularly great as they give you a big flat surface to glue stuff to), something fun to stick on them, and some Bostik Power Repair glue or other suitable strong glue.


I decorated the narrow hairband with bright felt balls, and the wide hairband with a trio of mini rubber ducks. Rubber ducks are pretty cute and the colours are fab, but I also love the idea of wearing rubber ducks in your hair to a festival where the forecast is for lots of rain! The Power Repair glue is waterproof, so you won't need to worry about the ducks sliding off your head during a downpour.

I applied the glue to the bottom of one of the ducks and the top of the wide headband using the narrow nozzle on the glue (you can also unscrew the whole cap if you're sticking something larger), then held them together for a few minutes.


The glue is "repositionable for up to 3 minutes" which means you don't have that OH NO I STUCK IT IN THE WRONG PLACE ARGH moment that so often happens when working with a glue gun but it does mean you may need to be patient while the glue sets a little. If you were sticking something flat on top of something else flat you could just leave them both sitting there but my duck would definitely have slid off the curved headband if I'd not held it in place.

The glue is quite a thick gel and applies easily without dripping, which is great. The packaging also boasts that it "won't glue your fingers together" which is always EXCELLENT news when working with strong glue (I always end up getting glue on my fingers no matter how carefully I work). 

I then left the headband propped up (between two small wooden boxes) for a while to give the glue a chance to set some more (it fully sets after two hours and will reach full strength after 24 hours).


After about 20 minutes I nudged the duck gently and was happy with how it was holding in place so I repeated the process to add the other two ducks, each time propping the headband up so the latest duck was sitting as horizontal as possible so it wouldn't slide down the curved band.


I used the same method for adding the felt balls to the narrow headband, just adding less glue and only waiting about 10 or 15 minutes for the glue to have taken hold. (I didn't time this exactly, just wandered off to get a few other things done while I was waiting so you may find you can add the next item to your headband much quicker than this!)


And that's it! Told you it was easy. Now all you need to do is go try on your hairband(s) and take some selfies :)


DISCLOSURE: this post is sponsored by Bostik, who also provided the Power Repair I used to make the headbands.

P.S. Fancy some more free crafty goodness? Subscribe to my newsletter for a monthly free pattern and visit my crafty tutorial archive for lots more free projects.

Thursday, 14 February 2019

DIY Upcycled Sewing Thread Reels Wreath

Today I'm sharing a tutorial for making a fun crafty wreath from your old empty reels of sewing thread!

Colourful yarn wreath decorated with upcycled sewing reels
 Yarn-wrapped wreath decorated with upcycled sewing reels
Yarn-wrapped wreath decorated with colourful upcycled sewing thread reels

ADVERTISEMENT: This tutorial is sponsored by Bostik, and is part of a series of crafty projects I'm sharing to promote their range of adhesives. Click here to see all the posts in the series!

I'm never sure quite what to do with my leftover thread spools - they don't really have an obvious purpose but I still can't quite bring myself to throw them away. "I'm sure these will be useful for something" I think to myself, sticking them in a box of craft supplies... and then never actually doing anything with them. I bet you guys have a bunch of stuff you keep like this, too, right?? You just never know when stuff might come in useful for crafting!

empty sewing thread reels

So, when the team at Bostik asked me to come up with a project to try out their new Fix & Flash glue I thought this would be the perfect opportunity to get out my stash of empty spools and actually make something with them.

 Bostik Fix & Flash glue

Making this wreath I also got to use up a bunch of scrappy bits of leftover yarn I'd been saving for ages AND I saved a bit of cash by making my own wreath base from a cardboard box instead of buying one. Essentially I felt like a crafty upcycling genius working on this project.

Colourful yarn-wrapped wreath decorated with upcycled sewing reels

Tip: if you don't have any empty thread reels but like idea of making one of these wreaths for your craft room, you could also make this project using a box of cheap sewing threads or those thread colours in your stash that you somehow have loads of but never actually sew with.

You will need:

- Bostik Fix & Flash (which I'm reliably informed is available at Hobbycraft) or other suitable strong glue
- Empty sewing thread reels
- A wreath base or a large piece of sturdy card (e.g. from a big cardboard box)
- Yarn for wrapping the wreath
- Leftover bits of yarn in assorted colours (or bits of felt, fabric or coloured paper)
- A sewing needle with a large eye
- Sewing scissors

If you're making your wreath base from card instead of using a shop-bought one you'll also need sturdy craft scissors, a pencil, and things to help you draw the wreath shape (I used a compass, a ruler and a large dinner plate). You will also need some PVA or other craft glue if you're decorating your reels with felt, paper or fabric.

To make the wreath:

1. If you're making your own wreath base (instead of just buying one from a shop), you'll need to cut a large ring shape out of sturdy cardboard.

I used a large dinner plate (approx 26 cm wide) for the outer circle, drawing around it with a sharp pencil. I then used a ruler to find the rough centre point of the large circle, and used a compass to draw the inner circle (approx 12.5 cm wide) around that central point.

It doesn't matter exactly what size wreath base you make or use, just ensure you've got enough space to add all your sewing thread reels!

 use a large plate to draw the wreath shape
cut out the wreath shape from strong card

2. Use some brightly coloured yarn to wrap your wreath base. Knot the end of the yarn around the ring shape, tying it securely so the knot will be at the back of your finished wreath. Then gradually wrap the whole of the wreath with yarn until the shape is evenly covered and there are no gaps for the base to peek through. When you're happy with how it looks, cut the yarn end and knot it securely at the back of the wreath.

This step is quite time consuming, but it's a lovely relaxing task to do on the sofa in the evening while watching a bit of telly!

wrap the wreath base with yarn

3. Now it's time to decorate your empty thread reels. Leftover bits of yarn are perfect for this, but you could also use pieces of felt or even colourful paper or fabric to wrap around the empty spools - just cut the colourful scraps to size and glue them in place with the appropriate craft glue.

When choosing colours you could stick to a strict colour palette for your reels, create a riot of different colours, or even create a rainbow effect across the wreath. I had lots of bits of leftover yarn in pink and other warm tones, so I chose a selection of those.

Tip: if you want a rainbow or another sweep of colour across the wreath, plan ahead and work out how you're going to position the reels before you start adding colour to them so you know which reels to add which colours to. I'd recommend using a large piece of paper and a pencil to mark out the positions of each reel, which you can then refer to as a guide when attaching them to the wreath. 

Wrap each empty reel with some leftover yarn, knotting the ends securely and trimming them neatly. Make sure both knots are on the same side of the reel, so you can hide them when you stick the reels in position! I hid the first end of my yarn under the rest as I wrapped it around the reel and used a sewing needle to help me loop the second end into the rest of the yarn to secure it.

wrap the empty reels with leftover bits of yarn
old sewing thread reels wrapped with colourful yarn

4. Once you've decorated all your spools, it's time to get out the glue and add them to your yarn-wrapped wreath base. I'd usually use a glue gun when sticking stuff onto wreaths but I often find glue guns quite awkward to work with and occasionally a bit messy (all those trailing strands of glue! and great squidges of glue that squeeze out from behind the thing you've just stuck in place!)... so I was really interested to try Bostik's new Fix & Flash glue.

using Bostik Fix & Flash glue to make an upcycled wreath

It turns out that using this stuff is half like being in a sci-fi film set in the future, and half like pretending to be a wizard because the glue sets like magic with a beam of light!

First use the fine nozzle to apply the clear glue to the back of one of the sewing reels, where it'll touch the wreath base. I'd definitely recommend test glueing something to start with as I managed to splurge glue everywhere as it was much more liquidy than I'd been expecting. Carefully position the reel and press it in place for a few seconds to create the initial hold.

attaching the first thread reel to the wreath

Then use the UV bulb at the other end to shine a beam of light for fifteen seconds onto the edges of where you've glued. And that's it! The glue has set.

using the Fix & Flash UV light beam

Make sure you follow the safety instructions when using the Fix & Flash (both the glue and the UV light), and gradually add all the reels to your wreath base. I set a little timer on my phone for 17 seconds so I could just tap that and easily time the amount of light needed. 

decorating the wreath with the upcycled thread reels

I will confess that I managed to get a bit of glue on my fingers when working on this project (oops) because I am quite clumsy and really ought to always wear latex gloves when using strong glue (because of the aforementioned clumsiness) but otherwise I was really pleased with how easy this stuff was to use. I definitely felt like I had more control over it than using a glue gun, and you can use Fix & Flash to glue loads of different materials.

I would never have tried this without Bostik asking me to create this tutorial, but I'm glad I did as I think this will be a really useful addition to my craft supplies stash!

Once you've added all the reels to your wreath it should look something like this:

finished yarn-wrapped wreath decorated with upcycled sewing thread spools

Hang the wreath from a hook or nail using more of the same yarn you used to wrap the wreath base earlier.

DISCLOSURE: this post is sponsored by Bostik, who also provided the Fix & Flash I used to make the wreath. 

P.S. Fancy some more free crafty goodness? Subscribe to my newsletter for a monthly free pattern and visit my crafty tutorial archive for lots more free projects.

Make a colourful yarn wreath for your craft room