Showing posts with label social media. Show all posts

Wednesday, 15 May 2019

Smartphone Snaps: DIY Travel Notecards Tutorial

Today's crafty project is inspired by travel and all the holiday snaps we take on our phones then share online!

Smartphone Snaps: DIY Travel Notecards Tutorial
 
ADVERTISEMENT: This tutorial is sponsored by Bostik, and is part of a series of crafty projects I'm creating to promote their range of adhesives. Click here to see all the posts in the series!

This is the second of a trio of Bostik-themed posts I'm sharing this week. On Monday I made fantastic festival hairbands with Bostik's Power Repair glue, on Friday I'll be getting creative with Blu Tack... and today I'm making cards with PVA Glue, Glu Dots, and Micro Dots.

 Smartphone Snaps: DIY Travel Notecards Tutorial

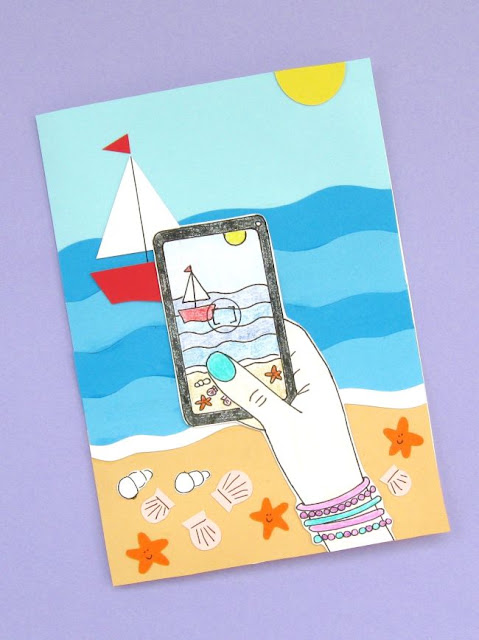
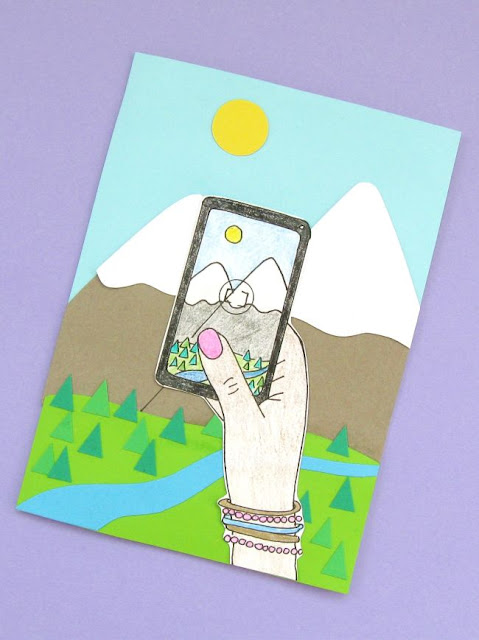
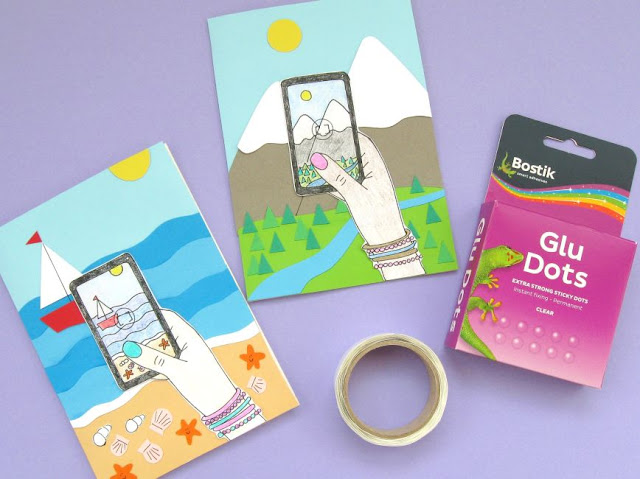
These fun travel-inspired cards would be great for sending to your social media loving pals! You can use the templates and printable provided to replicate my beach and mountain scenes or design your own travel scene then use the blank phone printable to sketch a mini version.

As well as making notecards, these designs would also be great for decorating a notebook cover to make a travel diary. You could also easily adapt this project to feature one of your own holiday photos! Simply print out a full size picture for the background, then trim a smaller version to fit the phone screen.

You'll find the links to the PDF templates and printable at the bottom of this post. The templates are designed to be used with 5 x 7 inch card blanks. You can make bigger or smaller cards, of course, by printing the templates at different sizes, but remeber that you'll need to stick to the same proportions.

Summer Holiday Beach Scene Notecard Tutorial
Summer Holiday Mountain Scene Notecard Tutorial

To make the cards: 

1. Use the templates provided to cut out all the pieces from coloured paper or card, using the photos as a guide when choosing colours.

Turn each paper template over and draw around it with a pencil. Once you've cut out the shape flip that over so the pencil marks will be hidden at the back.

For the very small pieces (the shells, the starfish, the flag, and the trees) just use the drawings on the template sheet as a guide and draw your own shapes directly onto the coloured card/paper.

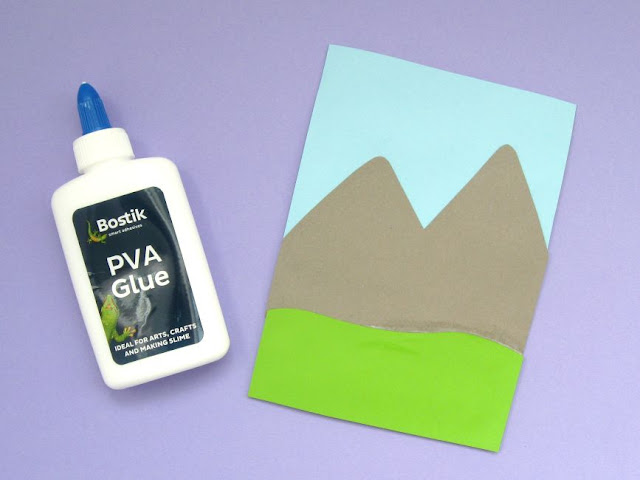
2. Begin building up the picture by sticking the largest pieces in position with PVA glue. Apply the glue evenly on the back of each card/paper shape and press them down firmly. PVA is quick and easy to apply and will allow you to reposition each paper piece slightly before the glue sets so you can make sure the edges line up neatly with the sides of the card.

For the beach scene, add the sky and the sand...

Smartphone Snaps: DIY Travel Notecards Tutorial

... then all the overlapping wave pieces, working from the top downwards. Use the photo as a guide when positioning these pieces.

 Smartphone Snaps: DIY Travel Notecards Tutorial

For the mountain scene, add the sky...

Smartphone Snaps: DIY Travel Notecards Tutorial

... then the mountains...

Smartphone Snaps: DIY Travel Notecards Tutorial

... then the grass.

Smartphone Snaps: DIY Travel Notecards Tutorial

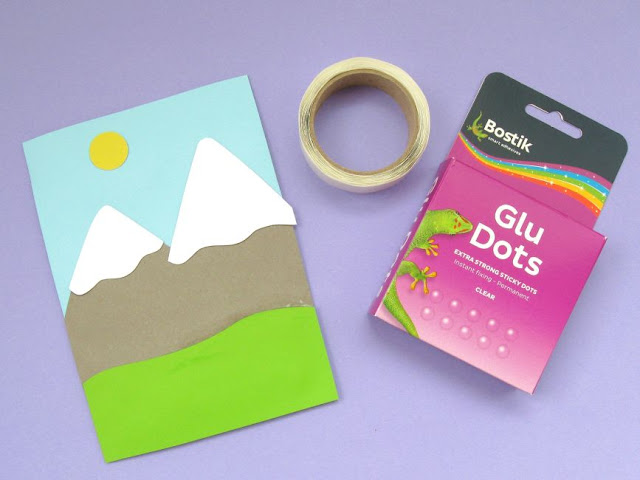
3. To attach the next set of shapes, I used Bostik Glu Dots. These mess-free permanent sticky dots come on a little roll  and create a firm hold when they're pressed into position.

Because the edges of these card/paper pieces won't be stuck down (as they would be if you'd stuck them in place with glue) this helps give a sense of depth to the card.

Add the sun, boat and sail to the beach scene...

Smartphone Snaps: DIY Travel Notecards Tutorial

... and the sun and snow pieces to the mountain scene.

Smartphone Snaps: DIY Travel Notecards Tutorial

4. Now it's time to add the smallest pieces! For these I used a sheet of Bostik Micro Dots. You peel off the top sheet of plastic and press your shape onto the dots and then when you lift it off again it's become like a little sticker. Magic!

On the beach scene, add the flag of the boat and several shells and starfish to the sand...

Smartphone Snaps: DIY Travel Notecards Tutorial

... then add the river and an assortment of triangle trees to create a little mountain forest.

Smartphone Snaps: DIY Travel Notecards Tutorial

Your two cards will now look something like this:

Smartphone Snaps: DIY Travel Notecards Tutorial

5. Use a fine-tipped black pen and a ruler to add the mast of the sail boat and the line dividing the two mountains. Also add details to the shells and (if you want) little smiley faces to the starfish. Then turn the cards over and carefully use craft scissors to cut away any excess paper/card overlapping the edges (take care during this step - I accidentally cut away too much from the side of the beach scene! Oops!)

Smartphone Snaps: DIY Travel Notecards Tutorial

6. Next, use colouring pencils or felt tip pens to colour in the hands and phones. Make sure the colours on screen match up with the scenes on the cards.

Smartphone Snaps: DIY Travel Notecards Tutorial

7. Finally, carefully cut out the pictures (I left a very small bit of white all around each drawing so the outlines remained clear) and stick them in place on the cards. I stuck my paper pieces straight onto the cards with lots of Glu Dots but if I made these again I think I'd use the PVA Glue to stick them to some white card first to make them a bit sturdier, then cut them out again and use the Glu Dots to stick them in position.

Smartphone Snaps: DIY Travel Notecards Tutorial

And you're done! 


DISCLOSURE: this post is sponsored by Bostik, who also provided all the adhesives I used to make the cards.

P.S. Fancy some more free crafty goodness? Subscribe to my newsletter for a monthly free pattern and visit my crafty tutorial archive for lots more free projects.

Smartphone Snaps: DIY Travel Notecards Tutorial

Tuesday, 29 January 2019

Design Dilemmas and the Magic of Social Media Feedback

What do you do with designs that go nowhere?

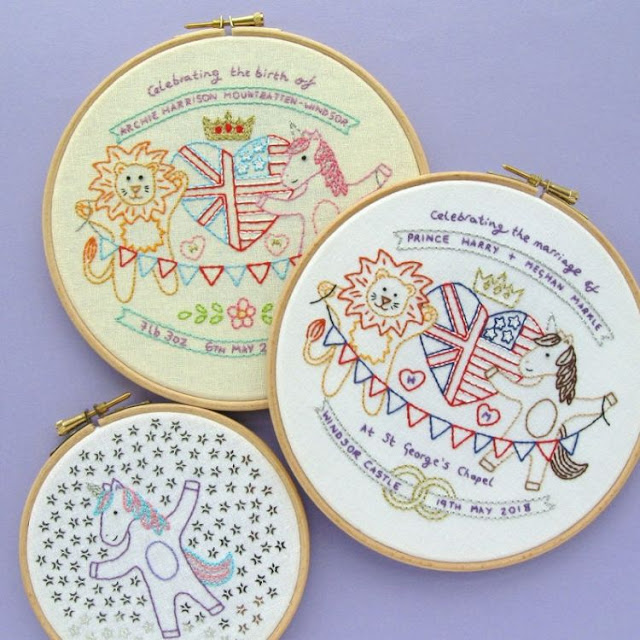
Last spring I started work on a bunch of ideas for possible projects to celebrate the Royal Wedding. I stitched and shared a simple cross stitch sampler pattern and put lots of work into this design for a cute embroidery pattern...

sketch for an embroidery pattern celebrating the Royal Wedding


... but then I ran out of time and it never got made and now I'm not sure what to do with it.

Over the years I've worked on a LOT of sketches, doodles, prototypes and project ideas that never turned into anything. This is just part of the creative process! I usually squirrel them away for the future because you never know what might end up being useful as source material for another project, or what might end up working after all when you revisit it with fresh eyes in the future.

This particular design, however, was so specific that I was convinced that it wouldn't possibly ever be remotely reusable. But I also really liked how it had turned out thus far and didn't want to just chuck it away (and have, as a result, wasted all that work).

So, after finding the pattern in a pile of paperwork this weekend, I posted this pic on Instagram and Facebook and asked everyone: "what the heck could I or should I do with this??? "Should I take the time to neaten it up a bit and share it on my blog in case there are some Harry & Meghan fans out there who'd like to (very belatedly) stitch themselves a wedding souvenir? Or just recycle it??"

And, thank goodness for the magic of getting feedback via social media, because everyone immediately had such great ideas.

Some people suggested sharing it to celebrate their upcoming anniversary, and lots of people suggested updating the pattern slightly so it could celebrate Meghan and Harry's baby, which is due this spring (I had totally forgotten that they're expecting a baby!). This could totally work for the royal baby!

Other people suggested doing something just with the lion and unicorn on their own (maybe even adapting the whole design to be a customisable nursery sampler)... which I had somehow not thought of as a possibility??? I do love those little guys, though, they're just so cheerful and sweet and the unicorn took me absolutely ages to draw (because I am the world's worst person at drawing horses). I'm picturing the lion holding birthday balloons, maybe? Or the unicorn standing next to an awesome rainbow birthday cake? Something happy and fun and colourful, anyway.

What do you guys think? I'd love to hear which of these suggestions you like, and if you have any more ideas for ways I could revisit this design and (finally) turn it into a finished project. 

UPDATE: this embroidery pattern is now finished and available in my shop and my Patreon pattern library.

Subscribe for a small monthly fee and you'll get access to a growing library of PDF patterns and tutorials, with an email whenever I add a new project. You can cancel any time.      

Click here to check out my Patreon page and sign up!

Royal Celebrations Embroidery Pattern
 Royal Celebrations Embroidery Pattern
 Royal Celebrations Embroidery Pattern
 Royal Celebrations Embroidery Pattern
 

Friday, 27 January 2017

Two New Instagram Hashtags for Colour Lovers

If you follow me on Instagram or are a regular reader of my blog, you'll know that I love colour - the brighter the better.

This week I started two new hashtags for people (like me) who take lots of colourful photos. It was surprisingly difficult to find hashtags which no-one had used for a single photo, but which still summed up what I wanted the tags to cover... but I got there eventually!

There's #colorcolourmakers for creatives: crafters, artists and makers creating colourful things. Use this hashtag to share your colourful makes, crafty supplies and creative workspaces.

  https://www.instagram.com/explore/tags/colorcolourmakers/

Then there's #colorcolourseekers for anyone and everyone who can't resist taking photos of colourful stuff! Use this hashtag to share all kinds of bright and colourful things, places and spaces.

 https://www.instagram.com/explore/tags/colorcolourseekers/

If you love to make colourful things, or take colour-filled photos I hope you'll join in with these hashtags!

For more colourful photos, you'll find me on Instagram as lauralupinhoward.

Friday, 5 September 2014

Crafty Ladies: Meet Liz Smith

This week's Crafty Lady is Liz of Made in Lowell

Liz is a master of many crafts! In her shop you'll find felted pincushions, knitted cup cosies, sewing-themed jewellery, beautiful polymer clay egg ornaments and more. 

If you're looking for something new to watch or listen to while making, I highly recommend Liz's (now ended) show Makers in Business. Her interviews with makers are all so interesting and inspiring.

-------


Hi! I’m Liz Smith.

I grew up in a town near Boston, Massachusetts. I now live in Lowell, Massachusetts which is the first industrial planned city in the US. It used to be a great textile manufacturing hub. It’s situated at the confluence of two rivers and threaded with canals. It went through some hard times in the later part of last century but is currently in the midst of a renaissance.


Many of the old brick mills are gone but some of the ones that remain have been converted to housing and artist studios. I live in one old mill with my writer husband, and our quirky cat, Chester, and I have a studio in a different old mill. Something about the history of the textile industry being all around lends itself well to a creative life here.


Recently I’ve been making…

I’ve been making and selling things as long as I can remember! I went to school for Fine Arts and I’m self-taught in crafts. When I finally got the chance to go full time as a maker in 2007, I concentrated on needle felting and polymer clay items. As the years have gone by I have expanded to quite a large product range.

I feel like I’m at a time of transition. I’ll keep making many of the old favorites (pincushions, ornaments , jewelry) but reduce the actual number of items so I can more easily keep up with inventory when things get hopping at the holidays.


Meanwhile a new passion is creeping into everything I do these days: sewing! I’ve been hand sewing at home for a hobby (yes professional makers can have hobbies too!). I’ve been making coasters, zipper pouches, and pillow covers. I also taught myself to embroider on these items. I even started 3 queen-sized quilts! I love using scraps and vintage fabrics.


I’ve been buying old quilt squares, too. Something about these unfinished pieces from the past touches my heart. I restored a 1914 treadle Singer 66 and I’m learning to sew on it. I feel like the next phase of my business will incorporate all of these things. It takes so much time to learn whole a new skillset to the point where I’m satisfied enough with my craftsmanship to sell my work, but I’m right on the edge of that moment and it’s exciting!


I have no idea, of course, if anyone will buy the new items but that’s the chance makers take following their hearts. I do believe that if you absolutely love making something you will find a way to get it to your right people or adapt the item until it is something that sells without giving up what you love about making it.

I’ve been working on…

For two years I created a once monthly interview show on local access TV. It’s called Makers in Business. I interviewed people who make things about how they run their creative businesses. I ended the show but there are 22 episodes still available on Vimeo and as audio-only on iTunes. I feel like makers have so much to learn from each other and I’ve always loved hearing how other folks solve the puzzle of being a business person and a creative person both.


I’ve been blogging about…

I blog whenever I feel like I have something interesting to share, otherwise I don’t keep to a schedule. It’s usually about what I’m up to lately, whatever’s got me excited, whether it’s Clutter Busting, or the book jacket illustration I designed for my Sister in law’s book of poetry, I try to make it have general interest as well as be specific to me and my world.


I’ve been reading…

To be honest I’m a lazy reader! I have all kinds of aspirations but then TWITTER. Seriously, if I told you what I was reading lately the true answer would be Twitter. But I’ve got my Twitter feed arranged so a wide variety of topics come across my screen at all times. I read tweets that contains local, national, and international news as well as pop culture and tweets by creative people in many fields.

If someone links to a blog post on Twitter I will probably go read it. But I’m not likely to visit various blogs every day or week without the prompt. When I find something that may be relevant to my followers I ReTweet it to share. I love this system and I rely on my clever twitter friends to ReTweet the things they find interesting in their streams as well.

I’ve been listening to… 

I don’t enjoy TV or movies as much as non-fiction magazine type information so I’m a National Public Radio and podcast junkie. I love the Slate Culture Gabfest, On The Media, Planet Money, and the New Yorker Out Loud just to name a few. I also bought an app that allows me to listen to the Red Sox baseball radio feed. I don’t even really care about sports but I find the sound of a baseball broadcast in particular very relaxing.
 

Liz’s 3 Top Tips for using Twitter

1. Don’t be intimidated, overwhelmed, or worry you’ll “do it wrong”, just jump in and start reading tweets. You’ll eventually learn the lingo if you watch how other people you like use it. Twitter is great for connecting with folks you’ll never have a chance to meet in real life as well as for finding out what’s going on in your own neighborhood. Tweeting something funny or cute is always a good bet.

2. Interact! Twitter is a conversation. If someone talks to you, do your best to answer back. (Unless it’s a bot or a spammer, of course). You don’t even have to do it right away. Twitter happens in real time but lots of people are reading your tweets later and understand if you are doing the same. Twitter is your chance to be a real human as well as the voice of your brand. Tell us what you’re up to at home and at work. That said, PLEASE don’t be an all commercial channel just posting links to your online shop constantly, that is super tedious.

3. Twitter and Facebook are not interchangeable! It’s possible to set it up so that all your Facebook status updates auto post to Twitter but I really don’t recommend that. I had to unfollow some folks because it seemed like they were at the Twitter party but when you tried to interact with them all you found was an empty room with a tape recorder making Facebook announcements for them. Very off putting. You don’t have to be on twitter all the time, just check in now and then and you’ll be fine.

-------

Wednesday, 6 August 2014

7 Social Media Tips for Makers

As I mentioned last month, I was included in a piece in last month's Craftseller magazine about social media. I got a bit carried away and sent lots of tips (turns out I type too much just like I sometimes talk too much!) and in the end, thanks to a mix-up, none of them got published. So, I thought I'd share them with you guys today.

This is in no way an exhaustive list of tips - and I am by no means an expert in This Sort of Thing - but I hope you'll find some of them helpful!

https://www.facebook.com/LupinHandmade
My Facebook Page

1. Make connections.

Remember the all important "social" in "social media" - reply to people when they message you or comment on your photos or Pins, and take time to comment on what others are sharing. One of the very best things about making and selling handmade stuff is being part of a fantastic, friendly creative community. Take part!

As well as being fun, making connections with your fellow makers and bloggers can help your business in all sorts of unexpected ways (networking, baby).

2. Work out what works.

Don't worry, you don't have to join all the different social media sites and update them all constantly. Instead, find out what works for you - what you enjoy doing, what kind of posts and photos people are responding to, and what's driving the most traffic to your shop. But be patient, you're not suddenly going to get a gazillion followers overnight and sell stuff instantly just because you Tweeted about it.

3. Think about your photos. 

If you're using Pinterest, portrait images work better than landscape ones so remember to take a couple in addition to the sizes that suit your shop, etc. Images can often end up getting re-Pinned and even blogged without your link attached, so think about adding your shop or blog name and/or url to the pictures you share to help people find their way back to your corner of the internet.

4. Always be professional!

Don't discuss difficult customers (this is such a turn-off for prospective customers) or bitch about your fellow makers (they probably know how to Google themselves).

You don't need to be a personality-free robot (who would follow one of those?) but think about your audience and target customer and what's appropriate (or not!) to share with them. Should you swear? Talk about politics? Discuss your kid's potty training? The answers to these questions will be different for everyone, but think before you Tweet.

5. Don't just sell, sell, sell.

Obviously you want people to visit your shop and buy things, but no-one is going to follow you if all you do is post links to your Etsy shop or photos of your products. Chat to people, and share interesting things. Link to things that you like and things you think your followers will be interested in.

I link to my newest blog post or tutorials, and mention new products and special offers, etc but I also share products by my fellow makers, interesting craft-themed articles, fun tutorials, great blog posts by the people I follow, etc.

6. Don't spam people with automated tweets.

Make sure that if you've connected your social media accounts and/or your shop to each other that you've un-ticked any settings that auto-post when you update. Getting 20 Tweets in a row from someone because they've just added a batch of listings to their Etsy shop or been Pinning lots of things on Pinterest is super annoying. Oh and if you do set up auto-posting from one account to another, check your feed to make sure the links work!

7. Making first, sharing second.  

Social media is great but remember that there's no point spending hours driving people to your shop unless there's something awesome waiting for them. Put your smartphone down or turn off your laptop and go make some great stuff!

Got any social media tips of your own to share? Leave a comment! :)

P.S. Wanna connect with me on social media? You'll find me on Facebook, Twitter and Google+.

Monday, 30 June 2014

How I Got 58 Million Views on Google+

A couple of weeks ago Rebecca noticed that my Google+ profile was showing a craaaaaazy number of views & sent me this screengrab:


Yup, you're reading that right - that's over 58 MILLION views on a profile that I only set up late last year (because I needed it to change an annoying new setting Google had added) and had never used.

How the heck was this possible? Was it a bug? Or were gazillions of people actually visiting my profile on Google Plus for some weird reason?? I mean, a lot of people in the blogging world talk about how it's important to post on G+ but is it really this popular???

I was a bit baffled.

Then I (appropriately) did some Googling and it turns out that the view count isn't tracking the number of times your profile is viewed but in fact shows "how many times your content has been seen by other people, including your photos, posts, and profile page." (my italics) since October 2012.

This still sounds like a mystery (as I haven't been sharing any content on Google Plus!) but actually the answer is quite a simple one. Basically: the views are actually from my blog.

I use a Blogger blog (owned by Google) and the photos uploaded to my blog are stored in Picasa Web Albums... which Google are now redirecting to / merging with Google+ Photos. So even though these albums are set as private, all the photos on my blog are now "content" that's part of my Google+ account.

It seems that every time someone visits my blog and views some of my photos each one of those views is added to the tally of views showing on my Google+ profile. You read a blog post with ten photos in it, that's ten more views on the tally... and there are a lot of photos on my blog!

Which explains where that gigantic number came from, and why it keeps on going up. As I type this (on Saturday - look at me being all organised and scheduling posts in advance), the current view tally is 58,932,603, so that's 650,749 "views" in about ten days. Crazy.

So I have no idea what tiny number of people might actually be viewing my Google+ profile, but I am taking this as a sign from the universe that I should try and start actually using G+. You can find me here.