Showing posts with label sky blanket. Show all posts

Friday, 7 August 2015

Show & Tell #14

One of the best bits of my job is seeing what people have been making from my books and free tutorials. I love seeing the photos of finished projects that people share with me, and I love sharing them with you guys too as part of my ongoing (though somewhat infrequent) Show & Tell series.

It's been a while since my last Show & Tell post, so I've got lots of crafty goodness to show you...

Holly stitched a fab cassette phone case using my pattern from Mollie Makes #41.


Lisa shared this in-progress photo of an angel bear she was sewing from my first book, Super-Cute Felt. Her daughter helped trace the pattern and was "very insistent that the colours are as close as possible" to the ones in the photos.


Kate bought a big bundle of felt from my shop and used it to create two colourful patchwork projects, which she shared as tutorials on her blog.

Felt patchwork table mats...


... and a rather fabulous felt patchwork blanket.


Louise emailed me these photos of a cute woodland garland she'd sewn using patterns from my second book, Super-Cute Felt Animals. It looks like lots of happy hours of sewing went into this!


Liz used my vintage felt baubles tutorial to decorate her Christmas cards last year. Look at all those baubles!


Liz said she made the ornaments "then attached them to cards using a brad, so the recipients can take the ornaments off and keep them when they are done with the card" She "made the cards from a very heavy cardstock so they wouldn't tip over" and "sewed on the coordinating borders with my machine". Such a great idea.


Linda wrote a lovely review of Super-Cute Felt Animals. "The day the book arrived in the mail our granddaughter was here and we had a wonderful time looking through the book and picking out animals I would make for her. She chose a cat and a dog"


Instead of stitching eyes (which can be quite fiddly at this scale) Linda added cute googly eyes instead.

She also stitched a pair of blackbirds using my free pattern.


The delightfully named "A Foolish Twit" tweeted photos of a whole bunch of things she's been making from my books. She said "Without your patterns I would never have got back in to crafting, now I love it!" which makes me very happy.

She combined two projects in Super-Cute Felt to make this bee needlecase...


... stitched lots of safari animals from Super-Cute Felt Animals...


... and made a whole army of mice finger puppets (I wonder what the collective noun would be for finger puppets?). You can also spot one of my floral projects in the bottom pic - patterns for the mice and the flowers can both be found in Super-Cute Felt.
 

My previous Show & Tell post was all about the sky blankets other people have been making, inspired by my sky blanket.

Here's Leanne's finished blanket - congrats, Leanne!


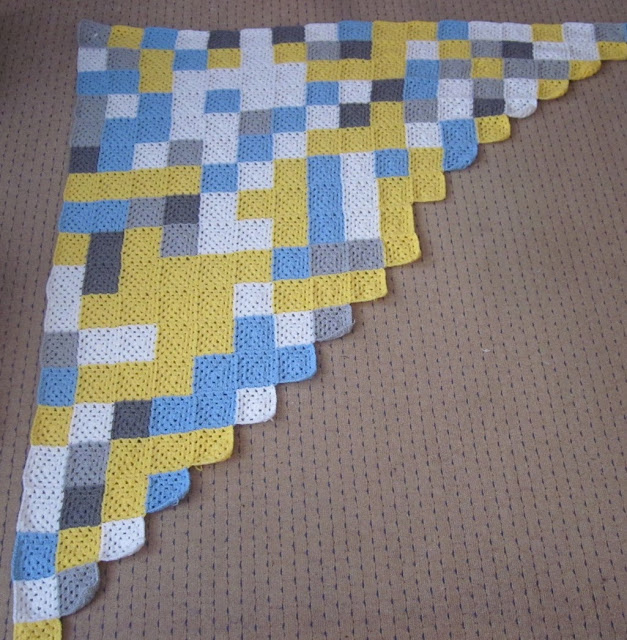
Amy is making a fab crochet version of the sky blanket, crocheting a granny square a day and using cheerful yellow yarn for sunny days instead of sticking with shades of blue.


She's blogging about the blanket as it grows. It's looking great, and has a surprising amount of yellow in it.


Amy wrote "I can't actually say just how much I love this project - it is great seeing how it grows, as I have no idea what colour the squares are going to be from one day to the next" ... "this blanket is bringing me nothing but pleasure" - which sounds a lot like how I felt when making my sky blanket. Such fun!

And last but by no means least, Polly stitched a tree stump pincushion using this guest tutorial shared on my blog by the talented Manuela.


Polly adapted the pattern slightly, using French knots to add the white spots on the toadstools which look great. She says "I'm really pleased I made this! I like having practical items which are also visually pleasing, and this makes me happy every time I use it." What more can you ask for from a crafty project?


You can see see all the previous show and tell posts here. My archive of free patterns and tutorials can be found here and you can read more about my books here 

If you want to share what you've been making from my patterns (or from supplies you bought from me back when I still sold them, or when I've done a destash sale) please do get in touch. If you just want to share your work privately and don't want to be included in a future Show & Tell post that's totally okay! :)

You can leave a comment and link here on this post, send me an message via my contact form or share a photo over on my Facebook page.

Please note: the Amazon links in this post are affiliate links. 

Wednesday, 29 April 2015

Fluffy Pom Pom Summer Skies

After knitting a Sky Blanket in 2012, last year I decided to Pom Pom the Sky: making a pom pom each day for a year, recording that day's weather.


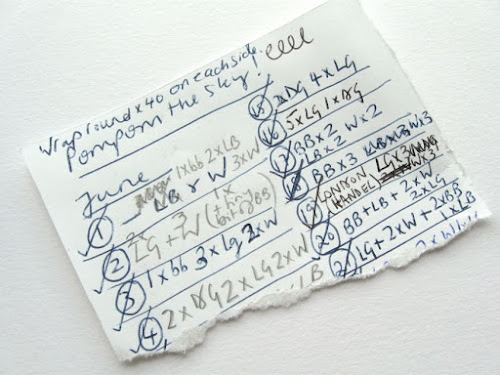
I started in June, using six strands of yarn per pom pom, which meant I could use lots of different colour combinations to record the sky. I made pom poms for June and most of July... then I stopped.


I kept recording the sky colours but it took months to admit to myself that I wasn't going to restart my pom pom making, and more months after that to blog about it and publicly admit that I'd abandoned the project.

I'm making other plans for the finished pom poms, but in the meantime I have (finally!) finished all the made-but-still-scruffy-looking pompoms I made last year, lined them all up in date order...


... and taken some photos to celebrate their loveliness:


P.S. Fancy making your own sky pom poms? You could make a lovely 10 pom pom square cushion or wall hanging with just over three months worth of pom poms (maybe a summer's worth?).

I recommend this pom pom maker for easy-to-make, even pom poms (I used the 45mm one) and Stylecraft Special DK yarn for great sky colours (I used Silver, Grey, Aster, Cloud Blue and White).

I recorded the colours of the sky each day at midday, choosing colours for 6 strands of yarn (e.g. 2 x light blue, 2 x white, 2 x bright blue). To make each pom pom I wound 3 strands of yarn round each side of the pom pom maker (wrapping the yarn round 40 times to make a nice dense pom pom), then tied a little tag on with the date so I could arrange the pom poms in calendar order later. 

Thursday, 5 February 2015

Show & Tell: Sky Blankets!

Remember my sky blanket?

In 2012 I knitted a blanket square a day based on how the sky looked at midday. I knitted almost a year's worth of squares (360 in total) and stitched them together to make a blanket recording the year's weather. It was a lot of work but a huge amount of fun!

My sky blanket was based on Lea Redmond's awesome Sky Scarf project, and in turn my blanket project has inspired other people to start their own sky blankets. Seeing the photos has been quite thrilling and I'm delighted to be able to share some of them with you guys today...


Karen's blanket has been put to good use this winter! Like me, she chose her sky colours based on the sky at midday each day:


Alicia blogged about working on her blanket. I love how she got her kids involved with the project: "They love coloring in the little squares every day.  During the school year we kept it in the car and they took turns filling them in for me on the way to school."

http://walkingsoftlyupontheearth.com/2014/07/18/sky-blanket/
 http://walkingsoftlyupontheearth.com/2014/07/18/sky-blanket/
 http://walkingsoftlyupontheearth.com/2014/07/18/sky-blanket/


Leanne has also been blogging about her blanket's progress. It's been lovely seeing updates popping up on her blog as her blanket has grown, and seeing her kitty "helping" along the way!

http://www.knitmeacake.com/2014-skyblanket/
 http://www.knitmeacake.com/2014-skyblanket/
 http://www.knitmeacake.com/2014-skyblanket/
 http://thislittlespaceofmine.co.uk/5-tips-working-year-long-craft-project/

You can read all about Leanne's blanket-making adventures on her old blog, Knit Me a Cake.

She also blogged about how to knit a sky blanket square - her squares are bigger than mine and all knitted in moss stitch (I stuck to plain old garter stitch for my blanket) - and recently shared some great tips for sticking with a long-term crafty project like this.


Finally, my blanket-making inspired Laura to make a wonderful weather quilt for her niece - giving it as a surprise 1st birthday gift!

Laura used a selection of prints to represent different kinds of weather (sunny, rainy, grey, etc), using at least two different prints for each weather type so she wouldn't end up with two squares the same next to each other.


Many thanks to the ladies who have shared their wonderful sky project photos! It has made me so happy to see them xxx

Fancy starting your own sky knitting project? Click here to read about Lea's original Sky Scarf project, or click here for instructions for how to knit a sky blanket.

Friday, 6 June 2014

Pompom The Sky

Back in March I was working on a project that involved making lots of pompoms. It was so much fun! I love making pompoms, they are just so joyful, and making those made me think "I should do a pompom-themed project, but what??"

I'd also been vaguely thinking about maybe knitting another Sky Blanket (with a square knitted each day to represent the colours of the sky, inspired by / based on Lea Redmond's awesome Sky Scarf project) because it was such an enjoyable project to do, I'd loved the process of recording each day's weather and I was really curious to see how different the colours would turn out a second time round.

But, you know, knitting another blanket is a big project and I've already got a quilt I need to finish and a whole bunch of other WIPs that need to be knitted and sewn... so maybe it wouldn't be a good idea to get started on another big crafty commitment right now. And maybe I'd get bored making the same project all over again (especially when it came to sewing all those squares together, which I found it hard to motivate myself to do the first time round).

And then I had a brainwave - I should make sky pompoms!

Test pompoms in sky colours

Pompoms are pretty quick and easy to make, especially now I've got myself a fancy pompom maker...


... so I shouldn't have a problem keeping up with a pompom-a-day schedule. Making sky pompoms will also be a fun way to do a second sky project but avoid getting bored because pompoms are pretty different to blanket squares, are they not?

Plus one of the slightly frustrating things about the sky blanket project was that you're using two strands of yarn per square so the number of colour combinations you can choose to represent the sky is strictly limited.

The finished blanket looks great (well, I think so!) but this did make it difficult to choose the day's colours (especially on those typically English days where the sky is blue but it's also cloudy and it's maybe been raining but just starting to clear up but over there are some more rain clouds looming - so many different colours happening!) and a series of totally different-looking skies ended up being represented by the same colour combos.

I will be making my pompoms with SIX strands of yarn, so I'll be able to create lots of different colour combinations. I'm going to be using the same yarn as before - Stylecraft Special DK in Silver, Grey, Aster, Cloud Blue and White.


Because I'm much too impatient to wait until the start of 2015, this time round I'll be recording the skies in a year of my life instead of a calendar year. I've got a few ideas brewing for what I'm going to do with the finished pompoms but it's a secret for the moment (mostly because I need to test out my ideas to see if they will actually work!).

I'll let you know as soon as I've decided and I will, of course, keep you updated on my pompom-ing!

Thursday, 2 January 2014

Hello 2014!

I know it's a little late but Happy New Year, everyone!

2014 is already off to a good start here...

... I met a deadline yesterday (hurrah!)
... I've got some fun Nice Days Out planned for this week (yay!)
... lots of people are starting sky blankets inspired by my project (so thrilling!)

... and the new issue of Crafty Magazine is out today and it contains a project by me (woohoo!)


My project? Turning plain tape measures into cute hot air balloons!


These were lots of fun to sew... and I do love hot air balloons (they always remind me of my years living in Bristol - you see so many hot air balloons there).

If you can't find a copy of Crafty in a store near you, it's also available HERE.

Wednesday, 6 November 2013

How To Knit a Sky Blanket

In 2012 I knitted a Sky Blanket (though it took me until quite late in 2013 to finish sewing all the squares together!), choosing the colours for each square based on the sky that day.

My blanket was inspired by Lea Redmond's awesome Sky Scarf project. Over at Lea's site you can find free instructions for knitting a sky scarf (as well as yarn bundles to buy if you want to knit a scarf like hers) which lots of people have followed to make some amazing scarves. If you want to make a sky scarf, or your own blanket project inspired by Lea's idea you don't really need to read this blog post... but every time I've blogged about my blanket's progress I've had questions about exactly how I've been making it, so I thought I'd share the details of my process so that if you want to you can knit a blanket just like mine :)


I knitted a blanket square a day for 360 days - not quite a whole year, but almost! I had hoped to knit a square a day, sew up the squares gradually and have the blanket finished by the start of 2013 but, alas, life (and deadlines!) got in the way. Better late than never though, right?
The most important thing is to remember to look at the sky each day so you can pick your yarn colours. The weather is so changeable here in the UK that I thought picking colours to represent the whole day's weather would be pretty impossible so I decided to look at the sky each day at the same time (midday) and use that for selecting my colours. I ended up with some days where it was clear and sunny for most of the day but cloudy in the middle of the day (so the square for that day was grey, despite all the sunshine), but saved myself a lot of bother umming and aahing about what colours to choose when it had been sunny and rainy and cloudy all in one day!


So, you look at the sky and choose your colours for the day. Set an alarm on your phone if you want, but it's okay if you forget - just look up as soon as you can and make a note of how the sky looks.

Each square of the blanket is knitted from a double thickness of yarn, so you can use two strands of the same colour (e.g. two bright blue strands for a clear sunny day) or blend two colours together, to create an inbetween-colour (e.g. bright blue and light blue) or to represent a sky that's got some clouds in it (e.g. light blue and white). This is easier on some days than on others (I remember some days seeing all 5 colours in the sky! and the sky can be so many different shades of blue!), but it doesn't need to be a perfectly accurate record of the weather - just go with your gut and choose the colours that feel right. This is knitting, not science!

Then make a note of your chosen colours on a calendar or in a notebook. You'll need to know what colour(s) to use when knitting that day's square, but you also need to keep a record so you can sew the squares together in the correct order.


I used Stylecraft Special DK to knit my squares. It's an affordable acrylic yarn that's soft and lovely to knit with, and (most importantly) it comes in some very nice sky shades. I bought mine from Country Crafts.


Light Grey = "Silver"
Dark Grey = "Grey"
Bright Blue = "Aster"
Light Blue ="Cloud Blue" 
White = "White"

I used 6mm needles. I cast on 12 stitches, knitted 20 rows of knit stitch then cast off (creating a square in garter stitch). Each square is about 8cm wide and the finished blanket is just the right size for a single bed. I left a long tail of yarn at each end of the square so I could make sure I stitched the squares together later with matching yarn. The large needles and double thickness of yarn makes the squares very quick and easy to knit!


I found it helpful to tick off the days on the calender as I knitted them, and then to mark the days off on a chart as I stitched the squares together. This was especially helpful when I fell a bit behind sewing the squares together, as I could look at the blanket and the chart and easily see where I'd got up to, and not get in a muddle.

I arranged my squares in rows from left to right, like on a calendar, so the top left square is the first day and the bottom right square is the last day. Sewing the squares in date order means you can sew the blanket together gradually as you knit the squares, and when you look at it later you'll have a visual record of how the weather changed through the year. Each row of my blanket is 18 squares wide, and the blanket is 20 rows long.


Do try and keep up to date with sewing the squares together if you can, as otherwise the boring task of sewing them all together (and weaving in all those ends) will become a bit overwhelming!

I stitched the squares together in alternating directions - so the rows of knitting are horizontal in one square then vertical in the next and so on. I used a large needle and whip stitched the squares together with the double thickness yarn tails, always sewing from the same side so the blanket has a neat front and a messier back with visible seams. Take care not to sew your whip stitches too tightly, so you can flatten the seam a bit afterwards. 


Once you've sewn together a section of the blanket, you need to weave in all the ends... which sadly takes ages as there are 4 per square! When the ends are woven in neatly, the back of your blanket should look something like this:


When I finished the blanket, I used a bit of spare yarn to sew on a polkadot blue button to mark the first square (many thanks to whoever it was who left a comment suggesting I use a button for this!). This way I'll always remember where my knitted year begins.

Knitting a sky blanket (just like knitting any blanket) is time consuming, but if you do it bit by bit it's amazing how quickly it grows through the year. It's also a great way to make something fabulous if (like me) your knitting skills aren't that great. The squares are easy to knit and sew together but the end result is very impressive!

The trickiest thing about this project is actually guessing how much yarn to buy. I worked out roughly how much yarn I thought I was going to need for the blanket, then divided that up into the sky colours I thought I'd use (so, more light blue and grey than bright blue and dark grey) and added in an extra ball of each colour just in case. ... but I still ended up needing to buy more light grey and ended up with such a big stash of yarn left over that I used it to knit another blanket! You need to decide for yourself if you want to buy the yarn as you go along (and risk some of the colours being slightly different) or to make a guess like I did.

Based on the weight of my test squares, I guesstimated that the blanket would need about 22 100g balls of yarn... so I bought 22 (divided amongst the colours) plus 6 extra balls (one extra of each colour). I bought: 6 light blue, 5 bright blue, 6 light grey, 5 dark grey, 6 white ... then later bought 7 more balls of the light grey because I'd run out (7 ended up being too many, as the winter months turned out to be a lot less grey and depressing than I'd expected, but light grey was definitely my most-used colour... it turns out that England is quite cloudy!). This is what I had left over... I think I used about 24 balls of yarn in total?


This is a really fun project to do, I really recommend it. In fact I almost wish I'd done it for a second year - the weather this summer was so different to last year, the two blankets would have turned out so different, with a gloomy spring and then a whole summer of bright blue skies like this.


The finished blanket is a really special, meaningful thing (a whole year recorded in a blanket!) and it's also a lovely object to own. I said when I started that I had no idea how it would look finished, but that I'd love it even if it was really peculiar-looking, but actually I think it's rather beautiful and the double thickness of yarn makes it warm and cosy and a bit like a patchwork quilt.

If you decide to knit your own sky blanket, do let me know! I'd love to see some pics of your progress :)

Fancy some more creative project ideas? Subscribe to my newsletter for a monthly free pattern and visit my crafty tutorial archive for lots of free tutorials.

Visit my shop to buy my printable PDF sewing patterns: