Showing posts with label baubles. Show all posts

Tuesday, 26 November 2019

Retro Felt Christmas Baubles Tutorial

Sew a set of felt ornaments for your Christmas tree, or to give as gifts this holiday season!


These decorations were inspired by pretty vintage glass baubles and are so much fun to sew. Make them in classic red and greens, retro pink, turquoise and lilac, or any colour combo that takes your fancy. You can also choose whether to stuff the baubles (as I did with the red and green set) or leave them unstuffed - flat ornaments are perfect for posting in a Christmas card!


Mix and match the colours across the set, and decorate them with co-ordinating embroidery thread, ribbons and trims, plus sequins and beads to add some festive sparkle. You could also use things like mini buttons and mini pompoms, or even strips of festive fabric cut with pinking shears.


This tutorial is an updated version of my vintage felt baubles tutorial. This version originally appeared on The Village Haberdashery's blog - visit their shop for lots of crafty goodness!

You will need: 

The template sheet provided (click here to download and print the PDF)
3 co-ordinating shades of felt for the baubles
Light grey felt for the bauble caps
Sewing thread to match all the felt colours
Embroidery thread in co-ordinating colours
Narrow ribbon for hanging the baubles (approx. 7 inches per bauble)
Assorted co-ordinating ribbons, ric-rac, sequins and seed beads for decorating the baubles
Sewing scissors
Embroidery scissors (these are great for cutting out small shapes!)
Sewing needles and pins
Optional: an air erasable fabric marker, a ruler, toy stuffing, and pinking shears

To make each bauble: 

1. Use the templates provided to cut two matching bauble pieces from your chosen shade of felt, and two cap pieces from light grey felt. Pin or hold the paper templates onto the felt as you cut around them.


2. Use pinking shears to cut a contrasting strip of felt to sit in the middle of the bauble. You can cut this by eye, or use a ruler and an air erasable fabric marker to draw guide lines to cut along. You can make this felt strip as wide or narrow as you like, but it must be long enough to overhang each side of the bauble as shown. Don’t have a pair of pinking shears? Just cut a straight edge with your sewing scissors instead.


3. Pin the felt strip to one of the bauble pieces and trim it to size. Using running stitch and matching sewing thread sew along the top and bottom edge, then remove the pin.


Now comes the fun part: decorating the bauble! You can use the photos in this post as inspiration, or get creative and come up with your own bauble designs. The basic design principle to follow is to add the embellishments in rows, keeping things as symmetrical as possible. 

4. Start by adding ribbon and/or ric-rac. To add each piece, cut a length slightly wider than the bauble (so it overhangs the edges by 1-2 cm at each side). Pin or hold the ribbon/ric-rac in place and sew along it with matching sewing thread. You can use running stitch, or sew tiny whip stitches along the edges. Fold the ends of the ribbon / ric-rac over and secure it at the back of the bauble shape with a few whip stitches, sewing into the felt but not through it.


You could add one piece of ribbon or add several pieces (as shown above). Create contrast and detail by sewing a narrow ribbon on top of a wider one, or by sewing a piece of ric-rac onto a second strip of contrasting felt (add this felt strip using the same method as in steps 2 and 3, but without the pinked edges).


5. Next, add some embroidery. Use co-ordinating embroidery thread, separate half the strands (so for six-stranded embroidery thread, just use three strands at a time) and switch to a larger sewing needle if necessary. If you’re an embroidery whizz you can add any stitches you fancy. I decorated my baubles with lines of running stitch and simple patterns of Xs and Vs, each sewn from pairs of stitches. To help keep your designs symmetrical, sew outwards from the centre of each row then fill in the second half with the same number of stitches.


Tip: If you have trouble keeping your stitched lines straight, use an air-erasable marker and a ruler to mark guide lines to sew along.

6. To finish the decoration, add a selection of sequins and small beads. Use matching sewing thread to sew each embellishment in place – I used thread to match the felt / ribbon I was sewing onto, but you could match your thread to the embellishments themselves if you prefer. Sew each seed bead with a double thickness of thread, using one stitch per bead. Secure each sequin with two or three stitches, depending on the size and shape of your chosen sequins. I used two stitches for the round sequins, and three for the stars.


7. Turn over the undecorated bauble piece. Position the two cap pieces on the top of the bauble pieces (which will become the front and back of the bauble) and sew them in place with two stitches each: one between each scallop. You’ll see that the cap pieces are larger than the cap shape on the top of the bauble – this is so that when you sew the grey felt caps together the bright felt of the bauble tops will be completely hidden inside the grey caps.


8. Turn the back bauble piece over again, and add a ribbon loop to the top. Cut a length of narrow ribbon about 7 inches long, fold it in half to form a loop and sew the ends in place with whip stitch and matching sewing thread. Take care to sew into the felt, not through it.


9. Place the two layers of the bauble together and begin joining the edges. Start with the cap, sewing around it with whip stitch and matching grey sewing thread.


If you want to stuff the baubles, add a very small piece of toy stuffing to the cap. Then start sewing around the edge of the bauble, using whip stitch and matching sewing thread. If you’re leaving the bauble unstuffed, sew all the way round the bauble and finish your stitching neatly at the back.


If you’re adding stuffing, sew most of the way round then stuff the bauble evenly with small pieces of toy stuffing and sew up the gap.

Tip: When sewing the long bauble, I’d recommend stuffing it gradually as you sew up the second side.

Enjoyed this free tutorial? Buy me a "coffee" and help support my blog!

Buy Me a Coffee at ko-fi.com

This tutorial is for non commercial use only: you can use it to make as many baubles as you want for yourself or as gifts, but please don't make any for sale. You may borrow a couple of photos if you want to blog about this project, but remember to credit me and link back to this page on my blog, and do not reproduce my entire tutorial / share my templates on your site. Thanks!

P.S. Subscribe to my newsletter for a monthly free pattern and visit my crafty tutorial archive for lots more free projects.

Visit my shop to buy my printable PDF sewing patterns:

Monday, 10 December 2018

Crafty Christmas Bauble Tutorial: Make a Sewing-Themed Ornament for Your Tree!

If you're reading this post (and you're not reading it because you're my mother, who sweetly reads all my blog posts just because I wrote them) then there's a pretty strong chance you love crafting.

Sooo... why not lean into your love of all things crafty and make some crafting-themed baubles to hang on your Christmas tree?

DIY Paper Christmas Baubles Decorated with an old Sewing Pattern

This tutorial is sponsored by Bostik, and is part of a series of crafty projects I'm sharing using their range of adhesives.

So far I've also made a giant floral hula hoop wreath, some autumn leaf cards, some fun 3D cards, a cute autumn scene in a mason jar, and a reindeer Christmas card.

Today's project is super easy and fun: turning bits and bobs from your craft stash into cute sewing-themed ornaments to add to your holiday decor.

DIY paper Christmas baubles

I decorated my baubles with some old sewing pattern pieces, a cheap and colourful tape measure I got in a sewing kit, and some sequins. You could also make these with knitting patterns, embroidery patterns,  or cross stitch charts, and they'd look just as fab!

These crafty baubles would be a great addition to your Christmas tree... but you could also use them to make a garland for your sewing room, as card toppers, or as gift tags (maybe with some crafty gift wrapping?).

DIY paper Christmas baubles

I decorated my baubles on one side only, but if you want your baubles to be double-sided just repeat steps 2-4 as you work through them.

You will need:

- a Bostik Blu Stick (or other glue suitable for sticking paper and card)
- some Bostik White Glu (or other craft glue)
- white card
- craft scissors
- a pencil
- an old sewing pattern (or a knitting pattern or cross stitch chart, e.g. from a craft magazine or a second hand book).
- a measuring tape
- some sequins
- a darning needle (to poke holes in the tops of the baubles)
- some thread, yarn or bakers twine for hanging the baubles
- the bauble template provided at the bottom of this post

How to make a craft-themed Christmas bauble:

1. Use the bauble template and a sharp pencil to draw a bauble shape on white card, then cut it out.

Cutting out the bauble shape

White card is crucial as a neutral base if you're using a semi-transparent sewing pattern to decorate your baubles, but if you're using book or magazine pages, you could use scrap card from cereal boxes or other packaging as your bauble base because the card will be hidden by the thicker paper.

2. Use a glue stick to cover the card bauble in glue, then stick it to the back of the sewing pattern (or whichever craft pattern you're using). I found it helpful to roughly cut out interesting sections of the sewing pattern ready to stick the bauble shapes to, rather than working with whole pattern pieces laid out on my desk.

I used a Bostik Blu Stick for sticking my bauble shapes. The glue starts out blue then dries totally clear, so it's perfect for making sure you've completely and evenly covered a card shape with glue. 

Sticking the bauble shape to the sewing pattern

Before the glue dries, turn the bauble over and carefully smooth down the paper to make sure it's completely stuck down without any air bubbles or creases.

The bauble shape stuck to the sewing pattern

Once the glue has dried and the paper is firmly attached, cut away the excess paper leaving a decorated bauble shape.

Bauble shape decorated with an old sewing pattern

3. Cut a length of measuring tape slightly wider than the bauble.

Don't have a measuring tape or just fancy a different look? If you're using a pattern from a craft book or magazine, you could cut a colourful strip from the photo of the finished project to run across the centre of the bauble.

Adding the measuring tape to the bauble

Add some craft glue to the back of the tape and press it in place on the front of the bauble.

I used Bostik White Glu to attach the measuring tape (and the sequins in the next step). The glue is really easy to control via the nozzle and it dries clear so if you accidentally use too much it won't show on your finished bauble.

Adding the measuring tape to the bauble

Turn the bauble over and leave it to dry, then trim away the excess tape.

Paper bauble decorated with sewing pattern and measuring tape

4. Add two rows of sequins to give your bauble some sparkle!

Tip: lay out your sequins on the bauble to check how many will fit in each row, and to get a rough idea of the spacing before you get out the glue.

I used more of the Bostik White Glu to attach my sequins, adding two rows of small dabs of glue then carefully pressing the sequins in position.

Adding the sequins to the bauble

Leave the bauble to dry - the glue will dry clear, so don't worry if you add a bit too much!

Waiting for the glue to dry

5. Use a darning needle to carefully poke a hole in the top of the bauble, then use the needle to thread a piece of sewing thread / yarn / bakers twine. I used some lovely sparkly sewing thread for my baubles, knotting the thread securely in a loop and trimming any excess loose ends.

DIY paper Christmas baubles


DISCLOSURE: this post is sponsored by Bostik, who also provided the Blu Stick and White Glu I used to make the baubles.

Click here to open the template sheet in a new window, make sure you're viewing it full size then print it at 100%.

DIY Christmas bauble template


P.S. Fancy some more free crafty goodness? Subscribe to my newsletter for a monthly free pattern and visit my crafty tutorial archive for lots more free projects.

Monday, 9 January 2017

December in Pictures: Frosty Leaves, Festive Fun & a New Home

It was rather quiet on my blog this December because I was a) busy getting ready to move, then b) moving house, and then c) doing lots of DIY in my new flat... but I also got up to some fun stuff and shared pictures! Wanna see?

I started the month in true Instagrammer / blogger style, by almost missing my train because I'd stopped to take photos of some frosty leaves. Totally worth it.


I got some gorgeous post from one of my (then) blog sponsors, in thanks for hosting their ad. How sweet is that? The adorable bunny brooch is by illustrator Emma Evans. 


I spent most of the start of December packing ready to move house, and ticking lots of other things off my "stuff that needs to get done before I can move" checklist. That bunny brooch got packed within hours of me taking that photo!

Of course, I couldn't resist squeezing in a couple more local Nice Days Out before moving away from the South-East. I spent a busy day in London, doing some Christmas shopping and oohing over all the festive loveliness (the lights, the shop windows and all the sparkly things for sale).

This is the swoonworthy flower stall in one of Harrods' food halls. It was such fun picking out delicious gifts for friends and family, umming and ahhing over all the loveliness.

 
I can never resist popping into the haberdashery department when I'm in Liberty. Not least because they're still selling my book! So thrilling.


My second last-Nice-Day-Out-before-I-move-away was a trip to Windsor. They had a gorgeous Christmas tree this year - a gift from the German town where Queen Victoria's husband Albert was born. Victoria and Albert popularised the idea of Christmas trees in Britain, and apparently Albert had his first tree at Windsor shipped in from his home town!


Windsor Castle is always a wonderful place to visit, but especially so at Christmas. It's quieter in the off-season, and the Castle is decorated with wreaths and garlands and Christmas trees, including a huge tree in the main hall.


I had a marvelous bit of luck, as it turned out that the only day I could manage to get away to Windsor for the day was not only wonderfully sunny (yay!) but it was also part of a special festive weekend of events at the Castle (hurrah!). There were choirs singing carols, ornament-making workshops, and a very funny "pop-up Panto". So much fun!

I also really enjoyed Fashioning a Reign, an exhibition of some of the Queen's outfits. Some of the embroidery and beading was quite incredible.

Back at home, I wrapped all my Christmas gifts super early so I could leave them at my parents house (to save carting them back and forth as I moved house then headed "home" for a family Christmas). Isn't the gift wrap gorgeous? It's not technically Christmas wrap, but who cares!


I totally dropped the ball on Christmas cards this year (I didn't send a single one! and I love sending Christmas cards!) but at least I managed this.

Before my unplanned blogging break I finished blogging about my trip to Leeds (so much great architecture!) and my day in Oxford with Polly. This is one of my favourite photos from that Oxford trip: a quiet corner of All Souls College.

 
I also blogged about the felt Christmas baubles tutorial I'd designed for the Village Haberdashery's blog. It feels a teeny bit pointless linking to a Christmas tutorial in January, but maybe you could bookmark it (or Pin it!) and make some felt baubles for Christmas 2017?


Then in the middle of December I moved to the seaside! Into my very own flat!


I'm really happy to be living in the South-West again (I love it here and had missed it a lot), and it's very exciting having my own place.

I shared this photo a few days after moving in: I might not have had a cooker or a fridge yet (or much proper furniture!) but I did have all the important stuff, like piles of colourful handmade blankets.


Seriously though, it has been such a joy finally using these blankets in my new home.

There's my Happy Rainbow Blanket (which I still need to take "finished" photos of!), a Giant Granny Square blanket (the first and only thing I have ever crocheted), my Sky Blanket, and my Random Squares blanket (which includes squares I knitted as a teenager). Each of these blankets contain so much meaning and so many memories, and they're all so wonderfully colourful. I love them.

It's also been really nice rediscovering some of the things I've had in storage for the past few years. I missed these plates rather a lot - isn't the pattern lush?


After a couple of busy weeks of moving boxes and doing DIY it was time to head to my parents house for Christmas. These are a choir of singing trees from the Christmas at Kew light trail I visited with my mum back in November; the trees lit up as they "sang". Delightful!


We had a lovely quiet Christmas - just how we like it. We watched lots of films and some Christmas telly and ate far too much food.

These are the excellent gifts I got for Christmas: the Ghostbusters remake on DVD (which I made my family watch immediately; such a great film!) and a Chocolate Orange (yum!).  


Aaaand that's it for another month!

I'm lauralupinhoward on Instagram - click here to visit my page and follow me. You'll also find me on Facebook and Twitter.

Monday, 31 October 2016

Christmas Ornament Tutorial: Sew a Felt Angel Bauble

UPDATE: this angel ornament tutorial is now available as a PDF pattern in my shop.

-------

felt angel ornament

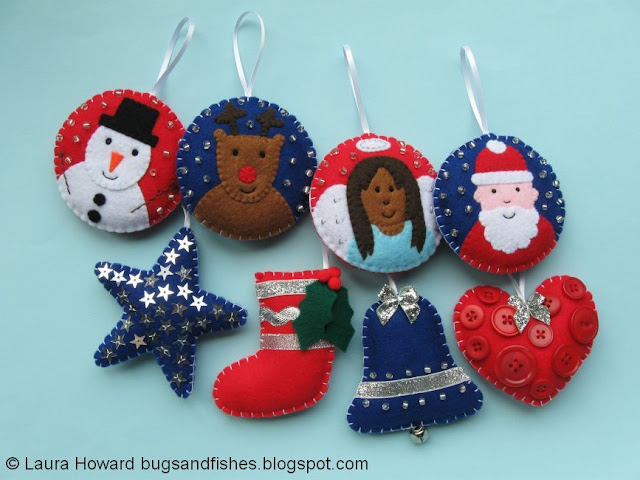
This angel bauble is part of a set of cute felt Christmas ornaments I designed for docrafts Creativity magazine last year.

felt Christmas ornaments

So far I've shared tutorials for making a snowman bauble, a stripey stocking, a reindeer bauble, and a sparkly star. The final few projects will be shared here on my blog in the next few weeks.

 felt Christmas ornaments
felt angel ornament


felt angel ornament


felt angel ornament


Subscribe to my newsletter for creative updates, and visit my crafty tutorial archive for lots of free projects. 

Visit my shop to buy my printable PDF sewing patterns: