As I mentioned last week, I've re-opened my craft supplies shop and am busy stocking it with lots of colourful, crafty goodness.
I've been busy photographing, measuring, and listing a whole bunch of lovely new things. Wanna see?
There are felt rainbows (and pick-you-own-colour felt squares), rainbow ribbons, pretty rainbows of pins, and bargain rainbow embroidery thread bundles. So much lovely colour!
I've also got some fab ribbon that's printed to look like a measuring tape, some black elastic for mask-making, cover buttons and a super-useful button covering tool (perfect for making felt buttons), and some GORGEOUS shimmery two-tone buttons.
Then there's embroidery scissors (so useful for cutting out small felt pieces!), lovely wooden cotton reels, big card bobbins for organising your yarns and ribbons, and some white elastic.
I've also bought some cute and colourful stickers. These are great for crafty projects, gift wrapping, journalling and scrapbooking, and for sticking on your snail mail.
There are cute woodland animal stickers (I've been sticking these on my shop parcels lately, I love them!), rainbow star, dot, and heart sticker sheets, and lots of colourful dots. I think the dots would be wonderful for creating bullet-pointed lists in your journal or diary!
I've also got colourful retro vinyl stickers featuring rainbows and unicorns and other fun stuff, and I've got some bargain books of mini stickers: cute kitties and happy stars.
Pen-wise, I've listed some fun colour-changing pens and a pair of metallic markers (I love a good metallic marker!). Then I've got giant wooden pegs (because why not? Oversized stuff is so joyful!) and packs of gorgeous glitter card (sooooooo shiny).
If you'd rather have tiny pegs than giant ones, don't worry - I've got you covered. I'm also selling a fab pack of luggage tags (I just adore those bright colours), a useful pack of coloured card, and some flower press kits.
I'm particularly excited to be stocking the flower presses as I feel
like they're just the kind of relaxing, nature-loving craft we all need
right now! I've got three sizes in stock, ranging from a mini press to
the biggest flower press I have ever seen in my LIFE (seriously, it is
HUGE). The boards are blank for you to decorate with paint, decoupage,
stickers, etc, so one of these kits is basically two crafty projects in
one.
Click here to visit my shop and see everything that's in stock!
Showing posts with label gift tags. Show all posts
Showing posts with label gift tags. Show all posts
Monday, 25 May 2020
New Craft Supplies in My Shop!
Labels:
button covering tool,
buttons,
cover buttons,
craft supplies,
crafting,
embroidery thread,
felt,
flower press,
gift tags,
glitter,
haberdashery,
new,
pegs,
pens,
pins,
ribbon,
scissors,
stickers,
threads
Monday, 27 May 2019
8 Paper Crafting Ideas: DIY Gift Boxes, Cards, Garlands, & More!
Today I’m sharing some fun and easy ideas for crafting with patterned paper and card.
This tutorial originally appeared on The Village Haberdashery's blog and was inspired by a range of gorgeous paper pads they stock. Each pad includes 30 sheets of co-ordinating paper and card (15 sheets of each), which all have a grid of squares on the back so you can easily cut straight edges.
I chose to work with the marbled paper pad – aren’t these patterns lovely?
As you can see, as well as the detailed marbled designs there are also some plain sheets in soft, ombré colours. You could use the papers for all kinds of fabulous crafty projects, but I’ve put together a few simple ideas to get you started!
1. Greetings Cards.
I love sending handmade cards to my friends. Everyone loves a bit of proper post, and there’s nothing quite like a handmade card. Use simple shapes and geometric designs, layering patterns to create some stylish cards. Click here for the template sheet to recreate my designs, or draw your own.
Cut and fold a sheet of card to size (remember if you’re using the card from the pad there will be a grid of squares on the inside) or decorate some ready-made blank cards.
Use the card as a template to cut out a section from one of the ombré pieces. The subtle colour variations make a great backdrop for adding some bold shapes. Stick the paper to the front of the card with a glue stick, lining up the edges neatly.
Then cut out your chosen shapes and stick them in position. You can use layers of the plain paper to create frames for the shapes (like the heart) or just layer the patterned papers on top of each other.
If you want, you can use a fine pen to draw around the shapes to make them really stand out – but make sure you have a steady hand! (Can you spot where mine slipped?)
2. Envelopes & Notecards.
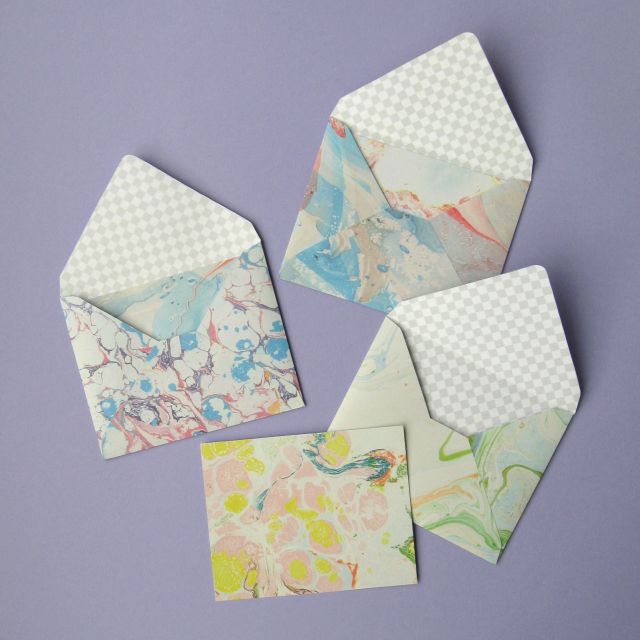
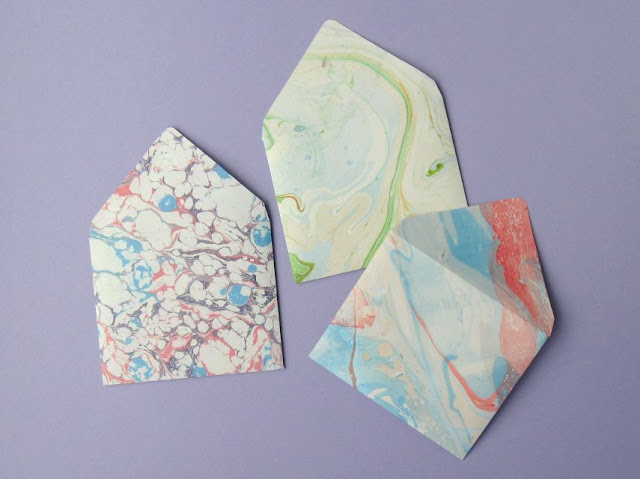
As an alternative to making handmade cards why not make some handmade envelopes? These are lovely to send but they also make a great gift: make a set of five or six envelopes with co-ordinating notecards, add some plain address labels and tie them up in a bundle with a bit of baker’s twine ready for gifting.
Find an envelope you like the shape of or search online for some printable envelope templates. If you’re going to be making lots of envelopes, I’d recommend gluing the shape to a piece of card (part of a cereal box would be perfect) to make a sturdy template.
Trace the envelope shape onto the back of one of the patterned paper pieces. Cut it out and use a ruler and one blade of a pair of scissors to carefully score along the fold lines. Fold the paper into an envelope shape and use a glue stick to secure the edges. You can use more glue to close the envelopes later when they’re ready to send, or add a couple of strips of narrow double-sided sticky tape to the edges of the flaps.
To make the co-ordinating notecards, just cut rectangular pieces of card slightly smaller than the envelopes so they’ll tuck neatly inside.
3. Gift Wrapping.
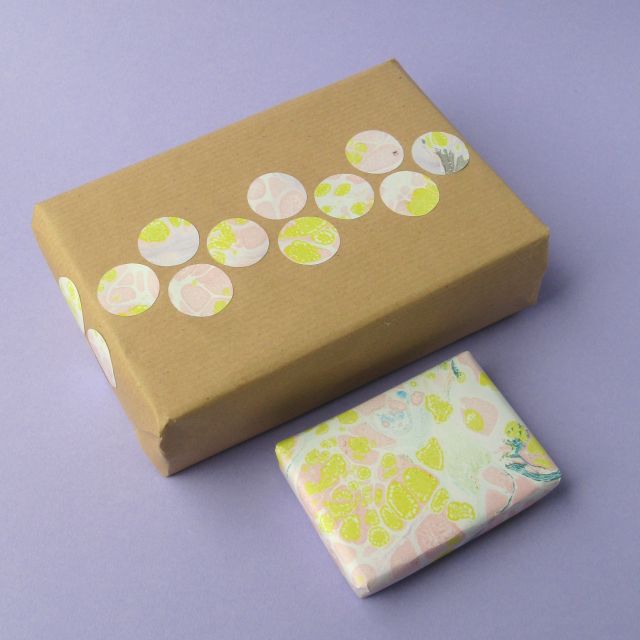
Pretty craft papers also make lovely wrapping paper! Use them to wrap small, special gifts or cut shapes from leftover scraps to create patterns on plain parcels.
I used the lid of a glue stick as a template to cut lots of identically sized paper circles, which I glued in a row across the parcel. You could cut different sized circles, glue them in rows or dot them at random, or explore different shapes like stripes and triangles. Get creative and turn a plain package into something fabulous!
4. Gift Tags.
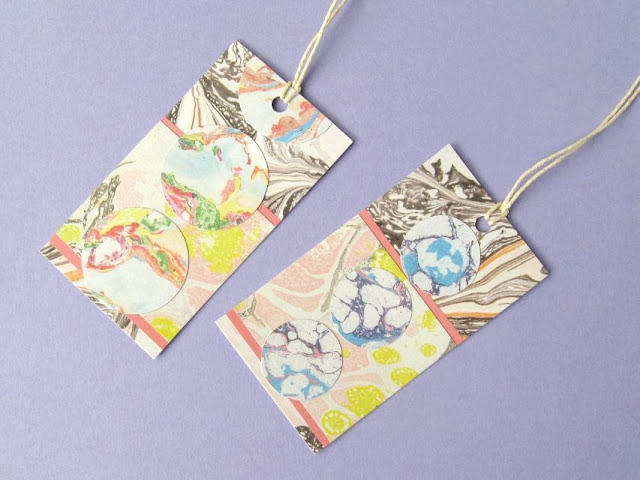
Another great way to make use of scraps of pretty paper and card is by making gift tags. Cut out lots of different shapes, layer colours and patterns, and see what you come up with!
Cut out a rectangle from one of the card sheets, punching a hole near the top and adding some string, twine or yarn to create the tag (or just decorate some plain ready-made tags!).
I added bands of plain and patterned paper, cutting them slightly wider than the tag and trimming them neatly to size once I’d glued them in position. I then added some card and paper circles in contrasting patterns to complete the designs, punched the holes and added some string.
5. Paper Chains.
When was the last time you made paper chains? They are such fun to put together and make wonderfully colourful party décor.
Cut several sheets of the decorative paper into strips about 3cm wide (each sheet of paper makes 10 strips). Bend one strip so the two ends meet, securing them with a piece of clear sticky tape. Add a second strip interlinking with the first, and continue to build the chain mixing patterns as you go.
You can use one strip of paper per chain link, or make a chain like the one pictured with two strips placed together so the inside and outside of each loop is patterned.
6. Bunting & Garlands.
Bunting is a summer party classic! It’s so easy to whip up a length of bunting or a modern garland to decorate your space… then when the party is over it can be disassembled and the pieces returned to your crafty stash.
Use the templates provided to cut out lots of bunting flags or circles from paper or card. Use a large, sharp sewing needle to poke two holes in each piece (at the top two points of the triangles or at opposite sides of the circles).
Use the needle to thread the flags or circles onto a long piece of sewing thread, yarn or thin twine. Double up the circles (as they tend to spin when hung up) and double the bunting flags if the back of the bunting will be visible when you hang it.
7. Party Food Toppers.
Let your guests know what’s in your party treats with these colourful toppers. This is such a simple idea but a practical and pretty one and a fab way to use up small bits of lovely paper.
Using the templates provided, cut circles from the one of the less busily patterned card sheets to create labels for sandwiches, cupcakes and other party foods.
Add the important info in pen, and attach a cocktail stick to the back of each circle with a piece of sticky tape. You could also cut extra paper circles to scatter on the table-top for extra Instagram-ability!
8. Gift Boxes.
If you’re giving a small gift, make it extra special by making a gift box. These boxes would also be perfect for wedding or party favours. Scrunch up some pretty tissue paper inside the box then add your gift.
Use the diagrams provided as a guide to drawing the box templates (one for the box itself, and one for the lid). If you’re just making one box, you can draw the template directly onto the back of the decorative card. If you’re planning on making lots of boxes you’ll save time by making some re-usable templates you can quickly draw around.
Draw and cut out one box and one box lid. I’ve designed the templates so both shapes will fit onto one sheet of card, but you can mix and match the patterns as you like.
Use a ruler and one blade of a pair of scissors to carefully score along the fold lines. Crease all the folds then use a glue stick to add glue to the four flaps (on the patterned/colourful side of the card) and carefully assemble the box and its lid.
Follow the links to view and download the printable PDF templates:
- Greetings Cards
- Bunting & Garlands
- Food Toppers
- Gift Boxes
Enjoyed these free projects? Buy me a "coffee" and help support my blog!

P.S. Subscribe to my newsletter for a monthly free pattern and visit my crafty tutorial archive for lots more project ideas plus step-by-step tutorials.
Visit my shop to buy my printable PDF sewing patterns:
This tutorial originally appeared on The Village Haberdashery's blog and was inspired by a range of gorgeous paper pads they stock. Each pad includes 30 sheets of co-ordinating paper and card (15 sheets of each), which all have a grid of squares on the back so you can easily cut straight edges.
I chose to work with the marbled paper pad – aren’t these patterns lovely?
As you can see, as well as the detailed marbled designs there are also some plain sheets in soft, ombré colours. You could use the papers for all kinds of fabulous crafty projects, but I’ve put together a few simple ideas to get you started!
1. Greetings Cards.
I love sending handmade cards to my friends. Everyone loves a bit of proper post, and there’s nothing quite like a handmade card. Use simple shapes and geometric designs, layering patterns to create some stylish cards. Click here for the template sheet to recreate my designs, or draw your own.
Cut and fold a sheet of card to size (remember if you’re using the card from the pad there will be a grid of squares on the inside) or decorate some ready-made blank cards.
Use the card as a template to cut out a section from one of the ombré pieces. The subtle colour variations make a great backdrop for adding some bold shapes. Stick the paper to the front of the card with a glue stick, lining up the edges neatly.
Then cut out your chosen shapes and stick them in position. You can use layers of the plain paper to create frames for the shapes (like the heart) or just layer the patterned papers on top of each other.
If you want, you can use a fine pen to draw around the shapes to make them really stand out – but make sure you have a steady hand! (Can you spot where mine slipped?)
2. Envelopes & Notecards.
As an alternative to making handmade cards why not make some handmade envelopes? These are lovely to send but they also make a great gift: make a set of five or six envelopes with co-ordinating notecards, add some plain address labels and tie them up in a bundle with a bit of baker’s twine ready for gifting.
Find an envelope you like the shape of or search online for some printable envelope templates. If you’re going to be making lots of envelopes, I’d recommend gluing the shape to a piece of card (part of a cereal box would be perfect) to make a sturdy template.
Trace the envelope shape onto the back of one of the patterned paper pieces. Cut it out and use a ruler and one blade of a pair of scissors to carefully score along the fold lines. Fold the paper into an envelope shape and use a glue stick to secure the edges. You can use more glue to close the envelopes later when they’re ready to send, or add a couple of strips of narrow double-sided sticky tape to the edges of the flaps.
To make the co-ordinating notecards, just cut rectangular pieces of card slightly smaller than the envelopes so they’ll tuck neatly inside.
3. Gift Wrapping.
Pretty craft papers also make lovely wrapping paper! Use them to wrap small, special gifts or cut shapes from leftover scraps to create patterns on plain parcels.
I used the lid of a glue stick as a template to cut lots of identically sized paper circles, which I glued in a row across the parcel. You could cut different sized circles, glue them in rows or dot them at random, or explore different shapes like stripes and triangles. Get creative and turn a plain package into something fabulous!
4. Gift Tags.
Another great way to make use of scraps of pretty paper and card is by making gift tags. Cut out lots of different shapes, layer colours and patterns, and see what you come up with!
Cut out a rectangle from one of the card sheets, punching a hole near the top and adding some string, twine or yarn to create the tag (or just decorate some plain ready-made tags!).
I added bands of plain and patterned paper, cutting them slightly wider than the tag and trimming them neatly to size once I’d glued them in position. I then added some card and paper circles in contrasting patterns to complete the designs, punched the holes and added some string.
5. Paper Chains.
When was the last time you made paper chains? They are such fun to put together and make wonderfully colourful party décor.
Cut several sheets of the decorative paper into strips about 3cm wide (each sheet of paper makes 10 strips). Bend one strip so the two ends meet, securing them with a piece of clear sticky tape. Add a second strip interlinking with the first, and continue to build the chain mixing patterns as you go.
You can use one strip of paper per chain link, or make a chain like the one pictured with two strips placed together so the inside and outside of each loop is patterned.
6. Bunting & Garlands.
Bunting is a summer party classic! It’s so easy to whip up a length of bunting or a modern garland to decorate your space… then when the party is over it can be disassembled and the pieces returned to your crafty stash.
Use the templates provided to cut out lots of bunting flags or circles from paper or card. Use a large, sharp sewing needle to poke two holes in each piece (at the top two points of the triangles or at opposite sides of the circles).
Use the needle to thread the flags or circles onto a long piece of sewing thread, yarn or thin twine. Double up the circles (as they tend to spin when hung up) and double the bunting flags if the back of the bunting will be visible when you hang it.
7. Party Food Toppers.
Let your guests know what’s in your party treats with these colourful toppers. This is such a simple idea but a practical and pretty one and a fab way to use up small bits of lovely paper.
Using the templates provided, cut circles from the one of the less busily patterned card sheets to create labels for sandwiches, cupcakes and other party foods.
Add the important info in pen, and attach a cocktail stick to the back of each circle with a piece of sticky tape. You could also cut extra paper circles to scatter on the table-top for extra Instagram-ability!
8. Gift Boxes.
If you’re giving a small gift, make it extra special by making a gift box. These boxes would also be perfect for wedding or party favours. Scrunch up some pretty tissue paper inside the box then add your gift.
Use the diagrams provided as a guide to drawing the box templates (one for the box itself, and one for the lid). If you’re just making one box, you can draw the template directly onto the back of the decorative card. If you’re planning on making lots of boxes you’ll save time by making some re-usable templates you can quickly draw around.
Draw and cut out one box and one box lid. I’ve designed the templates so both shapes will fit onto one sheet of card, but you can mix and match the patterns as you like.
Use a ruler and one blade of a pair of scissors to carefully score along the fold lines. Crease all the folds then use a glue stick to add glue to the four flaps (on the patterned/colourful side of the card) and carefully assemble the box and its lid.
Follow the links to view and download the printable PDF templates:
- Greetings Cards
- Bunting & Garlands
- Food Toppers
- Gift Boxes
Enjoyed these free projects? Buy me a "coffee" and help support my blog!

P.S. Subscribe to my newsletter for a monthly free pattern and visit my crafty tutorial archive for lots more project ideas plus step-by-step tutorials.
Visit my shop to buy my printable PDF sewing patterns:
Labels:
boxes,
bunting,
cards,
cards and wrap,
crafting,
gift tags,
gift wrapping,
gifts,
notecards,
paper,
paper chains,
paper crafting
Monday, 10 December 2018
Crafty Christmas Bauble Tutorial: Make a Sewing-Themed Ornament for Your Tree!
If you're reading this post (and you're not reading it because you're my mother, who sweetly reads all my blog posts just because I wrote them) then there's a pretty strong chance you love crafting.
Sooo... why not lean into your love of all things crafty and make some crafting-themed baubles to hang on your Christmas tree?
This tutorial is sponsored by Bostik, and is part of a series of crafty projects I'm sharing using their range of adhesives.
So far I've also made a giant floral hula hoop wreath, some autumn leaf cards, some fun 3D cards, a cute autumn scene in a mason jar, and a reindeer Christmas card.
Today's project is super easy and fun: turning bits and bobs from your craft stash into cute sewing-themed ornaments to add to your holiday decor.
I decorated my baubles with some old sewing pattern pieces, a cheap and colourful tape measure I got in a sewing kit, and some sequins. You could also make these with knitting patterns, embroidery patterns, or cross stitch charts, and they'd look just as fab!
These crafty baubles would be a great addition to your Christmas tree... but you could also use them to make a garland for your sewing room, as card toppers, or as gift tags (maybe with some crafty gift wrapping?).
I decorated my baubles on one side only, but if you want your baubles to be double-sided just repeat steps 2-4 as you work through them.
You will need:
- a Bostik Blu Stick (or other glue suitable for sticking paper and card)
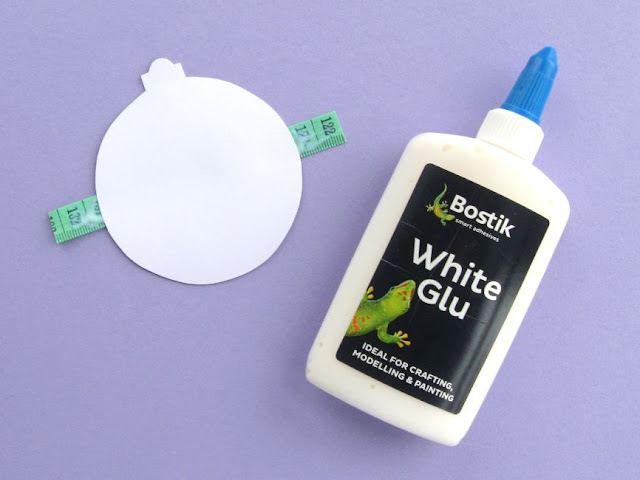
- some Bostik White Glu (or other craft glue)
- white card
- craft scissors
- a pencil
- an old sewing pattern (or a knitting pattern or cross stitch chart, e.g. from a craft magazine or a second hand book).
- a measuring tape
- some sequins
- a darning needle (to poke holes in the tops of the baubles)
- some thread, yarn or bakers twine for hanging the baubles
- the bauble template provided at the bottom of this post
How to make a craft-themed Christmas bauble:
1. Use the bauble template and a sharp pencil to draw a bauble shape on white card, then cut it out.
White card is crucial as a neutral base if you're using a semi-transparent sewing pattern to decorate your baubles, but if you're using book or magazine pages, you could use scrap card from cereal boxes or other packaging as your bauble base because the card will be hidden by the thicker paper.
2. Use a glue stick to cover the card bauble in glue, then stick it to the back of the sewing pattern (or whichever craft pattern you're using). I found it helpful to roughly cut out interesting sections of the sewing pattern ready to stick the bauble shapes to, rather than working with whole pattern pieces laid out on my desk.
I used a Bostik Blu Stick for sticking my bauble shapes. The glue starts out blue then dries totally clear, so it's perfect for making sure you've completely and evenly covered a card shape with glue.
Before the glue dries, turn the bauble over and carefully smooth down the paper to make sure it's completely stuck down without any air bubbles or creases.
Once the glue has dried and the paper is firmly attached, cut away the excess paper leaving a decorated bauble shape.
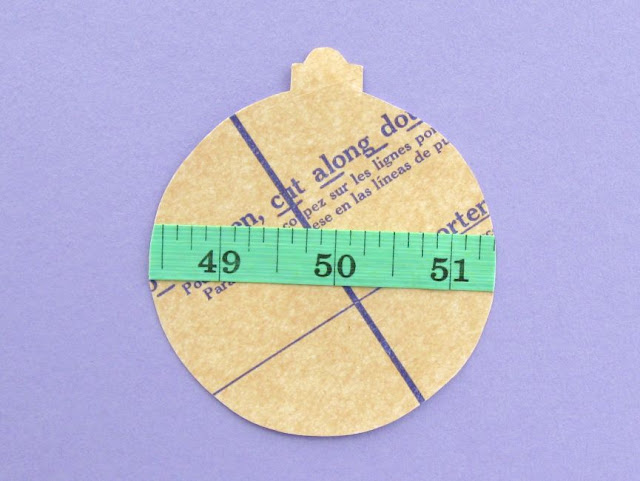
3. Cut a length of measuring tape slightly wider than the bauble.
Don't have a measuring tape or just fancy a different look? If you're using a pattern from a craft book or magazine, you could cut a colourful strip from the photo of the finished project to run across the centre of the bauble.
Add some craft glue to the back of the tape and press it in place on the front of the bauble.
I used Bostik White Glu to attach the measuring tape (and the sequins in the next step). The glue is really easy to control via the nozzle and it dries clear so if you accidentally use too much it won't show on your finished bauble.
Turn the bauble over and leave it to dry, then trim away the excess tape.
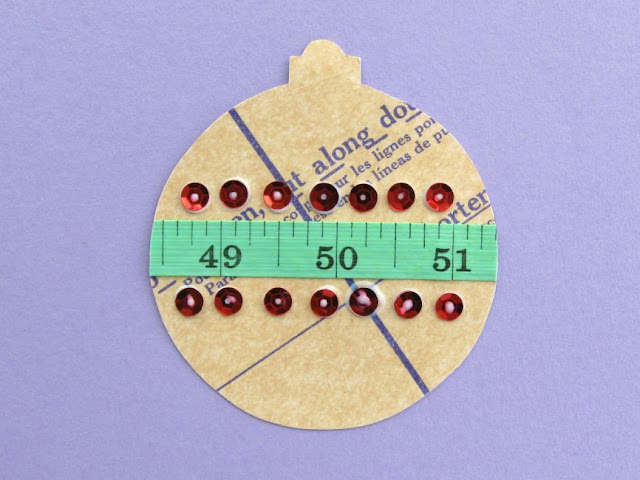
4. Add two rows of sequins to give your bauble some sparkle!
Tip: lay out your sequins on the bauble to check how many will fit in each row, and to get a rough idea of the spacing before you get out the glue.
I used more of the Bostik White Glu to attach my sequins, adding two rows of small dabs of glue then carefully pressing the sequins in position.
Leave the bauble to dry - the glue will dry clear, so don't worry if you add a bit too much!
5. Use a darning needle to carefully poke a hole in the top of the bauble, then use the needle to thread a piece of sewing thread / yarn / bakers twine. I used some lovely sparkly sewing thread for my baubles, knotting the thread securely in a loop and trimming any excess loose ends.
DISCLOSURE: this post is sponsored by Bostik, who also provided the Blu Stick and White Glu I used to make the baubles.
Click here to open the template sheet in a new window, make sure you're viewing it full size then print it at 100%.
P.S. Fancy some more free crafty goodness? Subscribe to my newsletter for a monthly free pattern and visit my crafty tutorial archive for lots more free projects.
Labels:
#BostikBlogger,
baubles,
Bostik,
christmas,
christmas crafting,
christmas ornaments,
craft tutorial,
decorations,
free tutorial,
gift tags,
gift wrapping,
how to,
ornaments,
paper crafting,
sponsored post
Thursday, 6 November 2014
How To: Minimalist Neon Christmas Cards & Tags
Today I'm sharing an easy "how to" for making simple Christmas cards and tags from neon felt.
This is a super simple design but the bright colour + the texture of the felt = a great combo. Of course, you could use any colour of felt for this project but the neon colours work so well!
I used acrylic felt for this project, the same type sold at Fuzzy Fish (as "lime" and "punk pink"). Cloud Craft also sell neon pink felt. (Full disclosure, these shops are currently sponsors of my blog but these are in no way sponsored links... I just love neon felt!). If you've spotted other places selling neon felt, please share a link in the comments :)
You will need:
Blank card & tags - I used these recycled cards from Paperchase
Felt
Fabric scissors
The templates at the bottom of this post
Glue or double sided sticky tape (and scissors for cutting the tape)
A black marker or other pen
Optional: a pencil, ruler and eraser
To make the cards:
1. Use the large template provided to cut out your Christmas tree shapes, one for each card you want to send.
2. Stick one tree to each card. You can use craft glue or pieces of double-sided tape. Peeling off the tape can be a bit fiddly but it's mess-free and sticks felt to card really well with no lumps or bumps. Make sure to leave space at the bottom of the card to write your greeting, if you want to add one.
3. Use a marker or other pen to write a simple greeting under the tree. It's a good idea to write the text in pencil first to make sure you get it nicely centred. You can also use a ruler to give yourself a straight line to write across. Wait until the ink is totally dry and then erase the pencil lines.
I tried using a silver marker for the card with the green tree but it didn't work at all as the silver didn't show up well on the brown card. Oops! However, silver lettering would look great if you were using black cards.
For a super minimalist look, leave the cards text free!
To make the tags:
1. Use the small template provided to cut out your Christmas tree shapes. If needed, resize the template to fit your tags. I used ready-made blank tags but you could make some yourself from blank card, a hole punch and a piece of string/twine/yarn/etc.
2. Stick a Christmas tree to each tag. You don't need much to attach the trees - I just used one piece of double-sided tape.
And that's it! Quick and easy tags ready for dressing up your parcels. These tags would look great paired with brown paper and silver ribbons... or with other neon gift-wrapping supplies. Neon London sell a great selection of neon ribbons and wrap.
Click here to view the template sheet in a new window or tab. Make sure you're viewing it full size, then print at 100%.
This tutorial is for personal use only. You may borrow a couple of photos if you want
to blog about this project, but remember to credit me and link back to
this page on my blog, and do not reproduce my entire tutorial / share my templates on your
site. Thanks!
Enjoyed this free tutorial? Buy me a "coffee" and help support my blog!

Subscribe to my newsletter for a monthly free pattern and visit my crafty tutorial archive for lots more free projects.
Visit my shop to buy my printable PDF sewing patterns:
This is a super simple design but the bright colour + the texture of the felt = a great combo. Of course, you could use any colour of felt for this project but the neon colours work so well!
I used acrylic felt for this project, the same type sold at Fuzzy Fish (as "lime" and "punk pink"). Cloud Craft also sell neon pink felt. (Full disclosure, these shops are currently sponsors of my blog but these are in no way sponsored links... I just love neon felt!). If you've spotted other places selling neon felt, please share a link in the comments :)
You will need:
Blank card & tags - I used these recycled cards from Paperchase
Felt
Fabric scissors
The templates at the bottom of this post
Glue or double sided sticky tape (and scissors for cutting the tape)
A black marker or other pen
Optional: a pencil, ruler and eraser
To make the cards:
1. Use the large template provided to cut out your Christmas tree shapes, one for each card you want to send.
2. Stick one tree to each card. You can use craft glue or pieces of double-sided tape. Peeling off the tape can be a bit fiddly but it's mess-free and sticks felt to card really well with no lumps or bumps. Make sure to leave space at the bottom of the card to write your greeting, if you want to add one.
3. Use a marker or other pen to write a simple greeting under the tree. It's a good idea to write the text in pencil first to make sure you get it nicely centred. You can also use a ruler to give yourself a straight line to write across. Wait until the ink is totally dry and then erase the pencil lines.
I tried using a silver marker for the card with the green tree but it didn't work at all as the silver didn't show up well on the brown card. Oops! However, silver lettering would look great if you were using black cards.
For a super minimalist look, leave the cards text free!
To make the tags:
2. Stick a Christmas tree to each tag. You don't need much to attach the trees - I just used one piece of double-sided tape.
And that's it! Quick and easy tags ready for dressing up your parcels. These tags would look great paired with brown paper and silver ribbons... or with other neon gift-wrapping supplies. Neon London sell a great selection of neon ribbons and wrap.
Click here to view the template sheet in a new window or tab. Make sure you're viewing it full size, then print at 100%.
Enjoyed this free tutorial? Buy me a "coffee" and help support my blog!

Subscribe to my newsletter for a monthly free pattern and visit my crafty tutorial archive for lots more free projects.
Visit my shop to buy my printable PDF sewing patterns:
Labels:
cards,
christmas,
christmas cards,
christmas crafting,
christmas trees,
gift tags,
how to,
neon,
simple
Subscribe to:
Posts (Atom)












.jpg)
.jpg)
.jpg)
.jpg)
.jpg)
.jpg)
.jpg)
.jpg)
.jpg)
