Showing posts with label parcels. Show all posts

Tuesday, 31 December 2019

Brown Paper Packages Tied Up With... Washi Tape!

This Christmas my gift wrapping was all about decorative tape!   


It's so easy to add simple stripes of washi or glitter tape to plain parcels, and the effect is fantastic. I wrapped all my gifts with brown paper then decorated them with lines of pretty tape: narrow but super sparkly glitter tape, and a trio of green and pink tapes with festive woodland designs on them.

I'd really recommend this as an easy way to wrap special gifts, whatever the occasion. Just choose tape in appropriate colours and designs and get sticking. Everyone was a lot more impressed with the results than my level of effort really deserved!

The glitter tape looked really fabulous against the plain brown parcel paper.


Top tip: if you're adding stripes to the centre of a parcel, start with the line that's in the very centre then work outwards.

Try to keep your lines evenly space and if you're adding two overlapping sets of stripes make sure to take extra care that you're sticking the colours in the same order each time. I wrapped these gifts quite late one night and didn't pay enough attention to the colours and was super annoyed when I realised my mistake.


Of course, this is one of those things where really no-one will notice you've made a mistake unless you point it out to them but if you're a crafty perfectionist like me it will get on your nerves!


The gifts I wrapped with the pretty woodland tape were much more subtle than all that colourful glitter (everything is more subtle than glitter, isn't it?)  but the finished effect was still very lovely.


As you can see I used six stripes per parcel, varying the position of the stripes to give each package a slightly different look. 


I didn't get a chance to take close-up pics of these so you can see just how pretty that tape looked because my camera battery died about 30 seconds after taking the photos in this post... but here's a card I made using tape from the same range. Isn't it charming?

http://bugsandfishes.blogspot.com/2019/12/easy-diy-christmas-card-ideas-washi-tape.html

Click here for lots of ideas for making simple cards with washi tape (this post was originally designed as a Christmas crafting post, but if you use non-Christmassy tape I think these card designs would work all year round), or visit my tutorial archive for lots more card-making and gift wrapping ideas.

Wednesday, 14 February 2018

3 Creative Ideas for Decorating your Parcels

Sending a gift to a friend for their birthday or other special occasion? Why not decorate the parcel to make it extra special!


Today I'm sharing three crafty ideas for jazzing up plain parcels: decorating them with pens, paint and colourful scrap paper.

Decorated parcels are super fun to receive but it's important to make sure they reach their destination safely: use lots of clear parcel tape to secure your decorated parcels before popping them in the post. If you're sending your package via a courier service it's best to wrap your decorated parcel in another layer of brown paper or even in a parcel box to keep it safe and protected on its journey.

This post is sponsored by My Parcel Delivery, a courier comparison site that helps you find the best deals for sending your important parcels.

https://www.myparceldelivery.com/

There are a whole range of courier services that deliver in Europe and internationally - two of the most popular are UPS who have lots of designated drop-off points (no waiting in long queues at the Post Office!) and Parcelforce who can collect your parcel from your very own home.

Follow these handy tips to package your parcels correctly!
 

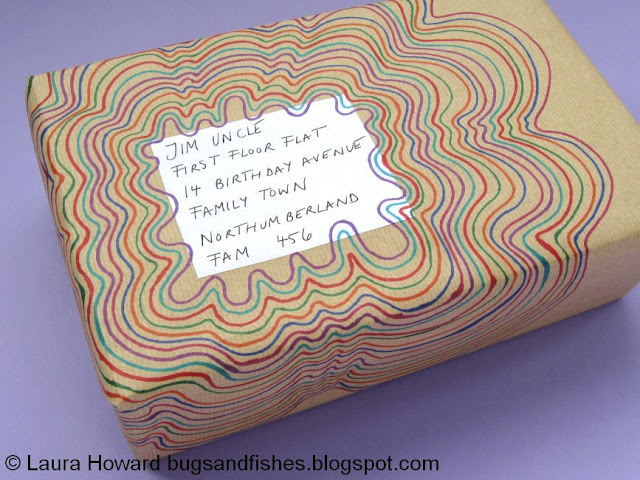
1. Marker Pen Doodles.

Use permanent markers to add a burst of colour to a plain package!

Start by drawing a shape around your handwritten address or printed address label...


... then add more lines to build up a stripey pattern, with one line of each colour.


Keep adding lines until you're happy with your design. I repeated the same colours, adding them in the same order, but you could add colours at random to create different patterns.


Carry your design on around the sides of your parcel for a really vibrant effect.


2. Painted Polkadots.

Cover your parcel in pretty polkadots! Use craft paint or leftover paint from emulsion tester pots - I used a pale lilac purple which stands out really nicely against the brown of the package, but you could use any colour (or colours) you fancy.

Print the polkadots using the eraser end of a pencil, carefully dipping the eraser in the paint then using it to make a few dots on the paper until the paint runs out. Repeat to gradually cover the parcel in dots!


Tip: print some test dots on a piece of scrap paper first to get the hang of printing them, and have tissues or kitchen roll to hand for wiping excess paint off the eraser.

If you're painting directly onto the wrapped parcel, remember that you'll need to wait for the paint to dry before you can turn the parcel over and paint on more sides!


3. Colourful Collages. 

Use small bits of leftover gift wrap, scraps of coloured paper and magazine pages to make a colourful collage!

Choose a selection of decorative papers, and use a compass or circular objects in your house (like glasses or spice jars) to draw circles in various sizes. Cut out the circles and arrange them on your parcel to create a bright abstract design.


Stick the circles to the parcel with a glue stick, with the design "overflowing" onto the sides of the package.
 

Then add pictures you've cut out from magazines or printed from the internet (you'll find lots of free printables online designed for scrapbooking, card making and other crafty projects) and stick them to your parcel to complete your collage.


DISCLOSURE: This post is sponsored by My Parcel Delivery, a courier comparison site that helps you find the best deals around. 

Fancy some more crafty goodness? Subscribe to my newsletter for a monthly free pattern and visit my crafty tutorial archive for lots more free projects.

Wednesday, 23 January 2013

Posting Parcels

The snow might be lovely to look at but it is unfortunately causing a bit of disruption to the post here in the UK. I feel very silly saying this to those of you who are used to lots of snow and cold temperatures, but we're just not used to it here!

I am posting orders a.s.a.p. (whenever we can safely get to the Post Office!) as usual... but if you've ordered something from me in the last few days or are planning to order something soon please be patient :)


Pssst - apologies for banging on about it, but my mega January Sale is still on... with loads of items in my main shop, my Etsy shop and my Folksy shop reduced by an extra 50% until the end of the month (e.g. if a sale item was £5 before, it's only £2.50 until the end of January). Lots of bargains to be had, especially over in my Etsy shop which currently has the biggest selection of sale stock...

Thursday, 6 December 2012

It's Nice to Be Nice

If you've bought some felt from me recently, your parcel has probably had this pretty tape on it...


... lovely Russian dolls reading "It's What's Inside That Counts". Here's a better shot of it on my desk, earlier this summer along with some tape from Summersville:


I love this tape, and adore how cheerful it makes all the parcels I send out. So I was delighted to see that the designer, Hazel Nicholls, has some new tape in stock...


... a biscuit-y "It's Nice to Be Nice" (image from her Etsy shop).

I've got that design as a print (it's currently in a box somewhere while I don't have space to hang it, but it used to hang in the kitchen in my old flat) and I do love a) biscuits and b) being nice, so I couldn't resist buying the tape version to add to my parcel-packing supplies.

I just ordered some this morning, so it should be making an appearance on my parcels sometime soon :)

Thursday, 8 December 2011

Folksy Goodies (and a new assistant)

A couple of weeks ago, the British craft website Folksy (where I've had a shop for a few years now) got a snazzy new look.

I have to admit to having been a teeny bit stressed by the prospect of big changes at my busiest time of year, but I love the colourful new logo, the new shop layouts look great, and the new "one page" listing process has already proved to be a huge timesaver when running my shop.

While the revamp was happening, the maintenance page had a sudoku puzzle on it to "keep you entertained" while the site was down overnight. My mother is a total sudoku fiend, she is completely addicted to them and happily works her way through the most complicated ones she can find. I am under strict orders to save her any sudoku puzzles I find in newspapers, etc, so I printed off the Folksy sudoku and gave it to her, she filled it in during her morning coffee, and I then tweeted that she'd finished it.

Then this week, the lovely staff at Folksy (who has seen my tweet) sweetly sent her a little parcel of goodies to say congratulations for completing the puzzle!


They sent her a set of Folksy badges and a Folksy notebook, both from the new "Folksy Collection" which launched this week.

Needless to say, my mother was totally thrilled by her surprise parcel! She was quite blown away by the unexpected kindness of the gift, and is very much in love with the notebook...


... she also likes the badges but has decided that badges aren't quite her sort of thing, so she's kindly passed them along to me. Hurrah! :)


The badges also got some attention from this big bundle of fur, who came to "help" me take photos... perhaps I should make him my new studio assistant?

"Oooh, what are these? Are they for me?"


"You don't want to take photos of these boring things. Take my picture instead!"


"I'm ready for my close-up now..."

Monday, 7 March 2011

All Taped Up

A quick snap of some of the parcels I packed up over the weekend...


... sealed with pretty Bloomsbury tape from one of my favourite Etsy shops, Summersville:


(Image from the Summersville shop).

Mmm... pretty packaging supplies...

Thursday, 25 March 2010

Business cards

After several years of selling online I have finally had some proper business cards made to send out with my orders! Hurrah!

Having ordered a few really high quality cards from Moo earlier this month to test out which images worked best, I fell in love with the riot of colour in this image...


... and ordered a big batch from another printing company. Moo cards are great but they're not really a cost effective option for me as I send out so many parcels. I got my new cards from 123Print and though they're not quite as perfect as the Moo cards (& I might experiment with different weights of card / different finishes in future) they do the job very well.

Today was a parcel packing day so I took a quick snap of one of my new cards in action, tucked into a bundle of pastel felt with one of my handmade thank-you notes. I always include a little handwritten note with my orders and make the cards myself whenever I have the time.


I'm loving the extra bit of colour the cards add to my parcels and - fingers crossed - hopefully some of my customers will keep the cards for future reference or use them to pass my details on to friends, etc instead of just recycling them!

Sunday, 20 December 2009

Gift Wrap Idea: Buttons

With all my business parcels packed and posted for the year it's time to turn my attention to my own Christmas gifts!

I'm using lots of yarn and pompoms (perfect for making use of the leftover yarn from the scarves I've been knitting) but I'm also trying out a few other ideas including one I'd like to share with you today... decorating your gifts with lovely buttons.


If you've got any crafty friends I think using craft supplies like buttons (or beads) and ribbon is a fab way to personalise their gifts. And because they'll be able to add the trimmings to their supplies stash and use them to make new things it's eco friendly too.

Start with a simple wrapped parcel (regular readers will know I'm a big fan of brown paper!) and tie ric rac, ribbon, yarn, lace or any other trims you fancy round it.

You can keep it simple with one striking trim like this ric rac...


... or use lots of co-ordinating trims together:


Then you need to add the buttons - this is a bit fiddly but well worth it. Thread an assortment of buttons onto a length of embroidery thread or yarn, and then weave the string around the ribbon so the button string becomes intertwined and the buttons are evenly spaced.

You don't need buttons for the underside of the parcel so I'd recommend tying one button string top to bottom around the parcel and a second string left to right (instead of using one long piece as you would with a normal bit of ribbon) leaving the ends of each string empty and tying the ends together on the underside of the parcel.


Another way to use buttons in your wrapping (and fewer of them!) is to make a button tag.

You can make a homemade tag easily with some cardstock, a holepunch and some embroidery thread or yarn as a string, or raid your stationery supplies if you've got some! Use a needle to pole the holes you'll need and then sew your buttons onto the tag using a double thickness of thread or some embroidery thread.


Use some sticky tape to secure the end of the thread and cover your sewing with a large address label or use craft glue to stick down a piece of paper or card.


Then write your tag and tie it to your parcel. Lovely.


PS if you'd like to add a vintage crafty feel to your gift wrapping without any of this messing around with buttons check out these lovely downloadable tags from doe-c-doe - button cards and vintage trims.

Please feel free to borrow one or two photos if you want to blog about this project, but remember to credit me and link back to the original source, and do not reproduce my entire post on your site. Thanks!

Enjoyed this gift wrapping idea? Buy me a "coffee" and help support my blog!

Buy Me a Coffee at ko-fi.com

Subscribe to my newsletter for a monthly free pattern and visit my crafty tutorial archive for lots more free projects.

Visit my shop to buy my printable PDF sewing patterns: