Showing posts with label jewellery. Show all posts

Friday, 23 August 2019

Faux Leather Crafts: Geometric Necklace Tutorial

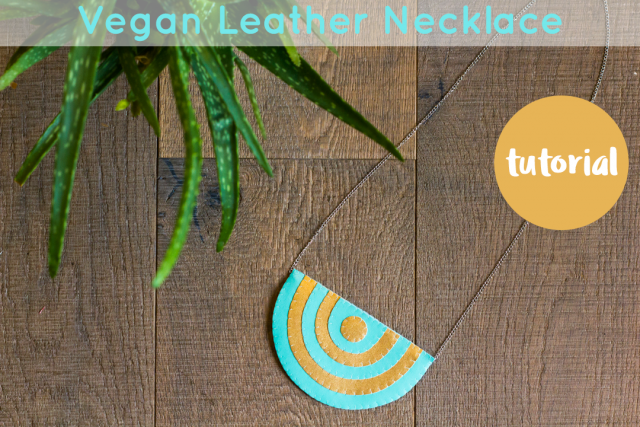
The third tutorial in my mini "crafting with vegan leather is awesome" series is... a geometric necklace!

geometric vegan leather necklace tutorial

Use a chain from an old necklace, or a length of ribbon, to make a bold geometric necklace. Use the templates provided or get creative and draw your own design! You could also make this necklace from felt instead of faux leather.

This tutorial originally appeared on the Village Haberdashery's blog and was created using synthetic leather and other craft supplies from their shop.

geometric vegan leather necklace tutorial

You will need:

- The necklace templates (follow the link to view and download the PDF template sheet)
- Some synthetic leather
- Matching felt and sewing thread
- A necklace chain or length of ribbon
- A sewing needle
- Sewing scissors
- An air-erasable fabric marker pen or an ordinary felt tip pen

To make the necklace:

Use the templates provided to cut out pieces A to F from the synthetic leather. Place the paper templates on the back of the leather, trace around them using an air-erasable fabric marker or a felt tip pen then cut out the shape using sewing scissors.

geometric vegan leather necklace tutorial: cut out the pieces

Sew the pieces together using whip stitch and matching sewing thread (I used blue thread throughout). Start with the smallest pieces, sewing piece A to piece B then piece B to piece C and so on, so you’re only stitching through two layers of the leather at a time.

geometric vegan leather necklace tutorial: sew the pieces together

Once you’ve sewn all the pieces together, use the leather shape as a template to cut out a matching piece of felt for the back of the necklace.

geometric vegan leather necklace tutorial: cut a felt backing piece

Place the felt and leather together then use sewing thread (in the same colour as before) to sew along the top edge, joining the layers together. Place the middle of your necklace chain (or ribbon) between the two layers, so it will be held in place when you sew around the rest of the necklace shape. Make sure there are even lengths of chain (or ribbon) sticking out from each side of the necklace.

geometric vegan leather necklace tutorial: add the chain

Blanket stitch around the rest of the necklace – making sure you don’t let the chain or ribbon slip out as you sew.

P.S. here are the other tutorials in this series: a faux leather star headband tutorial, a faux leather lightning bolt necklace tutorial, and a tutorial for making a mini notebook with a reusable faux leather cover.


This tutorial is for non commercial use only: you can use it to make as many necklaces as you want for yourself or as gifts, but please don't make any for sale. You may borrow a couple of photos if you want to blog about this project, but remember to credit me and link back to this page on my blog, and do not reproduce my entire tutorial / share my templates on your site. Thanks!

Enjoyed this free tutorial? Buy me a "coffee" and help support my blog!

Buy Me a Coffee at ko-fi.com

P.S. Subscribe to my newsletter for a monthly free pattern and visit my crafty tutorial archive for lots more free projects.

Visit my shop to buy my printable PDF sewing patterns:


Wednesday, 9 May 2018

3 Things to Make With Felt Flowers

Regular readers of my blog will know that I love coming up with project variations: ways you can change, adapt and make the best possible use of craft tutorials. "Why use a tutorial to make one thing when you could use it to make a whole bunch of things?" is pretty much my crafty motto.

So today I thought it would be fun to share three things I've made using my felt poppy pattern - I think they look fab with the poppies, but the ideas would work with many felt flower tutorials. You'll find several free flower patterns in my tutorial archive, and I'm also sharing a free flower pattern with my newsletter subscribers this month!

https://www.etsy.com/uk/listing/571069328/felt-poppies-tutorial-and-poppy


1. Use Them to Make Bracelets.

You can of course use felt flowers to make brooches, headbands and hairclips (in fact, she said in her best salesperson voice, my poppies tutorial shows you how to do just that!)... but have you thought about using them to make bracelets?

https://www.etsy.com/uk/listing/571069328/felt-poppies-tutorial-and-poppy

Felt flower bracelets are super pretty, especially for summer and for wearing to parties. They're really easy to make and you don't need any fancy jewellery-making equipment, just a bit of narrow elastic!

When you've sewn your felt flower, cut two lengths of elastic to comfortably fit around your wrist. Sew the ends of the elastic to the back of the flower to create the bracelet loop, then cover the sewn ends neatly with a piece of felt. For the poppies I used a piece of felt the same shape as the whole flower to back it neatly and hide all my stitching, but for other flower designs - like these, or the flowers I'm sharing with this month's newsletter - you can just use a circle of felt.

https://www.etsy.com/uk/listing/571069328/felt-poppies-tutorial-and-poppy

Here are some small poppy bracelets I once made as a custom order for a wedding - each member of the bridal party wore one, and the colours were chosen to match their dresses!

https://www.etsy.com/uk/listing/571069328/felt-poppies-tutorial-and-poppy


2. Sew Them Onto Stuff.

Okay so this one sounds a bit obvious, but it is my absolute favourite way to make full use of a flower tutorial. You can use felt flowers to decorate store-bought things like purses or cushion covers (or make those things yourself, of course!), or to make little practical gifts like these lavender sachets.


There are lots of people in my life who I'd never sew a flower brooch for as a gift because that's just not their style, but something small decorated with flowers? Sure!

When I was a teenager lavender sachets felt a but fusty and old-fashioned, but with the recent rise of the dreaded clothes moth they've become a thoughtful and useful gift again. They're super simple to make - you'll find instructions for making them from felt in my tutorial archive but they're also great projects for using up small bits of leftover fabric.


Small felt flowers like ones from my primroses and auriculas pattern look great sewn together in clusters on things like pincushions...

https://www.etsy.com/uk/listing/587158987/felt-primroses-auriculas-tutorial-pdf

... and for 3D flower patterns why not use them to make fabulous flower crowns, decorate a yarn-wrapped wreath, or stitch them to fabric framed in an embroidery hoop to make a bit of floral wall art?


3. Make Them From Paper Instead of Felt. 

This variation won't work with all felt flower patterns, but it's perfect for flowers with a 2D design. Cut the pattern pieces from colourful paper or card and use a pen to draw on any details you would have added with embroidery, beads, etc.

Turn the pattern pieces upside down and trace around them with a pencil or pen onto the back of your chosen paper/card. Once you've cut out the shapes and turned them over, any remaining line marks will be hidden. If you want to make lots of paper flowers, draw or glue the pattern pieces onto some sturdy card (e.g. from an empty cereal box) to create templates you can quickly draw around again and again.

You can use paper flowers to decorate so many things! They're perfect for making cards, of course, but you could also use them for scrapbooking, for making art and decorations, embellishing paper bunting triangles for a wedding or summer party... there are so many possibilities! Enlarge or shrink the pattern pieces to best suit your project idea and let your creativity run riot.

https://www.etsy.com/uk/listing/571069328/felt-poppies-tutorial-and-poppy


Visit my shop for printable patterns, including my felt poppies tutorial!

 https://www.etsy.com/uk/listing/571069328/felt-poppies-tutorial-and-poppy

For lots of free crafty project ideas and step-by-step tutorials, check out my tutorial archive.

Monday, 22 January 2018

Geometric Faux Leather Necklace Tutorial

UPDATE: my vegan faux leather craft tutorials are now available here on my blog! Make a lightning bolt brooch, a geometric necklace, a star headband, or a mini covered notebook.

----

The final faux leather tutorial I designed for The Village Haberdashery is now up on their blog: how to make a geometric necklace!

https://www.thevillagehaberdashery.co.uk/blog/2018/tutorial-vegan-leather-necklace

I loved working with the sheets of faux leather, especially the metallic gold - doesn't it look fab with the turquoise blue?

https://www.thevillagehaberdashery.co.uk/blog/2018/tutorial-vegan-leather-necklace

Click here for the step-by-step necklace tutorial.

And here are some handy links to the faux leather tutorials I wrote earlier: a star headband, a mini notebook,and a lightning bolt brooch. The headband, necklace and lightning bolt would also be fab made with felt!

Subscribe to my newsletter for a monthly free pattern and visit my crafty tutorial archive for lots more free projects.

Monday, 12 June 2017

Visiting Birmingham: Exploring the Jewellery Quarter

Time for another post about my trip to Birmingham (finally!).

On the first day (well, afternoon really) of my visit to the city I mostly just walked around oohing over the architecture and photographing owls.

The next morning I headed to the Jewellery Quarter: a historic area of the city which has been home to goldsmiths and silversmiths for over 200 years.


If you're visiting Birmingham and are at all interested in history this part of the city is an absolute must-see.

I recommend picking up a copy of the Jewellery Quarter Heritage Trail leaflet (PDF) from the tourist info office - it gives you an easy to follow walking route around the area and lots of interesting information to read along the way. There's a lot to see, including some really rather gorgeous buildings.


After following the trail I visited the Museum of the Jewellery Quarter, about which I'd heard great things - and it did not disappoint!


The museum is based in the former factory of a jewellery manufacturing firm, Smith & Pepper. When the owners of the firm retired they just ceased trading and locked up the building, creating a fascinating time capsule of a place.


Upstairs in the museum there are galleries devoted to the history of the Jewellery Quarter, and to jewellery made from natural materials around the world, but the highlight is by far the guided factory tour. It's hugely entertaining, packed with interesting facts and amusing anecdotes, and you get to look around this incredible place!


I'll share more photos from my Birmingham adventure soon. In the meantime...

Saturday, 23 July 2016

Four Fun Felt Projects for Mollie Makes #69

I got an exciting bit of post this week - a copy of this month's Mollie Makes magazine.
 

Why am I so excited about the arrival of this magazine, you ask?

Well, a familiar face makes an appearance this issue...


... yup, you guessed it, it's me! Yay! :)

The cover gift that comes free with Mollie Makes #69 is a kit for making a fabulous felt pom pom necklace, designed by Yoko Minemura Vega.

 
You also get a little booklet that contains three bonus projects: alternative ideas for using the materials in the kit... and those three projects were designed by me! (Double yay!)


I had loads of fun making these projects a few months ago, it's so nice seeing them styled so gorgeously by the Mollie Makes team.

You can choose from three home decor projects. A felt bouquet...


... a mini mobile...


... or a Scandi-inspired cushion.


I also designed a fourth project - a scalloped necklace. The necklace didn't fit in the printed booklet, so the lovely folks at Mollie Makes have shared it as a free project over on their blog. (Triple yay!).
 
http://www.molliemakes.com/craft-2/diy-jewellery-scalloped-felt-necklace/


Issue 69 of Mollie Makes is out now in the UK and is available in all good newsagents, supermarkets and independent craft shops, or from the official online store.         

Monday, 21 March 2016

The Amazingness that was London Craft Week: Part Three

Today we're playing a fun game called "guess which blog post Laura thought she'd published months ago but actually was gathering virtual dust in her drafts folder this whole time". Yup, that's right, this one! Oops. Better late than never though, right? :)

So, a long long time ago (May of last year) I spent two amazing days zipping round London exploring the awesomeness of the first ever London Craft Week.

On the first day I met so many interesting people, chatted to loads of different makers about their work, oohed over some incredible craftsmanship and got to peek behind the scenes of some fascinating spaces, it was wonderful. (You can read all about what I got up to on the day one here and here).

After that busy day I made the not entirely sensible decision to stay up late watching the election coverage... then had trouble a) getting out of bed the following morning and b) tearing myself away from the news of the (dramatic!) results. I'm glad I did though, because day two of London Craft Week was jam-packed with great stuff.

Once I'd finally got up and on a train and into London, my first stop was Trunk Clothiers, where the founder of (ki:ts) was demonstrating the art of hand stitching leather and showcasing his (then) current belt collection. It was so interesting to see the work in progress.


Next door, jewellers Cox + Power were running an open house, so after admiring their collections in the shop visitors could see the workshop where all that loveliness gets made.


Something that came up again and again during London Craft Week was how today's fine craftsmen and women are creating inventive, modern pieces but drawing on traditions, skills and techniques that stretch back hundreds of years.

At Cox + Power it was fascinating to hear how little a jeweller's workspace and tools have changed over the centuries, and we had a great chat about makers and making and the things that connect us all (whether we're making fine jewellery or cute stuff from felt!).


Next I headed to Savoir Beds - whose tailormade beds were first created for The Savoy Hotel in 1905 - where a skilled (and hugely entertaining) craftsman was demonstrating the craft of mattress making. I was especially fascinated by the large half-moon shaped needles used for slip stitching.


My next stop was the Contemporary Ceramics Centre which includes an exhibition space and a shop filled with gorgeous ceramics. The Centre is just opposite the British Museum, but I had no idea it was there as I always approach the Museum from the other direction. I will definitely be taking a slight detour and popping in here again in future!


After oohing over the beautiful ceramics, I headed down the road to a shop that I'd walked past many times on my way to the British Museum but never visited before: Cornelisson & Son. This is a truly wonderful little shop! There are so many art supplies squeezed into the space, everywhere you look is a riot of colour and creative possibility.


They sell some very specialist supplies here, but lots of more accessible ones too. Even if you have no interest in art it's worth a visit, just to see the shop's original drawers and storage jars filled with a rainbow of pigment. If you are a creative type though (and if you're reading my blog, the chances are that you probably are) what a pleasure it would be to shop for even something as small as a new pencil sharpener in a place like this!


For London Craft Week, Cornelissen were running a series of free talks. I turned up just in time for the one on colour charts, which you might think wouldn't be that interesting but you'd be wrong. It was wonderful to be able to peek behind the scenes at the shop, hear about its history and the specialist colour charts they produce for their customers... and we were treated to lots of great anecdotes along the way.

After filling my brain and eyes with all things colour-related, I walked up the Tottenham Court Road to Heals where textile designer Gemma Kay Wagget was spending the afternoon demonstrating screen-printing and giving tips to people who wanted to try printing for themselves.


Sadly I missed the demonstration itself as Gemma was taking a well-earned break, but I picked up a lovely notebook she'd screenprinted and a copy of Hole & Corner - a beautiful magazine "celebrating craft, beauty, passion and skill".


On to my next stop: the British Library, where weavers from Dovecot Tapestry Studios were working on a hand loom and discussing their work. We didn't get a chance to talk about much though, as a very loud fire alarm went off and the building had to be evacuated! You can see a short video about one of their projects here and see more of their work here.

As the Library emptied out and the fire engines arrived (to what I'm guessing was a false alarm as they left again pretty soon afterwards!) I headed down the road to The Crypt Gallery, a unique and highly atmospheric exhibition space under St Pancras Church.


This was the venue for the MAKE / CREATE exhibition, a collaborative exhibition between fine artists and makers that explored the intersection between traditional craft and contemporary art. I'm not the world's biggest contemporary art fan but this was a really rewarding (and slightly spooky) exhibition to visit.


Then there was just time for one last stop before I headed homewards: the Art Workers' Guild where some of the members were chatting about their work and giving tours of their meeting hall. 

I was especially entranced by Vicki Ambery-Smith's intricate architectural jewellery (and I'm hoping to get a chance to see this exhibition in Oxford featuring her work, sometime soon).


After all that, you might not be entirely surprised to hear that I decided to stay home and rest instead of attending some of the weekend's events!

This year London Craft Week will be taking place from 3rd-7th May. Visit the London Craft Week website for more info and to check out this year's programme of tours, talks, workshops, demonstrations and other event.

P.S. You can read more about the places, events and makers I visited during London Craft Week in part one and part two.