
This week's projects all coordinate with the animals in the "On Safari" chapter... today you can make a happy sun!
To make the sun, you will need...
- the template sheet at the bottom of this post
- orange felt, approx. 3 ¼ x 5 ¼ in (8 x 13 cm)
- yellow felt, approx. 2 x 3 ¼ in (5 x 8 cm)
- matching sewing threads, and black thread
- yellow embroidery floss (thread)
- 2 black seed beads (size 8/0)
- stuffing & a pencil or other small stuffing tool
- needles, pins & embroidery scissors (great for cutting out small felt shapes!)

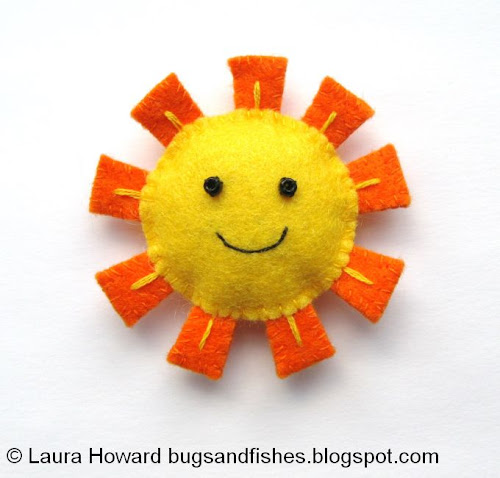
1.Use the templates provided to cut out two sun rays from orange felt and two suns from yellow felt.
2. Cut a length of yellow embroidery floss and separate half the strands (so for six stranded floss use three strands). Use running stitch to sew a line most of the way down each ray: sew out from the centre and then fill in the gap(s) as you sew back again, then stitch your way to the bottom of the next ray and repeat.

3. Place the stitched rays on top of the unstitched rays and sew the two layers together with whip stitch in matching orange sewing thread. Finish your stitching in the centre where it will be hidden in step 5.

4. Sew two black seed beads onto one of the yellow suns, sewing each bead flat like an O with three or four stitches of black sewing thread. Then use a double thickness of black thread to backstitch a smile.

5. Make a “sandwich” with the orange rays placed between the two yellow suns. Sew the yellow circles together with whip stitch in yellow sewing thread, turning the sun back and forth as you sew to help keep your stitching neat on both sides.

Leave a small gap and then stuff the sun in the front, i.e. between the rays and the circle with the smiley face. Then sew up the gap with more yellow whip stitches and finish your stitching neatly at the back.
Click here to view the template sheet in another window/tab, and print it at 100%.

This tutorial is for non commercial use only: you can use it to make as many felt suns as you want for yourself or as gifts, but please don't make any for sale. You may borrow a few photos if you want to blog about this project, but remember to credit me and link back to the original source, and do not reproduce my entire tutorial on your site. Thanks!

Please note: the Amazon links in this post are affiliate links.
Enjoyed this free tutorial? Buy me a "coffee" and help support my blog!

Subscribe to my newsletter for a monthly free pattern and visit my crafty tutorial archive for lots more free projects.
Visit my shop to buy my printable PDF sewing patterns:
5 comments:
This sun like a polish Order of the Smile!
I neve leave comments on Your blog, but I always read "Bugs and Fishes..."
O, look:
http://en.wikipedia.org/wiki/Order_of_the_Smile
Such a sweet little trio, Laura! I've still got some of that lovely soft felt I bought from you a while ago, I think my eldest will fancy having a go at these with me. Super-cute indeed! x
Thanks for sharing these, I think the sun is my favourite one.
Your felt creations are so cute!
pandeMondia - thanks for your comment! I'd never heard of the Order of the Smile before, what a nice idea :)
angharad - thanks! I hope you'll have fun making some of the projects.
Kay & Ellieboo - thank you both! x
Post a Comment