Showing posts with label snowflakes. Show all posts

Thursday, 24 September 2020

New in My Shop: Wooden Snowflakes, Toadstools, and More!

Things have been a bit quiet on my blog recently but I've been busy working on lots of new projects and adding lots of new things to my shop.

I was particularly delighted to receive a batch of new wooden bits and bobs from one of my suppliers recently: there are so many crafty possibilities in these lovelies!

There's a box of 45 little wooden snowflakes...

... big plywood buttons...

 ... a trio of toadstools...

 ... and a set of Christmas / fir trees, too! (How fab would those look decorated with paint and glitter??!?)

I just ordered a few sets of each to try them out, so my stock levels are a little low right now (in fact the Christmas trees sold out already!) but I'm hoping to order lots more in October. 


Click here to visit my shop and see everything that's new! 

My listings are set up with UK & European shipping but I'm happy to chat about and quote for worldwide shipping, too, just send me a message.

Tuesday, 3 December 2019

A Year of Wreaths: December Embroidered Snowflakes Wreath Tutorial

UPDATE: this project is now available as a printable PDF pattern on my Patreon.  

Subscribe for a small monthly fee and you'll get access to a growing library of PDF patterns and tutorials, with an email whenever I add a new project. You can cancel any time. 
 

-------

The final wreath of the year features embroidered snowflakes, silver sequins and seed beads, and some fabulous metallic thread. It's perfect for Christmas, or for just adding a bit of sparkle to the dark and gloomy days of winter.

the finished sparkly snowflakes wreath

As well as making the full wreath, you could also use the snowflake embroidery patterns to sew felt snowflake ornaments, stitch a snowflake in a small embroidery hoop or sew snowflakes onto anything you fancy!

embroidered snowflakes

Tuesday, 19 November 2019

Snowflake Embroidery Patterns

free snowflake embroidery patterns


UPDATE: these snowflake embroidery patterns are now available on my Patreon.

Subscribe for a small monthly fee and you'll get access to a growing library of PDF patterns and tutorials, with an email whenever I add a new project. You can cancel any time.    

Click here to check out my Patreon page and sign up!

The snowflakes are perfect for embellishing your winter sewing projects, or for making felt Christmas ornaments!

You can also use them to create December's A Year of Wreaths project: a sparkly snowflake wreath.

make an embroidered snowflake wreath for winter or Christmas


Subscribe to my newsletter for a monthly(ish) free pattern and visit my crafty tutorial archive for lots more free projects.

Visit my shop to buy my printable PDF sewing patterns:

Wednesday, 10 January 2018

Embroidered Snowflakes Wreath Tutorial

UPDATE: my sparkly snowflakes wreath tutorial is now available as a printable PDF pattern on my Patreon.

Subscribe to get instant access to a growing library of PDF embroidery patterns and craft tutorials, and updates when I add something new!

Click here to see all 12 seasonal wreaths in this series!

-----

Time for the final tutorial in my Year of Wreaths series: a sparkly snowflake wreath!

Yarn Wrapped Wreath with Embroidered Snowflakes

This one's a bit late (sorry!) but snowflakes are definitely for the whole of winter and not just Christmas, right?? I hope you'll agree it was worth the wait because I love how this final project turned out.

The wreath is decorated with navy blue yarn, metallic silver thread, sparkly beads and sequins, and five embroidered snowflakes.

Embroidered Felt Snowflakes

You could also use the snowflake embroidery patterns to make felt snowflake brooches or ornaments, or to add some snowy charm to other sewing projects.

Sparkly Winter Snowflake Wreath


Subscribe to my newsletter for a monthly(ish) free pattern and visit my crafty tutorial archive for lots more free projects.

Friday, 8 December 2017

How To Make Leafy Paper Snowflakes

Today I'm sharing a very special guest post: Jessica's leafy paper snowflake tutorial!

Lots of leafy paper snowflakes

Jessica posts beautiful, colorful, nature-filled photos on Instagram as vanillalemoncake and started the inspiring hashtag #natureflatlays. Her pictures always make me smile when they pop up in my feed!

She shared a tutorial a few years ago for making these gorgeous leafy paper snowflakes and has kindly agreed that I can repost it here on my blog to share the leafy snowflakey goodness with you all (hurrah!).

 Four leafy paper snowflake designs

I adore these snowflakes. They're a perfect blend of autumn and winter: a quirky alternative to a leaf garland, a leafy twist on the classic paper snowflake (you know I love those), and ideal decor for chilly autumn days or those early weeks of winter when the last few leaves are still hanging onto the trees.

A paper snowflake
Lots of leafy paper snowflakes
 Leaf shapes for leafy paper snowflakes

To make a leafy paper snowflake, you will need:

- A square of paper (cut from a sheet of A4)
- Scissors
- A ruler
- And a pen or pencil

Leafy Paper Snowflakes tutorial materials
 
To make the snowflakes...

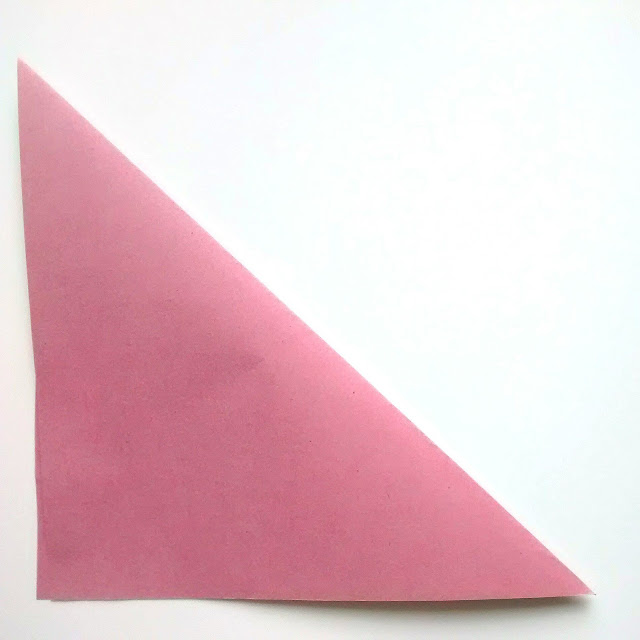
1. Fold the paper in half by bringing opposite corners of the square together. Run the ruler along every fold you make, to ensure crisp edges.

Leafy Paper Snowflakes tutorial step 1

2. With the folded triangle facing you, as shown above, fold it in half again by taking the bottom right corner up to meet the top left corner.

 Leafy Paper Snowflakes tutorials step 2

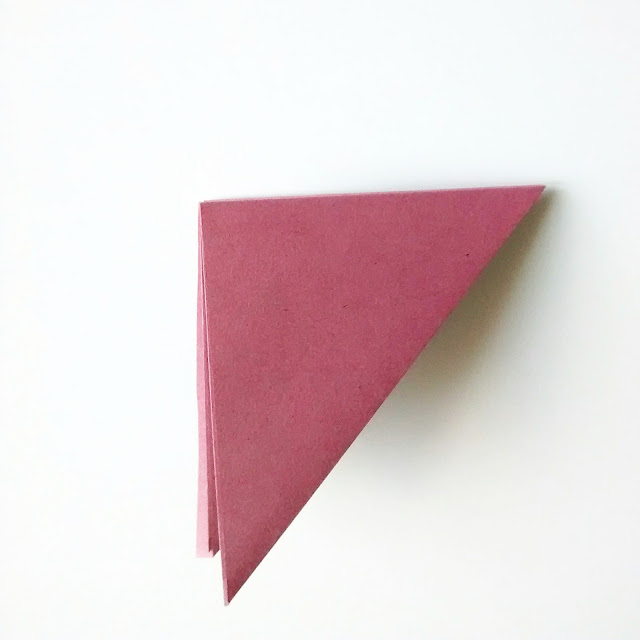
3. You will now have two flaps of paper at top left (see above). Take the top flap and fold it down towards the bottom, so the corners meet.

Leafy Paper Snowflakes tutorial step 3

4. Pick up the shape you've made, and fold the second flap down behind to meet the bottom corner. You now have your folded shape. 

Leafy Paper Snowflakes tutorial step 4

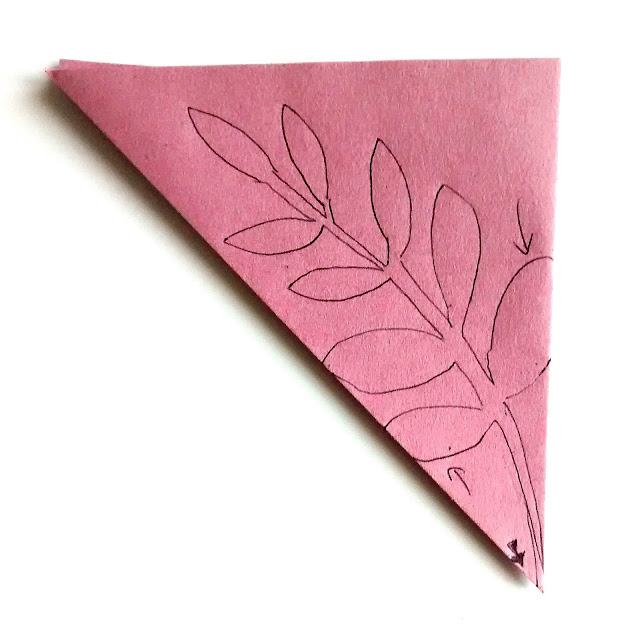
5. Turn the triangle round so that the folded point is towards you, the two folded edges of the triangle either side, and the unfolded edges of paper away from you.

Draw a leaf outline onto the triangle - use the photos in this tutorial as a guide, or get inspired by your favourite leaves!

The stem should grow from the point (see the filled arrow drawn on the paper, below). The leaf edge MUST incorporate part of the folded edge each side (see the arrows, below) otherwise the snowflake will not work. Give your stem enough width to avoid it being too fragile.

When you cut, take care to not cut along the folded edges within your leaf design. 
 
Leafy Paper Snowflake Tutorial step 5

6. Time to cut out the leaves! Hold the folds together firmly as you go, to ensure you cut all the layers identically. Cut along the leaf outline. Make sure you don't cut the parts that touch the folded edges.

Leafy Paper Snowflake tutorial step 6

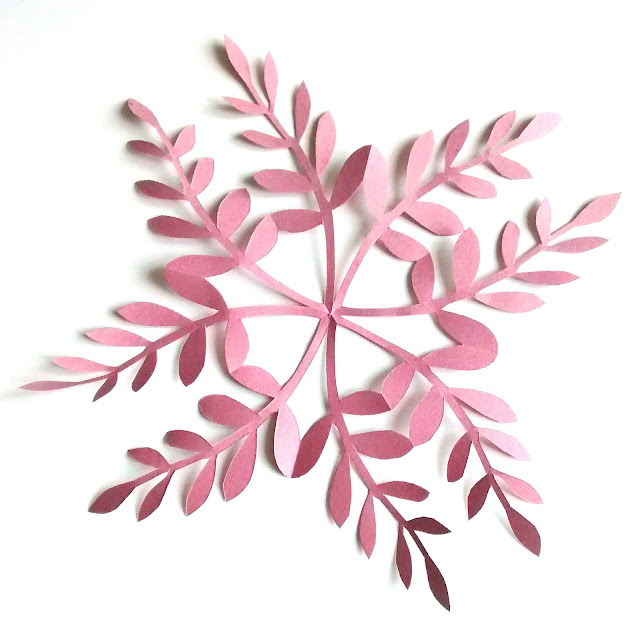
7. Now very carefully unfold your leaf. Each leaf should be joined to its neighbours along that folded edge you left intact. Congratulations... you just made your first leafy paper snowflake!

Leafy Paper Snowflakes tutorial step 7
 
Click here to visit vanillalemoncake on Instagram, see all of Jessica's lovely photos and meet Oliver the hamster!

vanillalemoncake on Instagram

-----

Subscribe to my newsletter for a monthly free pattern and visit my crafty tutorial archive for lots more free projects.

Visit my shop to buy my printable PDF sewing patterns:

Tuesday, 25 November 2014

How To: Embroidered Felt Snowflake Baubles

UPDATE: Unfortunately this project is no longer available

Wanna see the second Christmas project I designed for Tesco Living?

http://www.tescoliving.com/smart-living/how-to/2014/november/how-to-make-embroidered-felt-snowflake-baubles

I stitched a set of felt snowflake baubles. Each bauble is embroidered with a white snowflake, then embellished with sparkly seed beads and a silver sequin.

The embroidery is very simple to do , so it's perfect for beginners. You'll have a batch of baubles stitched up in no time!

http://www.tescoliving.com/smart-living/how-to/2014/november/how-to-make-embroidered-felt-snowflake-baubles

To make your own embroidered felt snowflake baubles, click here for the step by step tutorial.

P.S. Click here for the Christmas candle ornament tutorial. 

Saturday, 27 October 2012

DIY Snowflake Scallop Bunting

Time for another easy snowflake-themed craft project today - making scallop bunting decorated with paper snowflakes!


You could make some of this bunting for a Christmas party, or hang it as part of your seasonal decor.

You will need:
- the scallop bunting flag template at the bottom of this post
- white paper
- a compass or something circular to use as a template
- a pencil
- a glue stick
- black card
- baker's twine or other string, ribbon, or yarn for hanging the bunting
- a large, sharp sewing needle or a holepunch

First, use the template provided to cut out lots of scallop shapes from black card.

Then make lots of paper snowflakes using the method in yesterday's post. If you're using my scallop bunting template at actual size, your paper circles will need to be approx 9.5 cms in diameter. Use larger or smaller circles to fit larger or smaller bunting flags.You will need one snowflake per scallop.


Stick the snowflakes onto the scallops. Use a gluestick to stick one snowflake onto each card, making sure any pencil marks at the edges (from drawing the circle) are on the side you cover in glue! Place the snowflake face down on a piece of scrap paper and carefully cover it with glue. Then slowly peel it away from the paper (any excess glue will be left on the scrap paper), turn it over and lightly position it on the scallop as pictured. Then smooth the snowflake down so it's stuck firmly in place.


Next, cut a length of bakers twine / yarn / ribbon etc long enough for all the scallops plus extra at each end. Depending on the thickness of the twine etc you're using, either punch a hole in each of the top corners of the scallops... or use a large needle to poke holes through the black card.

Then thread the twine / ribbon through the holes, so it passes across the top of each scallop at the back of the bunting. The scallops should be evenly spaced and there should be a length of twiner / ribbon left each end for tying the bunting in place.


And you're done! Now you just need to hang the bunting wherever you fancy :) 

To print the template - right click on the image and select to view it in another window or tab, then click again (if necessary) to view full size and print at 100%. I've added a scale so you can check if your template has printed out correctly, but you can make it larger or smaller than mine if you prefer.


This tutorial is for non commercial use only. You may borrow one or two photos if you want to blog about my projects but remember to credit me and link back to the original source, and do not reproduce entire tutorials on your site. Thanks!
 
Enjoyed this free tutorial? Buy me a "coffee" and help support my blog!

Buy Me a Coffee at ko-fi.com

Subscribe to my newsletter for a monthly free pattern and visit my crafty tutorial archive for lots more free projects.

Visit my shop to buy my printable PDF sewing patterns:

Friday, 26 October 2012

Giveaway Winners: Notecards & Moo Business Cards

A very quick post from me today to announce some giveaway winners.

The winner of the set of business cards from MOO is...

... Mundo Feltro, who said: "Yessss! I love the idea!"

And the winners of the notecard sets are...

... Kathy, who said: "I would love the haberdashery cards. They remind of the things that I inherited from my great-grandmother's sewing basket!"

... and bairozan, who said: "Oh, the robins grabbed my heart! I'd love to have them so much if I'm lucky to win :) "

And simply because it feels weird to have a blog post without a photo in it, here's a snap of the snowflake bunting I'll be sharing a how-to for tomorrow :)

Thursday, 25 October 2012

DIY Glitter Snowflake Christmas Cards

I was sorting through a box last month and found some small paper snowflakes I'd made one past Christmas and I thought it was a shame to just throw them away, so I thought I'd use them for a couple of simple festive crafty projects instead: some Christmas cards and some bunting. I'll share the pics & instructions for making the bunting at the weekend, but first up: the cards.


These cards are lots of fun to make and they look really dramatic when finished. It's quite hard to photograph things that are covered in glitter but trust me, these are really sparkly!


They'd be a great project to work on one chilly winter weekend with friends or with your kids, folding and cutting paper snowflakes together while watching movies and then having a fun session with lots of glitter.

To make them you will need:  
- black sheets of card, cut to size and folded (or ready made card blanks)
- white paper 
- a compass or something circular, and a pencil
- scissors
- a glue stick
- PVA or other craft glue 
- white or silver glitter 
(or glitter glue)
- a silver gel pen or a white pencil

First, cut out some small circles from white paper. The size of the circles you need will vary depending on how large your finished cards will be, but for my A6 cards I used snowflakes that were approx 9cms (3 1/2 inches) in diameter. You could use a compass to draw your circles if you have one, or find a jar or vase or small dish that's about the right size and draw around it. If you want to make lots of snowflakes, you might find it easier to make a circular template from cardboard first. 

To make the snowflakes, fold each circle in half three times and snip out shapes from the edges so a pattern is formed when the paper is unfolded again. Remember that the more detailed you make your snowflakes the more fiddly it'll be to glue them in place and decorate them.  

Use a gluestick to stick one snowflake onto each card, making sure any pencil marks at the edges (from drawing the circle) are on the side you cover in glue! Place the snowflake face down on a piece of scrap paper and carefully cover it with glue. Then slowly peel it away from the paper (any excess glue will be left on the scrap paper), turn it over and lightly position it on the card leaving room underneath to write a message if you want to. Then smooth the snowflake down so it's stuck firmly in place.

I rather like how the plain white snowflakes look on the black card, so if you're not a glitter fan you could leave your cards like this. (Plain white snowflakes would look fab on square black cards!)


To add sparkle to the snowflakes, paint a layer of PVA or other craft glue onto the white snowflake shape, and sprinkle it with glitter. When you've removed the excess glitter you should be left with a very sparkly snowflake! Alternatively, you could use a glitter glue pen - the effect is more subtle than using proper glitter but it's also a lot less messy!


 I used white glitter for the middle snowflake, and silver glitter glue for the other two.

Finally, when the cards are completely dry, use a sharp white pencil or a silver gel pen to write "Happy Christmas" / "Happy Holidays" / "Season's Greetings" / etc under the snowflakes. You can then use the same pen or pencil to write your message inside the card. 


For more snowflake projects, try making felt snowflake coasters or ornaments, making a snowflake curtain, or decorating your gifts with paper snowflakes.  

You may borrow one or two photos if you want to blog about my projects but remember to credit me and link back to the original source, and do not reproduce entire tutorials on your site. Thanks!

Enjoyed this free tutorial? Buy me a "coffee" and help support my blog!

Buy Me a Coffee at ko-fi.com

Subscribe to my newsletter for a monthly free pattern and visit my crafty tutorial archive for lots more free projects.

Visit my shop to buy my printable PDF sewing patterns: