Showing posts with label candy corn. Show all posts

Wednesday, 22 September 2021

Easy Halloween Embroidery Pattern: Sew a Cute Candy Corn!

Fancy a quick and easy bit of Halloween crafting? You've come to the right place! :)

Today I'm sharing a free embroidery pattern for a cute and happy little candy corn: 

Candy corn are small American sweets, associated with the autumn harvest and often eaten at Halloween. I stitched some felt versions a few years ago and couldn't resist trying out an embroidered version (you guys know how much I love a project variation!). 

This little guy is quick and easy to stitch, and fits into a 4 inch embroidery hoop for stitching (or displaying in the hoop when you've finished). 

The candy corn is stitched in white, orange, and yellow (to match the colours of the sweets). I ummed and ahhed about whether to do the top two horizontal lines in white and orange, or in orange and yellow - maybe you'd like to stitch yours differently! 

I used backstitch and three strands from six-stranded embroidery thread (floss) to sew most of the pattern, but you might want to use more strands and/or a different stitch for a bolder candy corn. I then added two chunky French knots for the eyes, but if you cannot bear stitching French knots white seed beads would work just as well.


This little guy would look super cute sewn onto all kinds of textile projects - from coin purses to coasters to t-shirt pockets. You could also make little embroidered felt ornaments by stitching him onto a dark felt background. I like to use tissue paper patterns when I'm embroidering on felt (click here for an example!).

Want to sew some of my original felt candy corn? You'll find tutorials for the cute candy corn ornaments and more in this round-up of some of the Halloween projects available on my blog.

This pattern is for non commercial use only: you can use it to stitch as many candy corn as you want for yourself or as gifts, but please don't make any for sale. You may borrow the photo if you want to blog about this project, but remember to credit me and link back to this page on my blog, and do not reproduce my entire post or share my pattern on your site. Thanks! 

Enjoyed this free pattern? Buy me a "coffee" and help support my blog!

Buy Me a Coffee at ko-fi.com

P.S. Subscribe to my newsletter for a monthly free pattern and visit my crafty tutorial archive for lots more free projects.

Visit my shop to buy my printable PDF sewing patterns:


Click here to open the pattern in a new window, make sure you're viewing it full size then print it at 100%.

For an easier to print, high resolution version of this pattern subscribe to my new Patreon page!


Thursday, 19 October 2017

9 Free Halloween Craft Tutorials

Are you planning some Halloween crafting? Here are nine ideas from my free tutorial archive you might enjoy...

1. Eyeball buttons. These are great for giving an old cardigan a spooky twist! You could also sew them in other places too - eyeballs are the perfect Halloween accessory, you know.

Felt eyeball buttons
 Eyeball button cardigan for Halloween

2. Sew some cute little felt candy corn ornaments...

Cute felt candy corn ornaments
 
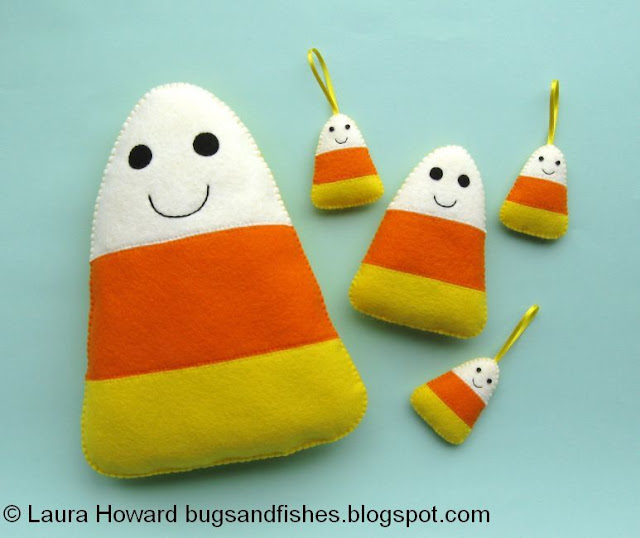
... or 3. Make a giant plush candy corn!

Felt candy corn

4. If you prefer your Halloween decor more chic than cute, why not make some candy corn inspired geometric Halloween coasters?

Geometric coasters for Halloween

5. Dress up as an owl with this fun felt owl mask.

Felt owl mask
 Felt owl mask

6. Disguise yourself with a felt moustache.

Felt moustache disguises

7. Turn any outfit into a Halloween costume with a sparkly dripping wound brooch.

Felt dripping wound brooch

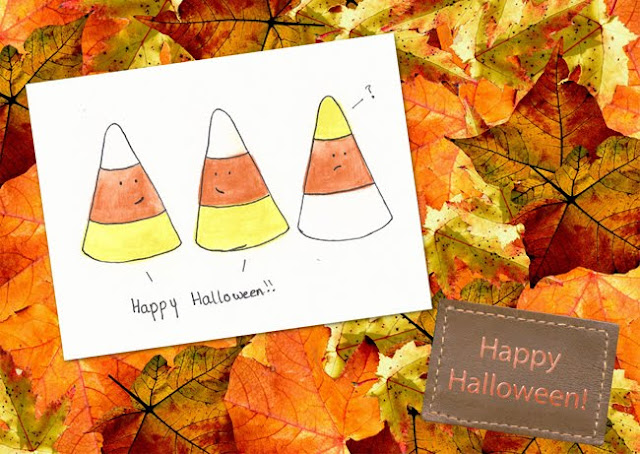
8. Make a fun Halloween card to send to your friends (includes instructions for how to turn your drawing into an e-card!).

Cute Halloween Card
 
9. Finally, invite all your pals to your Halloween party with these easy-to-make invitations. You could also use these templates to make a cute Halloween garland.

Halloween Party Invitations
 
Follow the links to find all the tutorials. Happy crafting!

You'll find eight more of my Halloween craft tutorials in Felt-o-ween: 40 scary-cute projects to celebrate Halloween - including a vampire, graveyard cupcake toppers, skull bows and more! (I am a teeny bit biased but I adore this book: so much felt-y Halloween goodness!). Felt-o-ween is available from Amazon USA, Amazon UK, The Book Depository and many other bookshops, you can read more about the book and take a peek at my projects here. (Disclosure: those links to Amazon & The Book Depository are affiliate links).

Cover of Felt-o-ween

For more Halloween craft ideas, visit my Halloween Pinterest board!

And for lots more crafty ideas to keep you busy after Halloween, visit my tutorial archive or check out my books: Super-Cute Felt and Super-Cute Felt Animals.

 Cover of Super-Cute Felt by Laura Howard

P.S. Thinking ahead for Christmas? Check out my free Christmas Ornament Tutorials.

Sunday, 26 October 2014

How To: Felt Candy Corn Plush

After making some felt candy corn ornaments I couldn't resist scaling up the pattern and making some GIANT CANDY CORN :)


I stitched a big mama candy corn and a baby candy corn. A giant candy corn or a whole family of them would make great decorations for Halloween, propped up on a bookcase or tucked among the cushions on your sofa.


They're dead easy to sew - and I've even re-sized the templates for you so you can just print them out and start sewing. Hurrah!


To make the plush candy corn, you'll need to refer to the candy corn ornament tutorial.

Follow steps 1 & 2, cutting out the pieces and sewing them to some backing felt.

At step 3, instead of adding seed beads for the eyes you'll need to add black felt eyes. Sew these in place with black sewing thread and whip stitch. Sew the smile with black embroidery thread (floss). I used three strands of six-stranded thread.


Follow steps 4 & 5 to cut out the candy corn shape and cut a backing shape. If you want you could make the back match the front (minus the face!) but using plain felt saves you lots of time.

Skip step 6 as you don't need to add a ribbon.

Then follow steps 7 & 8 to sew up the candy corn and stuff it. I used blanket stitch for sewing the larger versions of the candy corn as it gives a neat finish, but you could stick with whip stitch if you prefer.


And that's it! One giant plush candy corn, ready to spread some cuteness this Halloween.


Click here for template sheet 1 and here for template sheet 2. Make sure you're viewing them at full size, then print them at 100%.


This tutorial is for personal use only: you can use it to make as many felt candy corn as you want for yourself or as gifts, but please don't make any for sale. You may borrow a couple of photos if you want to blog about this project, but remember to credit me and link back to this page on my blog, and do not reproduce my entire tutorial / share my templates on your site. Thanks!

Enjoyed this free tutorial? Buy me a "coffee" and help support my blog!

Buy Me a Coffee at ko-fi.com

Subscribe to my newsletter for a monthly free pattern and visit my crafty tutorial archive for lots more free projects.

Visit my shop to buy my printable PDF sewing patterns:

Monday, 13 October 2014

How To: Candy Corn Halloween Party Invitations

Today I'm sharing a tutorial for cute and easy-to-make invitations for your Halloween party!


They feature the same happy candy corn design as the felt candy corn ornaments I shared last week. You can never have too many cute candy corn, right??

You could also make these as greetings cards to send spooky wishes to your friends.


You will need:

- the candy corn templates at the bottom of this post (I thought I'd save you the trouble of having to enlarge the pattern from last week's tutorial!).
- white, orange and yellow card (or paper)
- grey or other dark card
- scissors
- a pencil
- a glue stick
- a black marker or felt tip pen
- some scrap paper
- optional: scrap card

To make the invitations:

1. Turn the templates over. Use a pencil to trace around the templates, drawing the shapes onto the appropriate colour card. Then cut out each shape with scissors. Drawing round the shapes will have left some pencil marks on your candy corn pieces - when you glue these later, make sure to add the glue on the side with the marks so they'll be hidden on your finished invites.

Tip: If you're making lots of invites, glue your templates onto bits of scrap card (the card from an empty cereal box is ideal for this) and cut them out to make sturdy templates that are easy to draw around quickly.


2. Cut your grey card to size: I folded and cut an A4 piece of card into quarters to make A6 postcards.


3. Now it's time to stick the candy corn pieces onto the cards. Start with the bottom (yellow) piece and work upwards, leaving room below for your message and sticking the pieces so they're flush with each other.

Tip: I use scrap paper to protect my workspace when gluing - you can run the gluestick right along the edges of the shapes you're sticking without worrying about making a mess.


Your invites will now look something like this:


4. Use a black marker or felt tip pen to draw eyes and a smile on each of the candy corn, and to write "Party!" or "Come to our party!" or "Happy Halloween" along the bottom of the cards.

Tip: to avoid mistakes when positioning your text, you might want to write it in pencil first (for the first invite, at least) then write over it in pen and erase the pencil when the ink is dry. 


5. Write the details of your party on the back of your card or type up the info in a word processing program. Make a text box (with a narrow line framing it) that's slightly smaller than your cards and centre your text inside it. Then print out as many copies as you need, cut out the boxes and glue them to the back of your cards.


Click here to view the template sheet in a new window or tab. Make sure you're viewing it full size, then print at 100%. Please note that these templates are the correct size for A6 cards - if your card blanks are larger or smaller you may wish to resize the templates to fit.


This tutorial is for personal use only: you can use it to make as many candy corn cards as you want for yourself, but please don't make any for sale. You may borrow a couple of photos if you want to blog about this project, but remember to credit me and link back to this page on my blog, and do not reproduce my entire tutorial / share my templates on your site. Thanks!

Enjoyed this free tutorial? Buy me a "coffee" and help support my blog!

Buy Me a Coffee at ko-fi.com

Subscribe to my newsletter for a monthly free pattern and visit my crafty tutorial archive for lots more free projects.

Visit my shop to buy my printable PDF sewing patterns:

Friday, 10 October 2014

How To: Felt Candy Corn Ornaments

Today I'm sharing a free tutorial for making cute felt candy corn ornaments!


These ornaments are quick and easy to sew. They'd be a sweet addition to your Halloween party decor, or a nice gift for a Halloween-loving friend.

One is cute, lots are even cuter! You could make a whole set and string them on a long ribbon to make a candy corn garland.

Don't have anywhere to hang them at your party? No problem! Leave off the ribbon loop and just dot them around the room: propped up on your bookshelves or scattered across a table between all the Halloween treats you're serving. NB: due to their size and their seed bead eyes, these little candy corn should be kept out of reach of babies and small children.

You will need:

- White, orange and yellow felt
- Black seed beads
- White, orange, yellow and black sewing thread
- Yellow or orange narrow ribbon
- Toy stuffing
- A needle and pins
- Sewing scissors
- The template sheet at the bottom of this post


To make each ornament:

1. Use the templates provided to cut out the three felt pieces, as labelled.

2. Sew each of the three sections to a piece of yellow backing felt, sewing the sections flush with each other. Use matching thread and whip stitch, sewing along the straight inner lines only.  


3. Add two seed bead eyes and a stitched mouth, using black thread. Sew each bead eye flat like an O with three or four stitches. Then use a double thickness of thread to sew the smile.


4. Trim away the excess backing felt. 


5. Using the candy corn you've just cut out as a template, cut a matching piece of yellow felt. This will be the back of your ornament. 


6. Turn over the front piece. Cut a length of narrow ribbon approx 5 inches (12.5 cm) long. Fold it into a loop and stitch the ends to the top of the ornament, using whip stitch and sewing into the felt not through it. If you're worried about sewing through the felt, stitch the ribbon to the back piece instead. 


7. Place the front and back of your candy corn together. Start from the bottom and join the edges together with whip stitch and matching thread, sewing through the ribbon as you pass it. Leave the bottom edge open.


8. Stuff the ornament lightly, then sew up the gap with more whip stitches.


And you're done!

The front of your ornament will look something like this...


And the back like this:


If you want you could make the back in the same three colours as the front (just without adding the face) but using plain yellow for the back is much quicker :)

You could also leave off the face altogether if you prefer your Halloween decor a bit less cute. For the plain candy corn I added a bit of extra detail by using mini ricrac instead of a loop of ribbon:


This design also makes a cute brooch! Just add a brooch clasp at step 6 instead of a ribbon loop and stitch the front & back together without adding the stuffing.


Click here to view the template sheet in a new window or tab. Make sure you're viewing it full size, then print at 100%. 


This tutorial is for non commercial use only: you can use it to make as many felt candy corn as you want for yourself or as gifts, but please don't make any for sale. You may borrow a couple of photos if you want to blog about this project, but remember to credit me and link back to this page on my blog, and do not reproduce my entire tutorial / share my templates on your site. Thanks!

Enjoyed this free tutorial? Buy me a "coffee" and help support my blog!

Buy Me a Coffee at ko-fi.com

Subscribe to my newsletter for a monthly free pattern and visit my crafty tutorial archive for lots more free projects.

Visit my shop to buy my printable PDF sewing patterns: