Showing posts with label oak leaves. Show all posts

Tuesday, 3 September 2019

A Year of Wreaths: September Embroidered Oak Leaves Wreath Tutorial

UPDATE: this project is now available as a printable PDF pattern on my Patreon.

Subscribe for a small monthly fee and you'll get access to a growing library of PDF patterns and tutorials, with an email whenever I add a new project. You can cancel any time.    

Click here to check out my Patreon page and sign up!

-------

This month’s wreath design celebrates the arrival of autumn! It features berry red yarn, a bit of sparkle, and a cluster of felt oak leaves stitched with the opening line of John Keats’ famous poem ‘To Autumn’: “Season of mists and mellow fruitfulness”.

autumn oak leaves wreath
embroidered felt oak leaves
 
felt oak leaves on an autumn wreath


Subscribe to my newsletter for a monthly(ish) free pattern and visit my crafty tutorial archive for lots more free projects.

Visit my shop to buy my printable PDF sewing patterns:


Friday, 7 September 2018

How To: Embroidered Felt Oak Leaf Brooches

I get a bit obsessed with leaves at this time of year - watching them change and fall as autumn works its magic. So, this seemed like the perfect time to share a tutorial for sewing some felt oak leaves!


These embroidered oak leaf brooches are a great way to add a bit of woodland charm to your spring or autumn outfits.

I've included a template sheet at the bottom of this post for making the oak leaves pictured in these photos, but you could also go out and collect your own leaves and replicate them with felt and thread. Going for a walk to find a beautiful leaf would be a lovely autumn activity. It would also be lovely to turn a bit of your favourite tree or a much-loved walk into something you can wear regularly, carrying a little bit of nature with you wherever you go.


The oak leaves also make great headbands! Simply attach your stitched leaf to an elastic hairband or a length of coordinating ribbon and channel your inner wood nymph...


When I used to sew oak leaf brooches and headbands for sale in my online shops I embroidered them all with sewing thread, using a double thickness of sewing thread to stitch the veins on the leaves. In this tutorial I recommend using stranded embroidery thread (floss), which is easier to work with than a double-thickness of sewing thread and gives a nicer finish, but you could of course just double-up your sewing thread if you prefer!


You will need:

- Green or brown felt for the leaves
- Contrasting green or brown backing felt
- Sewing thread to match both your chosen felt colours
- Embroidery thread (floss) for stitching the veins (to match or almost-match the leaf colour, or to contrast nicely - e.g. orange embroidery thread on a light brown leaf)
- Sewing scissors (embroidery scissors are great for cutting out detailed felt shapes)
- A sewing needle and pins
- A brooch clasp

Optional: 

- An air erasable fabric marker pen
- Tissue paper
- A biro or other fine pen

To make an oak leaf brooch using freehand embroidery:

1. Use one of the templates provided (or your own leaf sketch) to cut out an oak leaf shape from brown or green felt. Place it on a piece of backing felt. 


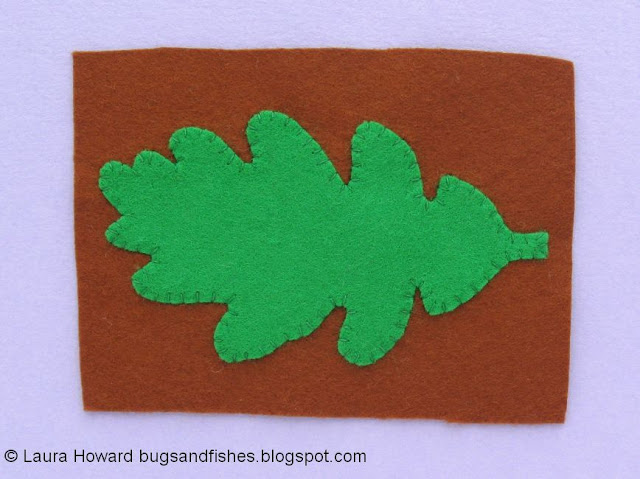
2. Sew the leaf to the backing felt, sewing around the edge with whip stitch and matching sewing thread.

You can pin or tack the leaf in position or just hold it against the backing felt as you sew. I find it helpful to start sewing near the centre of the leaf instead of at one of the ends as this quickly makes the leaf more secure against the backing felt. 


3. Backstitch a line down the centre of the leaf, using the lines on the template as a guide. You can sew this completely freehand or use an air-erasable fabric marker to draw a guide line.


Use three of the six strands in your embroidery thread (floss) for this central line, but only two strands for the remaining lines. Add the other lines to the leaf using backstitch, or by sewing a line of running stitch out from the central line then back again filling in the gaps with your second set of stitches to create a continuous line.

Remember that you'll be cutting around the leaf in a moment and take care not to stretch thread across where you'll be cutting.


4. Cut out the leaf shape, leaving a narrow border of the backing felt framing the leaf.


5. Use the shape you've just cut out as a template to cut a matching piece of the backing felt.


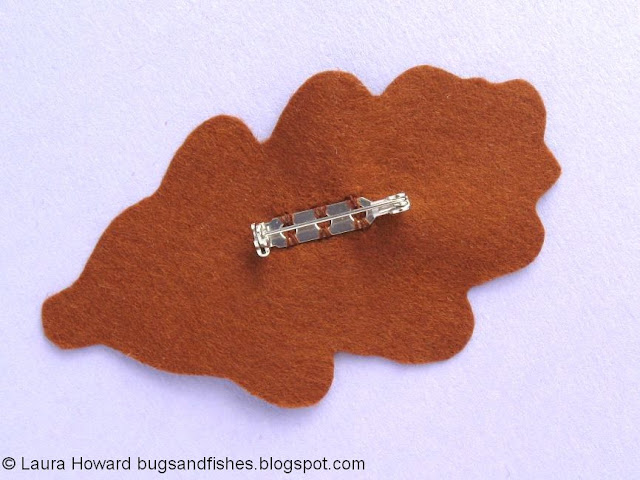
6. Turn over the plain backing piece and attach a brooch clasp with a double thickness of sewing thread. Think about which way up you'd like to wear the leaf before you attach the clasp!


7. Place the front and back of the leaf together and sew around the edges with matching sewing thread. You could use running stitch for this (sewing flush with the embroidered leaf shape, so your stitching is hidden), or use whip stitch or blanket stitch.

To make an oak leaf brooch using an embroidery pattern:

A. Trace one of the templates provided (or your own leaf sketch) onto a piece of tissue paper. Pin then tack the tissue paper to your chosen felt.


B. Embroider the leaf design, following the lines on the tissue paper pattern. Use embroidery thread and backstitch and/or running stitch as described in step 3, above.

If you're sewing the inner lines only (as shown in the photo below), sew the lines almost but not completely up to the outer line of the leaf (you'll be cutting round this later and you don't want to accidentally snip your threads!).


Alternatively, you can sew all the lines on the paper pattern (as shown below). I used three strands of embroidery thread (floss) for the outer line of the leaf.


C. Remove the tissue paper and cut out the leaf - how you do this will depend on how you decided to embroider the leaf.

If you've just stitched the inner lines, cut around the outer line to create the leaf shape...


... then tear away the tissue paper. Use a pin to carefully remove any remaining small pieces of the tissue paper.


If you've stitched the outer line of the leaf, remove the tissue paper first...


... then cut out the leaf shape, leaving a narrow border of felt around the edge of the stitching.


D. If you've only stitched the inner lines of the leaf, place the leaf shape on a piece of backing felt and sew it in position with whip stitch and matching sewing thread. Then cut out the shape, leaving a narrow border of the backing felt.


E.  Follow steps 5, 6 and 7 (above) to finish your leaf brooches, cutting a matching piece of felt then adding a brooch clasp and joining the front and back of the brooch together.

As the fully embroidered leaf doesn't have a backing felt layer, you may want to cut two matching leaf shapes and add one sandwiched between the front and back of the brooch to give it some extra sturdiness.


Enjoyed this free tutorial? Buy me a "coffee" and help support my blog!

Buy Me a Coffee at ko-fi.com

Subscribe to my newsletter for a monthly free pattern and visit my crafty tutorial archive for lots more free projects.

Visit my shop to buy my printable PDF sewing patterns:

This tutorial is for non commercial use only: you can use it to make as many felt oak leaves as you want for yourself and as gifts, but please don't make any for sale. You may borrow a couple of photos if you want to blog about this project, but remember to credit me and link back to this page on my blog, and do not reproduce my entire tutorial / share my templates on your site. Thanks!

Click here to view the template sheet, make sure you're viewing it full size then print it at 100%

Monday, 25 September 2017

A Year of Wreaths: September Embroidered Oak Leaves Wreath

UPDATE: my September wreath tutorial is now available as a printable PDF pattern on my Patreon. 

Subscribe to get instant access to a growing library of PDF embroidery patterns and craft tutorials, and updates when I add something new!

 
Click here to see all 12 seasonal wreaths in this series!

-----

Nine months into our Year of Wreaths, it's time to celebrate autumn! 

https://www.thevillagehaberdashery.co.uk/blog/2017/a-year-of-wreaths-september-embroidered-oak-leaves-wreath-by-laura-howard

September's wreath tutorial features berry-red yarn, felt oak leaves, sparkly thread, and an embroidered line of poetry: the opening line of John Keats famous ode to Autumn, Season of mists and mellow fruitfulness...

https://www.thevillagehaberdashery.co.uk/blog/2017/a-year-of-wreaths-september-embroidered-oak-leaves-wreath-by-laura-howard


I am a teeny bit obsessed with this metallic thread! 

It's seriously shiny and really easy to stitch with - something that will come as a surprise if you've ever tried to embroider anything with metallic embroidery thread (so many knots! and so much stress! ugh!). This stuff is fab, I love it and kind of want to use it for everything.

https://www.thevillagehaberdashery.co.uk/blog/2017/a-year-of-wreaths-september-embroidered-oak-leaves-wreath-by-laura-howard


Subscribe to my newsletter for a monthly(ish) free pattern and visit my crafty tutorial archive for lots more free projects.

Wednesday, 7 August 2013

How To: Leaf Card

Today I'm sharing a super simple design for a leaf card...


... it's quick and easy to make, but I think it looks rather nice!

A few of these cards would make a great addition to your stationery stash (they make great all-purpose notecards for thank-yous or birthdays or just sending a nice note to a friend) or you could make a set of cards, tie them neatly with a ribbon or a piece of twine and give them as a gift. I think they'd look especially nice paired with brown kraft paper envelopes.


To make the card you will need:

- one of the oak leaf templates from this template sheet
- woodgrain effect sticky back plastic / self-adhesive vinyl
- a piece of white card (A5 folded in half) or a card blank (the card blank I used has a finished size of 4 x 6 inches)
- scissors, a ruler & a pencil
- pins, sewing scissors
- double-sided sticky tape
- green felt (or brown if you want to make an autumn leaf)

1. Use the leaf template to cut out a felt leaf. You could use green paper or card if you wanted, but I think using felt gives the card some nice texture.


2. Cut a strip of sticky back plastic that's longer than the height of your card and 2.5 inches wide - use the ruler and pencil to make sure the edges are nice and straight. The top and bottom edge of the strip should overhang your card like this:


3. Position the strip so that there's a few mms of blank card visible to the left (see the photo of the finished card at the top of this post) and carefully peel off the backing paper to stick it in place.

This is the method I used to stick the plastic on neatly. First, peel away the top section of the backing paper and fold it back.


Turn the plastic over and (taking care that the exposed section doesn't touch the card yet) position the plastic on the card, lining it up neatly. Carefully press the exposed sticky section down onto the top of the card. Then use a ruler to smooth the rest onto the card as you peel away the remaining paper.


4. Your card will now look like this:


Turn the card over and cut away the excess plastic - it's much easier to get a flush edge if you turn the card over as you can follow the edge of the white card. The card will now look like this:


5. Cut some pieces of double-sided sticky tape and press them firmly onto the back of your felt leaf.


7. Carefully peel away the backing paper from the tape, and stick the leaf in position on the card (pressing firmly). And that's it! Easy, huh?


Please note: this tutorial is for non-commercial use only. You may borrow one or two photos if you want to blog about my projects but remember to credit me and link back to the original source, and do not reproduce entire tutorials on your site. Thanks!

Enjoyed this free tutorial? Buy me a "coffee" and help support my blog!

Buy Me a Coffee at ko-fi.com

Subscribe to my newsletter for a monthly free pattern and visit my crafty tutorial archive for lots more free projects.

Visit my shop to buy my printable PDF sewing patterns:

Wednesday, 31 October 2012

Autumn Leaves: Free Templates & 15 Project Ideas

As I mentioned yesterday, I've been taking lots of photos of autumn leaves lately and thinking about crafty things. So I thought I'd write a list of some leaf-themed crafty tutorials & ideas. Some of these are tutorials I've featured before, or suggested variations on past projects and others are just some simple ideas to get your creativity going. 


For all these projects you'll need some leaf templates. You can collect some leaves and draw round them, or just print out these leaf templates I draw about 4 years ago (I can't believe it's been that long!). You can find the full size template sheets HERE and HERE.


If you're planning on cutting out lots of leaves, it's a good idea to stick the templates onto some scrap card (like a cereal box) to make them sturdy and easy to draw around. You can then draw leaf shapes onto any paper or card you fancy. For autumnal tones I like using gold kraft paper, sugar (construction) paper in red, orange & yellow, and the backs of used brown envelopes. If it's springtime in your part of the world, use green paper instead, and maybe mix in some simple flower shapes among all the leaves.


1) Make a yarn-wrapped wreath decorated with paper (or felt) leaves:


2) String paper or card leaves together to make a leaf garland.


3) Or hang card or felt leaves vertically to make an autumnal mobile - follow the same method as for my butterfly mobile and use felt balls in yummy autumnal colours as spacers between the leaves. Hang the mobile from a circle of card, an embroidery hoop or a couple of twigs for a rustic look. 


 4) For a really dramatic display (a giant mobile, bold garland or whole curtain or leaves), enlarge the leaf templates (or draw large leaf shapes freehand) and make giant paper leaves as big as your bits of paper will allow. If you want, you can use a brown pencil to draw on veins for added detail. These oversized leaves would also look great scattered across a plain tablecloth at an autumn party, and you can just recycle them afterwards.


5) Use a small oak leaf shape (maybe gold or brown paper stuck on card for sturdiness) to make simple napkin holders like these butterfly ones...


6) ... or cupcake / sandwich toppers like these:


7) Use leaf shapes for your place cards or invites too - write your guests' names on small paper leaves and place them on their plates, or print your invites small enough to fit on the back of a large card leaf and pop it in a brown envelope ready to post. If your guests don't know each other, you could also make the place cards double up as name labels - make the leaves from card, and stick a safety pin on the back with sticky tape

8) Make leaf tags, or use clusters of leaves to decorate your parcels. If you're using paper oak leaves, you could also add gold bells or chunky wooden beads or felt balls as "acorns".


9) Make a simple stencil from your favourite leaf shape and use a sponge and some poster paint to decorate plain gift wrap. Or just cut out an assortment of leaf shapes and stick them at random on a plain parcel.

10) Use a small leaf shape instead of a heart and make lavender sachets for your friends - choose felt and ribbons and buttons in warm autumnal shades like rusty orange and deep plum.


11) Cut out a trio of felt leaves and use a line of running stitch down the middle to sew them onto a ribbon to make a fun leaf headband. 

12) Stick paper leaves to card blanks to make simple autumnal notecards or postcards. Use single leaves, pairs or trios.

You don't have to stick to plain paper - use sparkly gold paper, or felt instead like these felt hearts which were stuck in place with double-sided tape: 


And if you fancy something sparkly, you could make glittery leaf cards - like these snowflake cards, but with leaf shapes covered in lots of gold glitter. Glitter-covered leaves would also make great gift tags / garlands / etc.
 

13) You could also make leafy stationery sets by glueing a vertical row of small leaves down one side of some plain writing paper, and making matching leaf-decorated envelopes too.

14) Follow the method for making these butterfly brooches, but with leaf shapes cut from felt in autumnal shades to make leafy brooches embellished with sequins or embroidery.

15) Or use the templates as embroidery patterns and stitch a leafy something!

Happy crafting...

Enjoyed these free templates? Buy me a "coffee" and help support my blog!

Buy Me a Coffee at ko-fi.com

Subscribe to my newsletter for a monthly free pattern and visit my crafty tutorial archive for lots more free projects.

Visit my shop to buy my printable PDF sewing patterns: