Showing posts with label headbands. Show all posts

Tuesday, 3 March 2020

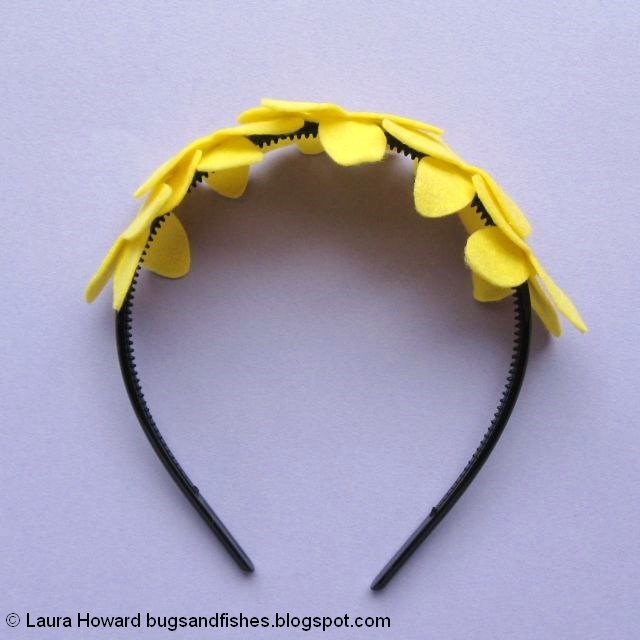
Daffodils Headband: Felt Spring Flowers Tutorial

Get crafty with felt flowers with today's free tutorial!


This colourful felt daffodil headband (or hairband, whatever word you prefer!) is fun and easy to make and would make a fab addition to a spring outfit.

The templates are from my felt daffodils wreath tutorial. Even if you don't fancy making the whole wreath, the felt flowers are perfect for using in different spring craft projects like this one.

https://bugsandfishes.blogspot.com/2019/03/march-felt-daffodils-spring-flowers-wreath-tutorial.html

Both of these tutorials originally appeared on The Village Haberdashery's blog - visit their shop for lots of crafty goodness!

To make this cute and colourful felt headband you will need:

* The template sheet from the daffodil wreath tutorial.
* Orange and yellow felt.
* Orange stranded embroidery thread (floss).
* A plastic headband / hairband / Alice band.
* Yellow sewing thread
* Sewing scissors
* Embroidery scissors (these are great for cutting out small or fiddly shapes!)
* Sewing needles and pins
* A glue gun and glue
* A heat-proof mat for the glue gun
* Newspaper to protect your workspace from any glue drips
* Optional: pinking shears 

To make the headband: 

1. Use the Narcissi templates from the daffodil wreath templates to cut out the following felt pieces: ten yellow petal pieces, five orange trumpet pieces and five orange circles.

When you cut each trumpet cut along three sides of the template with sewing scissors and along the remaining (long) side with pinking shears – just above the edge of the paper template. If you don’t have any pinking shears you could use embroidery scissors to cut a zigzagged edge, or just cut a straight edge.

2. Follow steps 3, 4 and 5 from the daffodil wreath tutorial to sew the trumpet and petals together.


3. Use a glue gun to stick the flower pieces to a plastic headband: first the petals, then the trumpets. Start with the central flower and work outwards, adding a small amount of glue to the felt pieces and pressing them in place very carefully.

IMPORTANT: take care when working with the glue gun as the glue gets very hot! Always place it on a heat-proof mat when not in use, and use newspaper or other scrap paper to protect your workspace. Work slowly, squeezing the gun with care to control the amount of glue you’re using and keeping your fingers out of the way of the hot glue.


Cute, huh? Now it's time to go take some daffodil selfies...

Enjoyed this free tutorial? Buy me a "coffee" and help support my blog!

Buy Me a Coffee at ko-fi.com

This tutorial is for non commercial use only: you can use it to make as many headbands as you want for yourself or as gifts, but please don't make any for sale. You may borrow a couple of photos if you want to blog about this project, but remember to credit me and link back to this page on my blog, and do not reproduce my entire tutorial / share my templates on your site. Thanks!

P.S. Subscribe to my newsletter for a monthly free pattern and visit my crafty tutorial archive for lots more free projects.

Visit my shop to buy my printable PDF sewing patterns:

Wednesday, 21 August 2019

Faux Leather Crafts: Star Headband Tutorial

Today's vegan leather craft project? Making a star headband from gorgeous metallic leather!

vegan leather star headband tutorial
 
Add lots of stars to make a super star crown, or just add a couple of stars for a bit of subtle glamour. I think this headband would also be fab made from glitter felt.

This tutorial originally appeared on the Village Haberdashery's blog and was created using synthetic leather and other craft supplies from their shop.

vegan leather star headband tutorial

You will need:

- The star templates (follow the link to view and download the PDF)
- Some synthetic leather
- Coordinating felt (I used black to match the headband) 
- A plastic headband
- Craft glue
- Sewing scissors
- An air-erasable fabric marker pen or an ordinary felt tip pen
- A glue gun and glue
- A heatproof mat for the glue gun
- Newspaper or scrap paper to protect your workspace

To make the headband: 

Use the templates provided to cut out as many stars as you want – I cut one large star and four small stars. Trace the star shapes onto the back of the leather using a pen then cut them out with sewing scissors.

vegan leather star headband tutorial: cutting out the stars

Cut pieces of felt slightly bigger than each star. Turn the stars over and place them on some newspaper or scrap paper. One by one, cover the back of each star with a layer of craft glue and then firmly press a piece of felt on top covering the star completely. Turn the felt and attached stars over and set them aside to dry.

vegan leather star headband tutorial: add the felt backing

Once the glue has completely dried cut away the excess felt, leaving stars which are leather on one side and felt on the other.

vegan leather star headband tutorial: glue the stars together

Use a glue gun to stick the stars to a headband. Add a line of glue down the centre of one of the stars, on the felt side. Carefully press the star into position on the headband, holding it in place until the glue has dried enough to stick it firmly. Repeat to add the rest of the stars

IMPORTANT: take care when working with the glue gun as the glue gets very hot! Always place it on a heat-proof mat when not in use, and use newspaper or other scrap paper to protect your workspace. Work slowly, squeezing the gun with care to control the amount of glue you’re using and keeping your fingers out of the way of the hot glue.

vegan leather star headband tutorial

Want to make more fun things from faux leather? Try my tutorials for making a lightning bolt brooch, a mini covered notebook, and a geometric necklace.


This tutorial is for non commercial use only: you can use it to make as many headbands as you want for yourself or as gifts, but please don't make any for sale. You may borrow a couple of photos if you want to blog about this project, but remember to credit me and link back to this page on my blog, and do not reproduce my entire tutorial / share my templates on your site. Thanks!

Enjoyed this free tutorial? Buy me a "coffee" and help support my blog!

Buy Me a Coffee at ko-fi.com

P.S. Subscribe to my newsletter for a monthly free pattern and visit my crafty tutorial archive for lots more free projects.

Visit my shop to buy my printable PDF sewing patterns:


Friday, 14 June 2019

Crafting With Felt Flowers: Floral Crown Tutorial

Sew a pretty felt flower crown or headband!

Felt Flower Crown Sewing Tutorial

Throughout this week I'm sharing ideas for crafting with felt flowers, and ways to re-use the flower templates from my April Felt Flowers Wreath tutorial. Today I'll show you how to make a floral crown that's perfect for parties, festivals or even weddings.

Felt Flower Wreath Tutorial

This tutorial was originally designed for The Village Haberdashery's blog and was created using felt and other craft supplies from their shop.

Felt Flower Crown Sewing Tutorial

You will need:

- The flower templates from my April wreath tutorial
- Wool felt in assorted colours
- Embroidery thread to match the felt
- 1 metre ribbon
- Sewing needles and pins
- Sewing scissors or embroidery scissors (these are great for cutting out detailed felt shapes!)

To make the floral crown:

Use the flower templates to cut out the flower pieces from felt (see step 1 of the wreath tutorial - I’ve used different colours to make the crown, but you’ll need the same quantities as listed to create seven flowers). Arrange the pieces, as shown.

Felt Flower Crown Sewing Tutorial: cut out the felt pieces

Stitch the flowers with half strands of contrasting embroidery thread (so for six-stranded embroidery thread just use three strands), sewing radiating stitches from the centre of each flower. I stitched nine stitches for each of the larger flowers, and six for the smaller flowers. If you like you can also add some extra stitched details to decorate the flowers, as I did. For extra decoration you could add buttons, beads or sequins to the flower centres.

Felt Flower Crown Sewing Tutorial: decorate the flowers

Cut a metre long piece of ribbon, cutting the ends at an angle to help prevent fraying. Pin the flowers onto the ribbon starting with the largest flowers in the centre then working outwards.

Sew the ribbon to the back of the flowers, using running or whip stitch in matching sewing thread. Remove the pins as you sew and take care to sew into the felt but not through it, so your stitching won’t show at the front of the crown.

Felt Flower Crown Sewing Tutorial: add the flowers to some ribbon
Felt Flower Crown Sewing Tutorial: add the flowers to a piece of ribbon
Felt Flower Crown Sewing Tutorial: pin then sew the flowers to a length of ribbon
Felt Flower Crown Sewing Tutorial


This tutorial is for non commercial use only: you can use it to make as many flower crowns as you want for yourself or as gifts, but please don't make any for sale. You may borrow a couple of photos if you want to blog about this project, but remember to credit me and link back to this page on my blog, and do not reproduce my entire tutorial / share my templates on your site. Thanks!

Enjoyed this free tutorial? Buy me a "coffee" and help support my blog!

Buy Me a Coffee at ko-fi.com

P.S. Subscribe to my newsletter for a monthly free pattern and visit my crafty tutorial archive for lots more free projects.

Visit my shop to buy my printable PDF sewing patterns:


Monday, 13 May 2019

DIY Fantastic Festival Hairbands Tutorial

Today I'm sharing a fun and easy DIY project: decorating plastic Alice bands!


ADVERTISEMENT: This tutorial is sponsored by Bostik, and is part of a series of crafty projects I'm creating to promote their range of adhesives. Click here to see all the posts in the series!

This post is actually the start of a whole week of Bostik-themed craftiness here on my blog. I'll be sharing creative ideas using all these different products:


I'll be using the PVA Glue, Glu Dots, Micro Dots and Blu Tack later in the week (on Wednesday and Friday), but today I'm getting crafty with Bostik's Power Repair glue.


According to the packaging, Bostik Power Repair Ultimate Strength Glue "provides a long lasting bond for just about anything - glass, wood, stone, metal, leather, rubber, plastics, ceramics and much more!" It "resists knocks and drops, is waterproof and works in extreme temperatures."

It's ideal for small repairs around the house, basically, but did I want to use it to repair something around the house? No I did not. I wanted to use it to make something fun and joyful and to test it out on a project that I'd normally use a glue gun for because I'm always interested in alternatives to worrying that I'm going to burn myself with hot glue.

So, I decided to decorate some plain plastic Alice bands and turn them into fun accessories to wear to parties, gigs, or festivals this summer.

 
To make your own headband, you'll need a plain plastic band to use as your base (the wide plastic ones are particularly great as they give you a big flat surface to glue stuff to), something fun to stick on them, and some Bostik Power Repair glue or other suitable strong glue.


I decorated the narrow hairband with bright felt balls, and the wide hairband with a trio of mini rubber ducks. Rubber ducks are pretty cute and the colours are fab, but I also love the idea of wearing rubber ducks in your hair to a festival where the forecast is for lots of rain! The Power Repair glue is waterproof, so you won't need to worry about the ducks sliding off your head during a downpour.

I applied the glue to the bottom of one of the ducks and the top of the wide headband using the narrow nozzle on the glue (you can also unscrew the whole cap if you're sticking something larger), then held them together for a few minutes.


The glue is "repositionable for up to 3 minutes" which means you don't have that OH NO I STUCK IT IN THE WRONG PLACE ARGH moment that so often happens when working with a glue gun but it does mean you may need to be patient while the glue sets a little. If you were sticking something flat on top of something else flat you could just leave them both sitting there but my duck would definitely have slid off the curved headband if I'd not held it in place.

The glue is quite a thick gel and applies easily without dripping, which is great. The packaging also boasts that it "won't glue your fingers together" which is always EXCELLENT news when working with strong glue (I always end up getting glue on my fingers no matter how carefully I work). 

I then left the headband propped up (between two small wooden boxes) for a while to give the glue a chance to set some more (it fully sets after two hours and will reach full strength after 24 hours).


After about 20 minutes I nudged the duck gently and was happy with how it was holding in place so I repeated the process to add the other two ducks, each time propping the headband up so the latest duck was sitting as horizontal as possible so it wouldn't slide down the curved band.


I used the same method for adding the felt balls to the narrow headband, just adding less glue and only waiting about 10 or 15 minutes for the glue to have taken hold. (I didn't time this exactly, just wandered off to get a few other things done while I was waiting so you may find you can add the next item to your headband much quicker than this!)


And that's it! Told you it was easy. Now all you need to do is go try on your hairband(s) and take some selfies :)


DISCLOSURE: this post is sponsored by Bostik, who also provided the Power Repair I used to make the headbands.

P.S. Fancy some more free crafty goodness? Subscribe to my newsletter for a monthly free pattern and visit my crafty tutorial archive for lots more free projects.

Thursday, 9 November 2017

Faux Leather Star Headband Tutorial

UPDATE: my vegan faux leather craft tutorials are now available here on my blog! Make a lightning bolt brooch, a geometric necklace, a star headband, or a mini covered notebook.

----

Have you ever made anything from faux leather? I hadn't until recently, when the folks at The Village Haberdashery sent me a pack to get crafty with. It turns out to be very fun stuff - and vegan-friendly, too!

I've designed four easy tutorials for things to make with faux leather, which will be popping up on the Village Haberdashery blog in the coming weeks. Click here for the first tutorial: a guide to making a shiny star headband.

Faux Leather Star Headband

This tutorial is perfect for using one of the metallic faux leather sheets...

Star Headband

... isn't that gold just delicious? (I never can resist shiny things).

Gold metallic vegan leather stars

You'll find the free step by step tutorial HERE and the faux leather packs HERE.

Fancy some more free tutorials? Subscribe to my newsletter for a monthly free pattern and visit my crafty tutorial archive for lots more free projects.

Saturday, 5 December 2009

This used to be a sweater...

... but I don't think it'll keep you very warm now! :)
This is my entry for Folksy's Upcycle Christmas competition - listed in my Folksy Shop with just a few hours to spare before the deadline. Phew!

It's a vintage-inspired cocktail hat / fancy fascinator made from wool felt and decorated with lots of sparkly beads:It started life as an old sweater that shrank in the wash (a kind gift from a neighbour) and a couple of bracelets that have been languishing in my jewellery box since I was a teenager (many years ago now!)You can read more about it & see more photos HERE and if you're a member of Folksy please add it to your favourites if you like it - the item with the most votes by Thursday evening will win the "peoples choice" prize. It's not currently for sale but will be included along with all the other Upcycle Christmas entries in an online auction being held to raise money for Sue Ryder Care. The auction begins on December 7th, I'll post details as soon as I know them so you can go bid on any of the entries that have caught your eye...