Showing posts with label garden. Show all posts

Friday, 12 October 2018

Autumn at Kew: Colour & Texture

Kew Gardens is full of loveliness in the autumn, and not just because of all the trees! Here's some of the gorgeous colour and texture I spotted on my autumn visit...


Some parts of the garden are fading at this time of year, while others are in full bloom and bursting with colour.


I was particularly charmed by this border. I don't know what kind of plants these are but they are rather wonderful, and not at all the usual shades I'd associate with autumn.


I loved this tree in the rock garden...


... these almost flame-like leaves...

 
... and these fabulous honey-coloured grasses.


They look so soft and fluffy, don't they?


There were still a few roses just clinging on in the rose garden. Fabulous bursts of colour popping up now and then like the memory of summer.


Plants take on a really sculptural quality in the autumn, don't you think?


In the spirit of leaving the best until last, my favourite autumnal find was this rather magical corner.


This is a lovely, peaceful spot all year round, with benches and a water sculpture within a circle of hedges. But with the leaves yellowing and illuminated by the warm autumn light? Truly wonderful, like something out of a fairytale.


Visit my crafty tutorial archive for lots of projects inspired by the magic of autumn.

Catch up on all my posts about Kew Gardens.

View my travel archive for lots more posts about my days out in London and around the UK.

Monday, 27 August 2018

Summer at Kew: Blue Skies & Lush Greenery

My final summer visit to Kew Gardens was gloriously hot - in fact, I think I'd describe it as a little too hot. Instead of striding round the gardens like normal my pace was reduced to a veeeeeery slow wander with frequent rest stops in patches of shade, and the train journey home was rather sticky (ah, the joys of public transport in summer!).

If you're going to sit in a garden on a hot sunny day, though, this is not a bad one to choose!

The rock garden was looking lush in the sunshine...


... and the waterlily house was a riot of green.


Shady, tree-lined paths were a must this visit...


... as was a walk round a lake. I'm not sure if it's actually cooler near water or it just feels like it, but either way this was lovely!


I also went for a walk through the woodland at Kew (which is full of bluebells in the spring - something I sadly missed seeing due to deadlines! - and wonderfully shady on a hot summer's day), and visited Queen Charlotte's Cottage. The cottage was originally a private retreat of the royal family, and was gifted to Kew by Queen Victoria on the condition that the surrounding woodland was kept in its natural state.


Apparently there was once a paddock next to this cottage, known as the New Menagerie, which was a mini zoo for the royals to enjoy - including "a pair of black swans, buffaloes, the now extinct quagga (an animal similar to a zebra) and the first kangaroos to arrive in England".

There aren't any exotic animals at the cottage these days, but if you visit at the weekend you can go inside and imagine being a prince or princess stopping for afternoon tea on a walk through the gardens. (It's a shame they don't actually serve royal-themed afternoon teas here, because that would be awesome).


Finally, I visited the gardens that make up Kew's Japanese landscape...


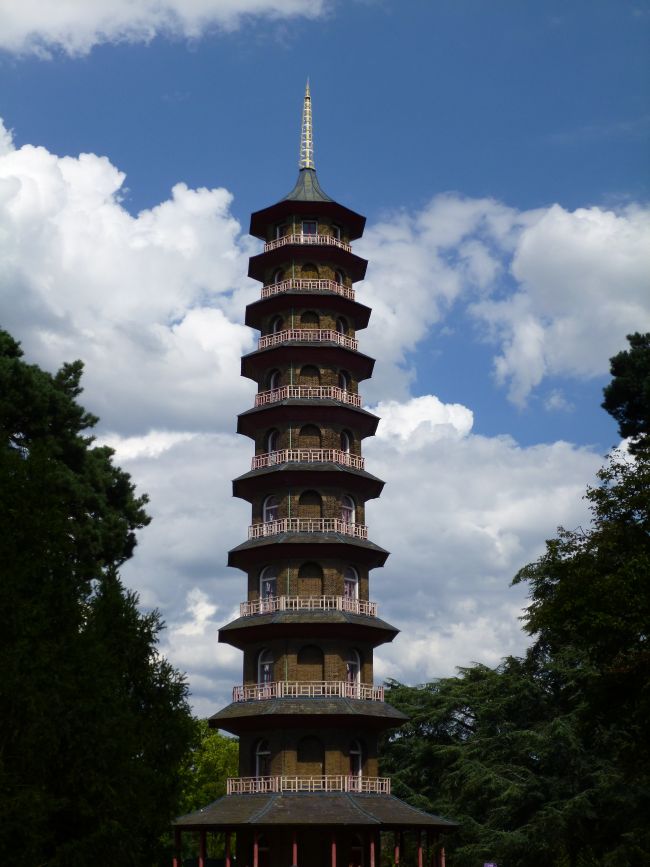
... and the Great Pagoda (the base of which is another wonderfully shady spot to sit on a hot day!). The Pagoda was completed in 1762 and was being restored when I visited, but it's now open to the public again - if you fancy climbing those 253 steps!


I've been a bit wary of climbing towers since I visited York Minster and nearly had a panic attack climbing the central tower, but the Pagoda staircase doesn't look particularly claustrophobic (unlike the narrow stone staircase at York!)... and I bet the views are amazing. A return visit may be called for!*

Click here to catch up with all my posts about my visits to Kew during my year's membership (definitely one of the best things I've ever bought for myself).

Click here to view my travel archive for lots more posts about my days out in London and around the UK.


(*To Kew, not York Minster's tower! I'm proud that I conquered my fear and got to the top of the Minster's tower, but you couldn't pay me to climb it a second time!!).

Friday, 10 August 2018

DIY Floral Hula Hoop Wreath Tutorial

I've got a really fun project to share with you guys today: how to make a gigantic floral wreath!


This tutorial is sponsored by Bostik - it's the first in a series of crafty projects I'll be sharing over the coming months, all made using their range of adhesives. I love the challenge of creating things using specific materials, and I hope you guys will enjoy what I come up with.

The first challenge theme was to make something for the garden, and I immediately wanted to make a garden-friendly wreath (regular readers will know how much I love making wreaths!).


I don't know who first thought of using a hula hoop to make a giant wreath but it's a genius idea and my current fave crafty trend. Oversized stuff is always cool, and it's really easy to find cheap plastic hula hoops in pretty colours on the high street.

I decorated my wreath with plastic fake flowers, which add lots of colour and will also withstand a bit of English drizzle! (If you know it's going to rain heavily or be very windy I'd recommend moving the wreath indoors or to a sheltered spot to help protect it from the elements).


You will need: 

- A plastic hula hoop
- Plastic fake flowers
- Craft glue which will stick to plastic (I used extra strong Bostik Glu Dots)
- Pliers or strong scissors
- String or twine

To make the wreath:
1. Choose a selection of fake flowers to decorate your wreath. I bought five sunflowers, which I thought would make a lovely cheerful display, but you could mix and match lots of different types and colours of flowers.


2. Use a pair of pliers or some strong scissors to disassemble the flowers, removing the individual elements from the main stems.


Once I'd detached the flowers and leaves from the main stems, this is what I had to work with:


3. Locate the join in your hoop and make sure this will be hidden under your floral arrangement. Because I planned to add the sunflowers to the top of the hoop, I placed the join at the top so it would be hidden later.


4. If you'll be adding flowers at the top of the hoop, like me, you'll need to attach a piece of string or twine before you start adding the flowers. If the top of your hoop will be undecorated you can leave this step until you come to hang the hoop.

Cut a long piece of string/twine and knot it securely around the hoop leaving two ends of equal length. Think about where you're planning to hang the wreath (e.g. from a nail in a fence panel, or from a fence post) and make sure you've got an appropriate amount of string/twine for the job.


5. Lay the flowers and leaves out around the hoop to roughly plan your arrangement. When you're happy with how it looks, make a quick sketch of the design or take a digital photograph for reference then set all the pieces to one side.


6. Now it's time to decorate the hoop!

I used extra strong Bostik Glu Dots to secure my flowers and leaves - the mess-free dots stick instantly and make constructing the wreath a quick and easy process.


Glue the flowers and leaves to the hoop one by one, starting in the centre of the design and working outwards. Add the Glu Dots (or your chosen adhesive) to a section of the hula hoop then press the flowers/leaves into place. Repeat to gradually build up your floral design.


7. Hang your finished wreath in the garden and enjoy!


DISCLOSURE: this post is sponsored by Bostik, who also provided the Glu Dots I used to construct the wreath.

Fancy some more free crafty goodness? Subscribe to my newsletter for a monthly free pattern and visit my crafty tutorial archive for lots more free projects.

Wednesday, 1 August 2018

Summer at Kew: Rock Gardens, Peacocks & Climbing Roses

Kew has a lot of famous attractions - like the glasshouses - which are the absolute "must sees" when visiting the gardens. During my year of membership, I visited these a lot but also fell in love with some of the quieter corners of the grounds.

One of my favourite areas at Kew is the rock garden. It's huge, and includes several waterfalls!


The rock garden is arranged in six geographical areas and contains a huge variety of different plants from all over the world. These aren't big, showy, spectacular plants but they're still lovely and the cumulative effect of them all in this large rock garden? Wonderful!


Having a year's membership to Kew (which is surprisingly affordable, especially given the price of a day ticket!) gave me time to fully explore the gardens, of course, but the real treat was coming back at different points during the year and seeing how much things had changed. Look at how bare the rock garden looked back in January!

Near the rock garden in the early summer there's a walkway covered in climbing roses (super pretty)...


... and down by the Palm House pond you'll find these awesome plants with umbrella-sized leaves (this picture does a terrible job of showing just how big these leaves were but trust me when I say they were huge!).


I really enjoyed my summer strolls round the gardens...


... especially round the lake, which was looking lush...


... and it's always a joy spotting some of Kew's peacocks!


Click here to catch up with all my posts about Kew.

Click here to view my travel archive for lots more posts about my days out in London and around the UK.