Showing posts with label free. Show all posts

Thursday, 29 September 2022

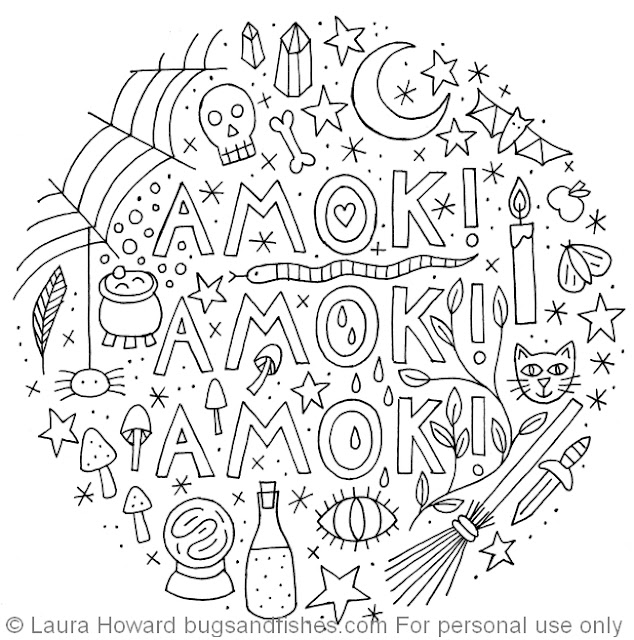
Amok! Amok! Amok! A Hocus Pocus Embroidery Pattern for Halloween

I've got a free, spooky embroidery pattern to share with you guys today - a celebration of one of my favourite films, and all things witchy! 


With the nights drawing in, my thoughts have turned to the books and films I want to revisit on chilly autumn evenings. 

Top of my Must Watch Halloween Movies list is the kids classic "Hocus Pocus" - starring Kathy Najimy, Bette Midler, and Sarah Jessica Parker as witches brought back to life by some hapless teens. 

My absolute favourite moment from the film is when SJP's dim, giddy character gleefully shouts "Amok! Amok! Amok!" ... so obviously I had to stitch an homage to that moment. 

I started out wanting to design something simple, focusing on the text itself, then got a bit carried away drawing cute and spooky witchcraft-themed things! More is more, right???

The finished pattern fits nicely in a 7 inch embroidery hoop, or you can trace individual motifs for some quick Halloween stitching. 

I think this would also make a great Halloween colouring page, maybe even to colour in during a Hocus Pocus rewatch?

CLICK HERE TO VISIT MY PATREON AND DOWNLOAD THE FREE PDF PATTERN.

Want more crafty projects? Subscribe to my Patreon for a small monthly fee and you'll get access to a growing library of PDF patterns and tutorials, with an email whenever I add a new project. You can cancel any time. 

Click here to check out my Patreon page and sign up!

This pattern is for personal use only: you can use it to stitch as many spooky things as you want for yourself or as gifts, but please don't make any for sale. Thanks xx

Enjoyed this free pattern? Buy me a "coffee" and help support my work!

Buy Me a Coffee at ko-fi.com

P.S. Subscribe to my newsletter for more free patterns and visit my crafty tutorial archive for lots more creative projects.

Visit my shop to buy my printable PDF sewing patterns and lots more:


Monday, 28 February 2022

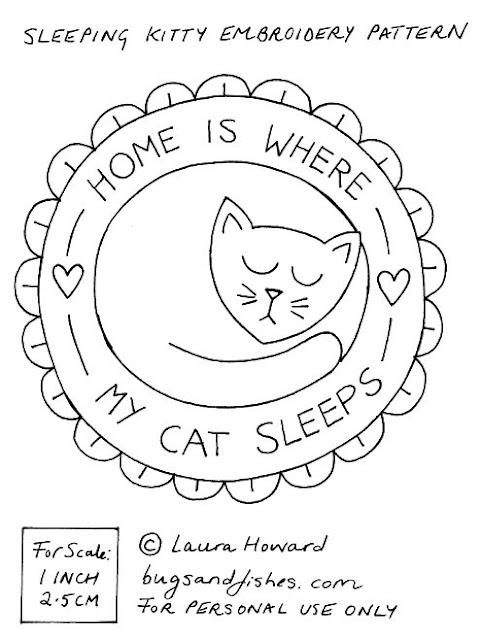
Home Is Where My Cat Sleeps: Free Embroidery Pattern

I'm dipping my toes back into blogging after a long break, with a free embroidery pattern for cat lovers!


The pattern features a cute sleeping kitty (adapted from my cat pincushion tutorial) and the text HOME IS WHERE MY CAT SLEEPS. Super cosy!

It's designed to fit nicely inside a 5 inch embroidery hoop, but I'd recommend using a 6 inch hoop when stitching to give yourself more room to work. It would look fab framed in a hoop, or stitched onto larger projects like a bag or a patchwork quilt, and would be a sweet gift for any cat ladies (or cat gentlemen) in your life.

I've not had a chance to stitch this myself yet, but when I do I'm planning on keeping things simple and sewing the whole design with backstitch - remember that smaller stitches will help you sew smooth curves.  

Click here to open the pattern in a new window, then print it at 100%. A hi-res PDF version of this pattern is also available in my Patreon pattern library.

This pattern is for non commercial use only: you can use it to stitch as many sleepy kitties as you want for yourself or as gifts, but please don't make any for sale. Thanks xx

Enjoyed this free pattern? Buy me a "coffee" and help support my blog!

Buy Me a Coffee at ko-fi.com

P.S. Subscribe to my newsletter (currently taking a break but hopefully back soooon) for free patterns and visit my crafty tutorial archive for lots more creative projects.

Visit my shop to buy my printable PDF sewing patterns and lots more:


Saturday, 4 April 2020

Dove & Robin Christmas Ornament Tutorials

UPDATE:  my felt doves tutorial and little felt robins tutorial (originally shared with my newsletter subscribers) are both now available as printable PDF patterns in my Etsy shop!

http://eepurl.com/dvfYO1


Thursday, 28 November 2013

A Winter Snow Globe - Free Cross Stitch Pattern!

Regular readers may remember that last winter I designed my first non-text-based cross stitch pattern: a snow globe with snow-capped mountains, a little cabin and some fir trees.


There was a lot of trial and error involved in the design process, but it was very enjoyable solving the problems of how to turn the picture in my head into a little pixelated, stitched picture... and I was so pleased with how it turned out!

I totally meant to draw up a neat version of the chart to share with you guys, but (as I couldn't mention at the time) I was busy working on my new book and I just didn't have the time to get it sorted out. Boo.

11 months later, I have finally drawn up the chart so you can stitch your own cross stitch snow globe. Yay!


You can find the chart and a few notes at the bottom of this post. The chart should be pretty simple to follow if you look at a photo of the finished piece - I've marked all the outlines and main shapes, you just need to fill in the blocks of colour as shown in the photos. I hope the notes will all make sense, but if there's something you're not sure about, please do leave a comment and I'll get back to you as soon as I can!


I haven't included suggested thread colours, as I just used some random shades from my stash but you will need: silver or light grey (the metallic silver thread looks great but it is a total pain to stitch with!), white for the snow, sky blue (this should be dark enough that the white "snowflakes" stand out clearly), brown for the cabin and the tree trunks, and green for the tree branches.

I stitched my snow globe on 14 count Aida, and used half strands of embroidery thread for all the cross stitching (e.g. three strands of six-stranded thread). I also used a single strand of black thread for the outline of the door and the window frame.

Click here to view the chart in another window/tab, and print it at 100%.


This cross stitch pattern is for non commercial use only: stitch as many snow globes as you like as gifts, but please don't make any for sale or sell the chart itself. If you blog about this project, please don't post the full size chart on your site and remember to credit me and link back to my blog or this post. Thanks!

Enjoyed this free pattern? Buy me a "coffee" and help support my blog!

Buy Me a Coffee at ko-fi.com

Subscribe to my newsletter for a monthly free pattern and visit my crafty tutorial archive for lots more free projects.

Visit my shop to buy my printable PDF sewing patterns:

Friday, 5 April 2013

DIY Cross Stitch Sampler: Stop Faffing About & Just Get On With It

(Heads up, I don't usually swear here on my blog but there is a bit of mild cussing in this post)

Last autumn I tweeted that I wished I had a clue about graphic design, so I could make a motivational poster with the phrase "Stop faffing about and just bloody get on with it!" to pin up in my studio.

I need reminding to do this at least once every work day (not least when I am faffing about on Twitter!) and, in a broader sense, I think it makes a great motto... a shorthand for stopping worrying about every little detail and fiddling around making perfect detailed plans and just making a START. Take leaps! Do stuff! Make things happen!

So (since I'm a crafty lady and not a graphic design whiz) I decided to stitch it as a motivational cross stitch sampler instead and I have finally finished the chart...


Nothing fancy, but I think it does the job! I've drawn two versions - one with a bit of mild cussing and one without - so you can choose the design you prefer :)


Here are the charts:


Click on one of the images above to open the image link in another window or tab and click again to view it full size and print. It's quite large so you can print it out at the size that suits you best (or just print a copy for your wall if you can't be bothered stitching it!).

These charts are intended for non commercial use only: stitch as many samplers as you like as gifts, but please don't make any for sale or sell the charts themselves. If you blog about this project, please don't post the full size chart on your site and remember to credit me and link back to my blog or this post. Thanks!

Enjoyed this free pattern? Buy me a "coffee" and help support my blog!

Buy Me a Coffee at ko-fi.com

Subscribe to my newsletter for a monthly free pattern and visit my crafty tutorial archive for lots more free projects.

Visit my shop to buy my printable PDF sewing patterns:

Wednesday, 13 October 2010

Freebie: Anti-Fashion Zine

I've been having a bit of a clearout this week and last night I found a whole folder full of clippings from women's magazines and beauty columns and was totally at a loss as to why I'd kept them... until at the back of the folder I found some half-finished anti-fashion zines.

Before I had a blog, I used to write lots of zines (including one called Bugs and Fishes which I published at irregular intervals for about 6 years, hence the name of this blog!). I wrote about all sorts of weird stuff, stuck it down on a bit of paper with pritt stick, photocopied it and handed it out to friends, and later sold a few copies through my fledgling Etsy shop.

As I don't sell my zines anymore, I thought it might be nice to share one here instead: issue #3 of my anti-fashion zine This Season's Must Have (yes I know sharing issue #1 would make more sense, but I can't find the files on my computer and my scanner needs replacing, so shh).

I love clothes, but fashion (and fashion journalism) drives me crazy! This Season was inspired by endless articles about the new "must have" jeans and how not wearing them would be social death. It's packed with clippings that made me either fall on the floor laughing or grind my teeth in a vaguely feminist, and distinctly anti-fashion rage. Hope you enjoy it :)
Creative Commons Licence
This Season's Must Have by Laura Howard is licensed under a Creative Commons Attribution-NonCommercial-NoDerivs 3.0 Unported License. Click on the images to view full size and print (each page prints to A4 size)

Monday, 28 December 2009

December Giveaway - Happy Christmas!

It's time for the last giveaway of the year... and this month YOU get to choose what you win! :)

To enter all you have to do is visit my Etsy shop and choose your favourite item up to a value of $20 ... then come back and leave a comment on this post saying which piece you'd like if you win.

Leave your comment before midnight (UK time) on Sunday 3rd January and I'll pick the winner at random on Monday 4th January. (If the item you choose has sold by then I'll ask you for a second choice). I'm happy to ship internationally, so anyone can enter.

Please make sure you leave a name or pseudonym (no anonymous comments please) and be sure to come back in the New Year to see if you got picked. Good luck!

EDIT: this giveaway is now closed.

Saturday, 17 October 2009

October Giveaway - win your favourite brooch!

As September seems to have slipped by without a giveaway (time seems to be going so quickly this year!) this month there will be TWO winners. And you get to choose your prize! Hurrah!

Up for grabs - your favourite brooch from my Etsy shop.To enter, visit my Etsy shop, choose your favourite brooch and leave a comment on this post saying which is your favourite before midnight (UK time) on Saturday 24th October. I'll pick two winners at random on Sunday 25th October. (Please note that if the design you pick has sold out by then I'll ask you to choose again)

I'm happy to ship internationally, so anyone can enter. Please make sure you leave a name or pseudonym (no anonymous comments please!) and be sure to come back on Sunday to see if you got picked :)

Friday, 17 October 2008

Felt Ornament How-To #1: Stars and Hearts

I just couldn't wait to begin these tutorials, so here's the first one to get you started...


You will need...

A sewing needle
Some pins
Assorted colours of felt (at least 2 colours for this project)
Matching sewing thread
Co-ordinating narrow ribbon
Sewing/fabric scissors

1. First cut out your pattern. You can use my pattern sheet or draw your own simple shapes (cookie cutters make great templates).

2. Pick your colours. This ornament is based on simple contrasting colours: I chose red and white but you could pick any two to match your Christmas theme or make an assortment in lots of bright shades.

3. Pin the pattern to your first colour and cut it out.


4. Remove the pattern, put it to one side and pin the felt shape to the second colour - remember to leave space to cut a border round it! Then, using a contrasting colour sewing thread (I used red to match my background colour) sew the shape to the backing felt.


 This stitching will act as a decorative detail so try to get the stitches as even as possible. If you're worried about it you can always use a matching thread like I did here:


5. Now remove the pin and carefully cut round your shape, leaving a border of the backing colour to "frame" it: I cut mine quite narrow, but a wider border makes for a bigger bolder ornament. Remember: if you're not sure it's always best to cut a bit extra, as you can always trim some off if you're not happy with it at this stage.


6. You now have the front of your ornament. Use it as a template to cut out another piece of your backing felt the same size (this will be the back of the ornament).

7. Pick a piece of ribbon - I use simple narrow ribbons for my decorations but you could try wider pieces (the larger the ornament, the bigger the ribbon you can use) patterned ribbon, ricrac, or even knitting yarn or string: anything you're happy sewing with!

8. Cut a piece about 5 inches (12 cms) long. Fold it over to form a loop and sew the two cut ends to the inside of your backing piece of felt at the top like this:


When you put the front and back of your ornament together the messy ends of the ribbon should now be hidden between them. Use thread that matches your backing felt to help hide your stitches.

9. Now you're ready to sew your ornament together. Pin the front and the back so they're exactly how you want them, with the ribbon emerging from the top. Then, starting from the ribbon sew all around the outside "border" in matching thread, as close to the central shape as possible (again, this keeps your stitches hidden) ... and you've finished!


 VARIATIONS: As discussed above, you can use different colours and ribbons to great effect with this simple pattern. Any simple shape can be used - dig around in your cookie cutter drawer to see what you can find, or sketch your own patterns. I've added an 8 point star template to the pattern sheet for you to try. You could also make larger and more colourful ornaments by adding extra layers - repeat stages 4, 5 & 6 to create more elaborate layered designs.


Please note: this tutorial is NOT for commercial use. You can make as many of these ornaments as you like (they make great gifts!) but please don't sell them or reproduce my tutorial anywhere without my permission. If you give it a mention, please do link back to the original page & if you make the ornaments please let me know - I'd love to hear how it went & would adore to see pictures!

Enjoyed this free tutorial? Buy me a "coffee" and help support my blog!

Buy Me a Coffee at ko-fi.com

Subscribe to my newsletter for a monthly free pattern and visit my crafty tutorial archive for lots more free projects.

Visit my shop to buy my printable PDF sewing patterns:


Pattern sheet (double click to view full size and print)