Thursday, 3 January 2019

Making a Patchwork Quilt: the hand-quilting is FINISHED!

Remember my patchwork quilt?


This quilt is officially my longest running work in progress: I started it way back when I was a teen, which is so long ago that if the quilt was a person it would now be a teenager itself, definitely old enough to drive a car and maybe technically an adult by now (yikes). 

After a flurry of quilt-making enthusiasm when I was a student, I put the part-finished quilt top away in a cupboard for years. When I rediscovered it in a box in 2012, I thought about just getting rid of it but that felt a bit wrong so when my mum said she liked it I decided to try and finish it as a gift for her. I got the quilt top finished by 2014... then put it in a box again and didn't look at it for another four years.

Last year I was full of enthusiasm for Finally Finishing long-running projects (including a patchwork blanket and another quilt), so in the spring I bought wadding, white backing fabric and white quilting thread ready to complete the quilt.

I washed and ironed the fabric and put the quilt sandwich together (if you're not familiar with quilting, this is the step when you put all the layers together ready to sew them) then started the hand quilting in the summer.


Now, I don't know if you've ever done any hand quilting but it's a seriously labour intensive process and a very repetitive one! It's also not exactly the ideal project to work on during the hot summer months (and last summer really was hot). So, after making a start I ended up taking a break for a couple of months... but I did a big push this autumn to put the hours in and managed to finish the quilting at the end of November. Woohoo!

I thought the Christmas quilt I made my sister took a long time, but this one is a bigger quilt and made up of smaller squares so I had a lot more (and longer) lines to stitch so there were waaaaay more hours of stitching to put into this quilt.

The Christmas quilt was also a lot neater than this one: I'd used a proper block for marking out the squares for the Christmas quilt and cut and sewed them super neatly. The squares for the old patchwork quilt were a lot more randomly sized - and sewn together rather wonkily, too! I started out the hand quilting using my previous method of using masking tape as a guide line to stitch along... but I soon abandoned this to stitch freehand, following the not remotely straight lines of the "squares". So, all the quilted lines on this quilt are pretty wobbly (and my stitching isn't that neat to begin with, I have so much respect for people who manage to do neat hand quilting because mine all turned out so messy!) but hopefully this just adds to the quilt's handmade charm rather than detracting from it.

I'd originally hoped to keep the fact that I was finishing this quilt a secret from my mum (so it would be a big surprise when it was done) but I soon realised that this was going to be impossible, simply because of logistics of hiding something that big. So I told her about it and we've spent many happy hours sitting watching TV and movies together in her living room while I stitched and stitched and stitched. Sometimes this fella kept us company, too.


I've mostly kept the quilt stashed in her spare bedroom, working on it in bits and pieces when I went round to visit. I took it back to my flat a couple of times thinking I'd be able to really focus on it and push the project forwards but this turned out to be a terrible strategy because I'd spend the whole evening hunched over the quilt, stitching away happily while listening to podcasts or audiobooks and the next day my neck and back would be very angry with me!

For the Christmas quilt I stitched pairs of lines at a time, working steadily outwards and marking off each pair on a neat little chart as I went. For this one I worked a bit more haphazardly, sewing out from the centre but stitching several lines at once. I didn't make a chart to track my progress this time, just laid the quilt upside down on the floor at regular intervals to get an overview of how much stitching was left (the stitched lines are much more visible on the back than the front as they stand out against the plain white instead of getting lost in all that colour and pattern).

By November 20th, I'd stitched out to the first two corners of the quilt. It was amazing what a difference finishing that first corner made: it suddenly started to feel like an actual quilt instead of just a big bundle of fabric.


Excited by the prospect of finally getting this baby FINISHED, I devoted the next few evenings to quilting. I got the third corner finished on the 22nd...


... then started on the fourth and final corner. I couldn't resist laying it out to take a few more "in progress" photos before the quilting was finished.


Having the end in sight felt great!

Sewing these final few lines was definitely the most enjoyable bit of the quilting process (hand quilting is so boring, you guys! oh my goodness!!), and I was full of glee when I tied off the last stitch that weekend.


Even though it's now been over a month since I finished the quilting, I still haven't taken any photos of it "finished" and ready for the binding.

I have trimmed off most of the excess wadding and backing fabric (another step that's made it look much more like a real quilt), bought a fabric sample card so my mum can choose the perfect colour for the binding fabric (this important decision is still in progress but she's currently leaning towards blue), and sold the quilting hoop to a friend (because frankly, I plan on never hand-sewing another quilt as long as I live!!!).

Once my mum has decided which colour she wants for the binding, I'll measure the quilt and order enough fabric plus some matching thread. Then it'll be time to get started on the final stage! Maybe this time round I'll actually follow the instructions properly (unlike last time)? Watch This Space.

Tuesday, 1 January 2019

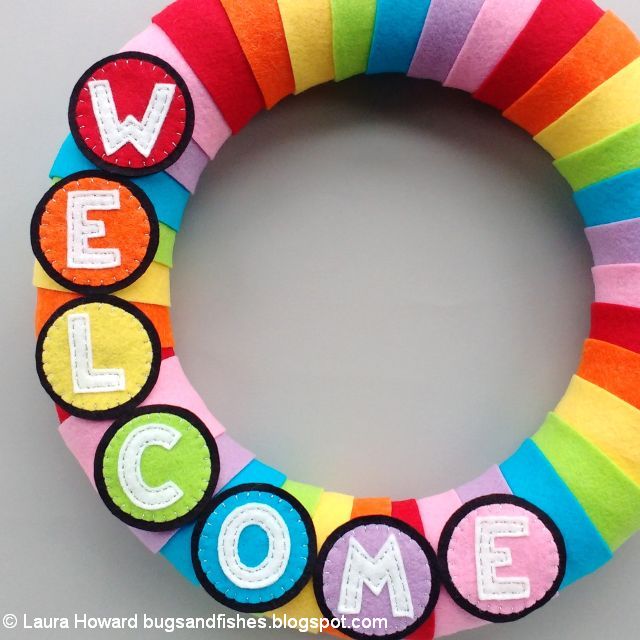
A Year of Wreaths: January Rainbow Wreath Tutorial

UPDATE: this colourful wreath tutorial is now available as a printable PDF pattern over on my Patreon.

Subscribe for a small monthly fee and you'll get access to a growing library of PDF patterns and tutorials, with an email whenever I add a new project. You can cancel any time.    

Click here to check out my Patreon page and sign up!

-------

Banish the January blues with this bright and cheerful rainbow felt wreath!

felt rainbow wreath

These happy colours are perfect for brightening up dull winter days and I’ve added a bit of sparkle too (yay!).

Want to welcome visitors but prefer a more muted colour palette? Just switch in your seven favourite shades in place of the rainbow colours. 

felt rainbow wreath

felt rainbow wreath


Subscribe to my newsletter for a monthly(ish) free pattern and visit my crafty tutorial archive for lots more free projects.

Visit my shop to buy my printable PDF sewing patterns:

Monday, 10 December 2018

Crafty Christmas Bauble Tutorial: Make a Sewing-Themed Ornament for Your Tree!

If you're reading this post (and you're not reading it because you're my mother, who sweetly reads all my blog posts just because I wrote them) then there's a pretty strong chance you love crafting.

Sooo... why not lean into your love of all things crafty and make some crafting-themed baubles to hang on your Christmas tree?

DIY Paper Christmas Baubles Decorated with an old Sewing Pattern

This tutorial is sponsored by Bostik, and is part of a series of crafty projects I'm sharing using their range of adhesives.

So far I've also made a giant floral hula hoop wreath, some autumn leaf cards, some fun 3D cards, a cute autumn scene in a mason jar, and a reindeer Christmas card.

Today's project is super easy and fun: turning bits and bobs from your craft stash into cute sewing-themed ornaments to add to your holiday decor.

DIY paper Christmas baubles

I decorated my baubles with some old sewing pattern pieces, a cheap and colourful tape measure I got in a sewing kit, and some sequins. You could also make these with knitting patterns, embroidery patterns,  or cross stitch charts, and they'd look just as fab!

These crafty baubles would be a great addition to your Christmas tree... but you could also use them to make a garland for your sewing room, as card toppers, or as gift tags (maybe with some crafty gift wrapping?).

DIY paper Christmas baubles

I decorated my baubles on one side only, but if you want your baubles to be double-sided just repeat steps 2-4 as you work through them.

You will need:

- a Bostik Blu Stick (or other glue suitable for sticking paper and card)
- some Bostik White Glu (or other craft glue)
- white card
- craft scissors
- a pencil
- an old sewing pattern (or a knitting pattern or cross stitch chart, e.g. from a craft magazine or a second hand book).
- a measuring tape
- some sequins
- a darning needle (to poke holes in the tops of the baubles)
- some thread, yarn or bakers twine for hanging the baubles
- the bauble template provided at the bottom of this post

How to make a craft-themed Christmas bauble:

1. Use the bauble template and a sharp pencil to draw a bauble shape on white card, then cut it out.

Cutting out the bauble shape

White card is crucial as a neutral base if you're using a semi-transparent sewing pattern to decorate your baubles, but if you're using book or magazine pages, you could use scrap card from cereal boxes or other packaging as your bauble base because the card will be hidden by the thicker paper.

2. Use a glue stick to cover the card bauble in glue, then stick it to the back of the sewing pattern (or whichever craft pattern you're using). I found it helpful to roughly cut out interesting sections of the sewing pattern ready to stick the bauble shapes to, rather than working with whole pattern pieces laid out on my desk.

I used a Bostik Blu Stick for sticking my bauble shapes. The glue starts out blue then dries totally clear, so it's perfect for making sure you've completely and evenly covered a card shape with glue. 

Sticking the bauble shape to the sewing pattern

Before the glue dries, turn the bauble over and carefully smooth down the paper to make sure it's completely stuck down without any air bubbles or creases.

The bauble shape stuck to the sewing pattern

Once the glue has dried and the paper is firmly attached, cut away the excess paper leaving a decorated bauble shape.

Bauble shape decorated with an old sewing pattern

3. Cut a length of measuring tape slightly wider than the bauble.

Don't have a measuring tape or just fancy a different look? If you're using a pattern from a craft book or magazine, you could cut a colourful strip from the photo of the finished project to run across the centre of the bauble.

Adding the measuring tape to the bauble

Add some craft glue to the back of the tape and press it in place on the front of the bauble.

I used Bostik White Glu to attach the measuring tape (and the sequins in the next step). The glue is really easy to control via the nozzle and it dries clear so if you accidentally use too much it won't show on your finished bauble.

Adding the measuring tape to the bauble

Turn the bauble over and leave it to dry, then trim away the excess tape.

Paper bauble decorated with sewing pattern and measuring tape

4. Add two rows of sequins to give your bauble some sparkle!

Tip: lay out your sequins on the bauble to check how many will fit in each row, and to get a rough idea of the spacing before you get out the glue.

I used more of the Bostik White Glu to attach my sequins, adding two rows of small dabs of glue then carefully pressing the sequins in position.

Adding the sequins to the bauble

Leave the bauble to dry - the glue will dry clear, so don't worry if you add a bit too much!

Waiting for the glue to dry

5. Use a darning needle to carefully poke a hole in the top of the bauble, then use the needle to thread a piece of sewing thread / yarn / bakers twine. I used some lovely sparkly sewing thread for my baubles, knotting the thread securely in a loop and trimming any excess loose ends.

DIY paper Christmas baubles


DISCLOSURE: this post is sponsored by Bostik, who also provided the Blu Stick and White Glu I used to make the baubles.

Click here to open the template sheet in a new window, make sure you're viewing it full size then print it at 100%.

DIY Christmas bauble template


P.S. Fancy some more free crafty goodness? Subscribe to my newsletter for a monthly free pattern and visit my crafty tutorial archive for lots more free projects.

Wednesday, 21 November 2018

An Autumn Visit to Arnos Vale: Bristol's Victorian Garden Cemetery

I joined a local hiking group this year, which has been a huge amount of fun. I've organised a few walks in my new seaside hometown, and have gone on several others in and around Bristol (though not nearly as many as I'd have liked!).

It's really nice having a group of people to get out and walk with, and I've found that organising walks (which you're then committed to because other people are coming) is a great way to get myself out of the house and exploring. I've decided to use this as a way of kicking myself into finally visiting places which have been on my "Ooh, I want to go there!" list for ages... and this autumn the first place I've ticked off the list is Arnos Vale Cemetery.


It sounds a bit weird to say that I took my hiking group for a walk round a cemetery, but Arnos Vale is somewhere pretty special. Established in 1837, the 45 acre site is really beautiful: a veritable maze of little woodland paths with interesting gravestones and memorials around every corner.


I arrived early to get my bearings before the others arrived and it didn't take me long to get slightly spooked out walking around the site. Okay so the ghost stories I'd been reading that week probably didn't help, but this is an incredibly atmospheric place to explore (particularly on your own, first thing after it opens on a slightly misty autumn morning!).


Later, after the other ladies from the group had headed home (and after we'd had some truly delicious cake from the on-site cafe), I went for another solo wander to take photos and explore some of the smaller paths we'd missed out when following the main discovery trail.


The trail map is available via the website or as a free leaflet from the gift shop - where you can also buy self-guided trail leaflets that tell you more about the history of the cemetary, some of the people buried here, and the symbolism used in gravestones and memorials.


"What did you do on Saturday, Laura?"
"Oh, I walked around a cemetery and thought about death! It was great!"

I'm already trying to work out when I can fit in a return visit.