Showing posts with label spring. Show all posts

Monday, 23 January 2023

Spring Birds Embroidery Patterns

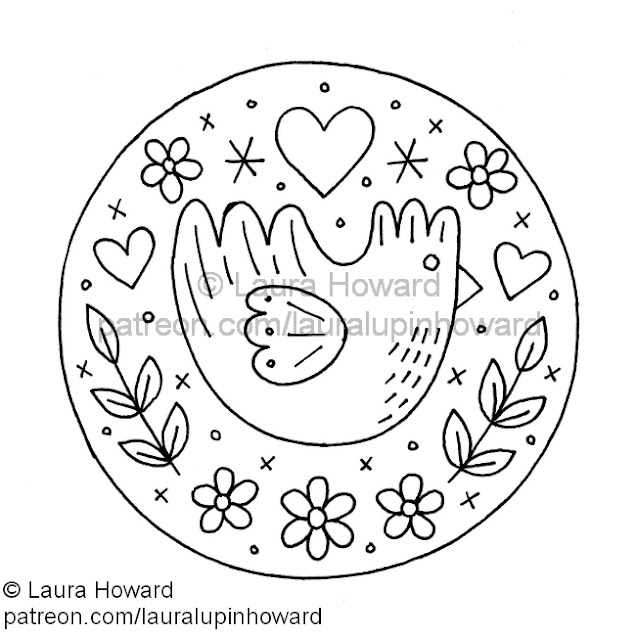
I've got another spring-themed embroidery pattern to share over on my Patreon this week: folk-inspired birds!


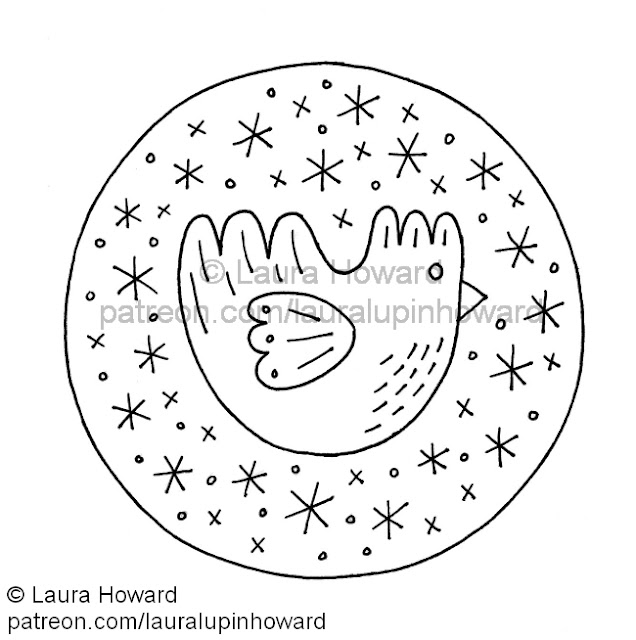
This is actually a little set of patterns. I had so much fun designing the spring birds pattern that I couldn't resist adding some extras.

There are a couple of simpler versions of the embroidery design - smaller and much quicker to stitch, perfect for a quick crafty fix or sewing to give as a gift.


I've also included templates you can use to make little felt birds to applique in the centre of a small embroidery hoop, or anywhere else you feel just really needs a cute felt bird.

Click here to find the spring bird embroidery patterns, and to sign up to my Patreon. 

Or click here to get a preview of the many projects in my Patreon pattern library!

Subscribers get full access to a growing library of PDF patterns and tutorials, and emails whenever new projects are added. You can unsubscribe at any time.  

P.S. Visit my crafty tutorial archive to find more creative projects.

You'll also find printable PDF sewing patterns over in my shop along with lots of vintage goodness:


Tuesday, 17 January 2023

Tulips: Spring Flower Embroidery Patterns

Hello friends!

I've been busy behind the scenes this month working on lots of loveliness to share with my Patreon subscribers and here on my blog over the coming year, I'm so excited to get started! 

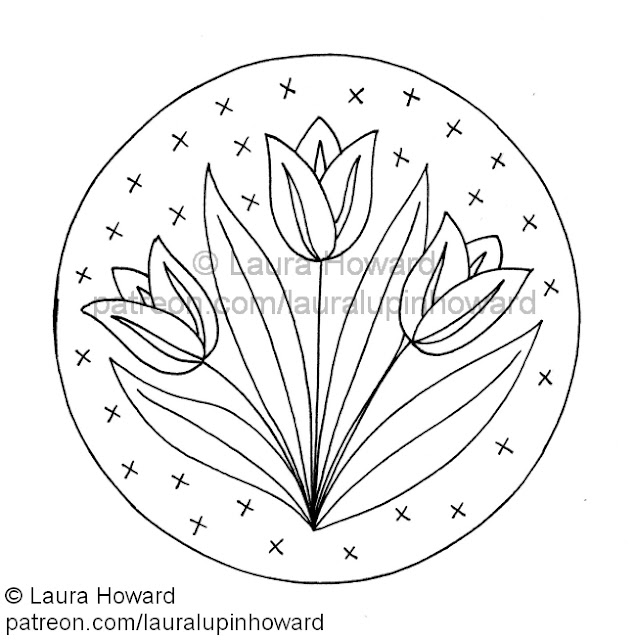
The first new addition to my Patreon pattern library? A pair of tulip embroidery patterns. 


These floral designs would look great framed in 5 inch embroidery hoops, or sewn onto a small sewing project.

I've designed them to match another set of spring flower patterns which are also available over on my Patreon: daffodils & narcissi.


Click here to find the tulip embroidery patterns, and to sign up to my Patreon. Subscribers get full access to a growing library of PDF patterns and tutorials, and emails whenever new projects are added. You can unsubscribe at any time.

P.S. Visit my crafty tutorial archive to find more creative projects. You'll also find printable PDF sewing patterns over in my shop along with lots of vintage goodness:


Monday, 14 March 2022

Spring Leaves: Free Embroidery Pattern

Fancy a simple embroidery project to celebrate spring? Stitch a trio of little green leaves!

This leafy pattern is designed to fit nicely inside a 3 inch embroidery hoop, but using a 4 inch hoop when stitching will give you more room to work. It would look nice framed in a hoop (maybe with a loop of pretty green ribbon or ric rac attached to make a spring ornament?), or sewn as a motif onto larger projects. 

I've not had a chance to sew this myself but I'm thinking ALL THE GREENS. I'm planning on keeping things simple and sewing the whole design with backstitch - remember that smaller stitches will help you sew smooth curves.    

Click here to open the pattern in a new window, then print it at 100%. A hi-res PDF version of this pattern is also available in my Patreon pattern library.

This pattern was adapted from my felt spring leaves brooch tutorial (I do love a project variation!).


If you'd like to sew some more leaves, how about embroidered felt oak leaves...


 ... or a felt monstera leaf brooch?


This pattern is for non commercial use only: you can use it to stitch as many leaf trios as you want for yourself or as gifts, but please don't make any for sale. Thanks xx

Enjoyed this free pattern? Buy me a "coffee" and help support my blog!

Buy Me a Coffee at ko-fi.com

P.S. Subscribe to my newsletter (currently taking a break but hopefully back soooon) for free patterns and visit my crafty tutorial archive for lots more creative projects.

Visit my shop to buy my printable PDF sewing patterns and lots more:


Friday, 11 March 2022

Tutorial: Sew Felt Spring Tree Brooches

Spring is coming! Celebrate the return of all things green and glorious - or just your love of trees - with today's sewing tutorial: a step by step guide to making a felt tree brooch.


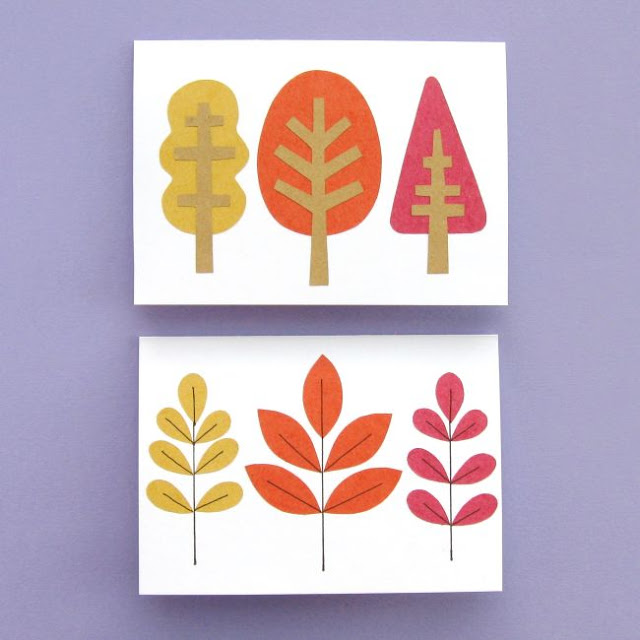
These trees started off life as part of a tutorial for some autumn leaf and tree cards...

... then I couldn't resist doing a spring version, so I made some spring tree textile art...


... and shared some spring tree embroidery patterns:


Obviously I had to make some felt tree brooches, too! :)

You could also add ribbon loops to create little tree ornaments, or sew lots of trees for a spring forest garland. These would also make sweet motifs or patches to add to larger projects.


How to make a felt tree brooch:

1. Follow the steps in my spring tree textile art tutorial to sew your chosen tree design, using the templates linked to in that post. 

Instead of sewing the tree pieces to a piece of felt in an embroidery hoop you can just sew them to a piece of loose backing felt, but you may find having the felt held in the hoop makes it easier for you to add the embroidered details. If you're sewing your tree on loose felt there's no need to use tacking stitches to hold the tree shape in position, just use a pin instead.

If you're planning on making a few trees, try it one way then the other and see which method works best for you!

2. Remove the felt from your embroidery hoop (if you've used one) then cut out the tree shape, leaving a narrow border of the backing felt.


3. Use the tree shape as a template to cut out a matching matching shape from more of the backing felt. This plain shape will become the back of your brooch (or ornament, etc).


4. Turn the back of your brooch over, and add a brooch clasp. Sew it with a double thickness of sewing thread to match the backing felt.


5. Then hold the front and back of the brooch together and use more of the same thread to join them together, sewing flush around the tree shape with running stitch. And you're done! Arboreal felt goodness to pin to your jumper (sweater) or jacket this spring.


This tutorial is for non commercial use only: you can use it to stitch as many trees as you want for yourself or as gifts, but please don't make any for sale. Thanks xx

Enjoyed this free tutorial? Buy me a "coffee" and help support my blog!

Buy Me a Coffee at ko-fi.com

P.S. Subscribe to my newsletter (currently taking a break but hopefully back soooon) for free patterns and visit my crafty tutorial archive for lots more creative projects.

Visit my shop to buy my printable PDF sewing patterns and lots more:


Tuesday, 21 April 2020

Felt Weather Mobile Tutorial: Sew a Felt Cloud or Raincloud!

UPDATE: this project is now available as part of my Patreon pattern library.

Click here to find the Felt Weather Mobile Tutorial and to sign up to my Patreon. 

Subscribers get full access to a growing library of PDF patterns and tutorials, and emails whenever new projects are added. You can unsubscribe at any time. 

-------

My baby mobile tutorial continues this week with a how to for making a fluffy felt cloud, with or without raindrops.


The weather mobile would make a special gift for a baby's nursery. You can also use the individual tutorials to make cute ornaments (just add a ribbon loop!) or things like brooches or patches.


Remember: as with all mobiles, this is a decoration not a toy so make sure you hang the finished project well out of reach of little fingers. 

 
P.S. Visit my crafty tutorial archive for lots of free projects.

Visit my shop to buy my printable PDF sewing patterns:

Thursday, 16 April 2020

Felt Weather Mobile Tutorial: Sew a Rainbow!

UPDATE: this project is now available as part of my Patreon pattern library.

Click here to find the Felt Weather Mobile Tutorial and to sign up to my Patreon. 

Subscribers get full access to a growing library of PDF patterns and tutorials, and emails whenever new projects are added. You can unsubscribe at any time. 

-------


The weather mobile would make a lovely gift for a new baby. Remember: as with all mobiles, this is a decoration not a toy so make sure you hang the finished project well out of reach of little fingers.

As well as using the tutorials to make the mobile, you can also make individual felt brooches or ornaments. The rainbow would also make a fab patch, or look lovely sewn onto projects like a coin purse or a needlebook.


P.S. Visit my crafty tutorial archive for lots of free projects.

Visit my shop to buy my printable PDF sewing patterns:

Tuesday, 14 April 2020

Felt Weather Mobile Tutorial: Sew a Cute Felt Sun!

UPDATE: this project is now available as part of my Patreon pattern library.

Click here to find the Felt Weather Mobile Tutorial and to sign up to my Patreon. 

Subscribers get full access to a growing library of PDF patterns and tutorials, and emails whenever new projects are added. You can unsubscribe at any time. 

-------

This fortnight I've got a very fun project to share with you: how to make a cute and colourful felt baby mobile inspired by the weather. You'll learn to sew fluffy clouds and rainclouds, a smiling sun and a bright rainbow then combine them all to make a mobile!

Today: how to sew a little felt sun. 


This mobile would make a sweet addition to any nursery or a special gift for new parents. You could also use the tutorials to make individual ornaments or fun brooches - just add a ribbon loop or a brooch clasp.  

IMPORTANT: As with all mobiles, this is a decoration not a toy so make sure you hang the finished project well out of reach of little fingers.


P.S. Visit my crafty tutorial archive for lots of free projects.

Visit my shop to buy my printable PDF sewing patterns:

Thursday, 9 April 2020

Hello Spring: Tree Embroidery Patterns

Celebrate spring by stitching a tree (or three!).

Earlier this week I posted a tutorial for making spring trees textile art, and today I'm sharing a couple of spring tree embroidery patterns.


You can stitch this "Hello Spring" pattern - perfect for framing in a 4 inch embroidery hoop, turning into a patch or adding to small sewing projects - or a trio of simple little tree designs.

You'll find all four embroidery patterns at the bottom of this post.

I originally stitched this hoop as a sample to show off how you could use one of the little tree patterns in lots of cute projects, but then I thought I should probably share the whole pattern... so here we are!

The more free embroidery patterns to choose from the better, right?


I embroidered my "hello spring" design mainly with backstitch, adding French knots for the flower centres and sewing their petals as lazy daisy stitches. I used stranded embroidery thread (floss), stitching with three of the six strands from the skein. If you're sewing this design I'd recommend just adding a dot for the flower centre when tracing the pattern on your fabric instead of drawing the whole flower.

After sewing the main lines of the tree, I added some extra lines of running stitch for more detail and general cuteness. I used the same shade of green throughout but you could use two or three different shades if you like.

Of course you could also stitch these tree embroidery patterns in autumnal colours instead of spring ones, and adapt the hoop design to say "hello autumn" or "hello fall" with little leaves instead of flowers. Maybe I'll stitch that myself later in the year!


Want some more tree projects?

Click here for the felt textile art tutorial I shared earlier this week...

http://bugsandfishes.blogspot.com/2020/04/spring-trees-embroidered-felt-hoop-art-tutorial.html

... or click here to make colourful tree and leaf cards to send to your pals.

https://bugsandfishes.blogspot.com/2018/09/diy-autumn-trees-leaves-cards-tutorial.html

This pattern is for non commercial use only: you can use it to stitch as many trees as you want for yourself or as gifts, but please don't use them to make anything for sale. You may borrow a couple of photos if you want to blog about this project, but remember to credit me and link back to this page on my blog, and do not reproduce my entire  post or share my pattern on your site. Thanks!

Enjoyed these free patterns? Buy me a "coffee" and help support my blog!

Buy Me a Coffee at ko-fi.com

P.S. Subscribe to my newsletter for a monthly free pattern and visit my crafty tutorial archive for lots more free projects.

Visit my shop to buy my printable PDF sewing patterns:


Follow the links to open each pattern sheet in a new window, make sure you're viewing it full size then print it at 100%.

Click here for the Hello Spring embroidery pattern.


Click here for the spring trees patterns. 

Tuesday, 7 April 2020

Spring Trees: Embroidered Felt Textile Art Tutorial

This week on my blog it's all about SPRING.

Today I'll show you how to sew some embroidery hoop art featuring a trio of spring trees, then later in the week I'll be sharing some spring-themed embroidery patterns.


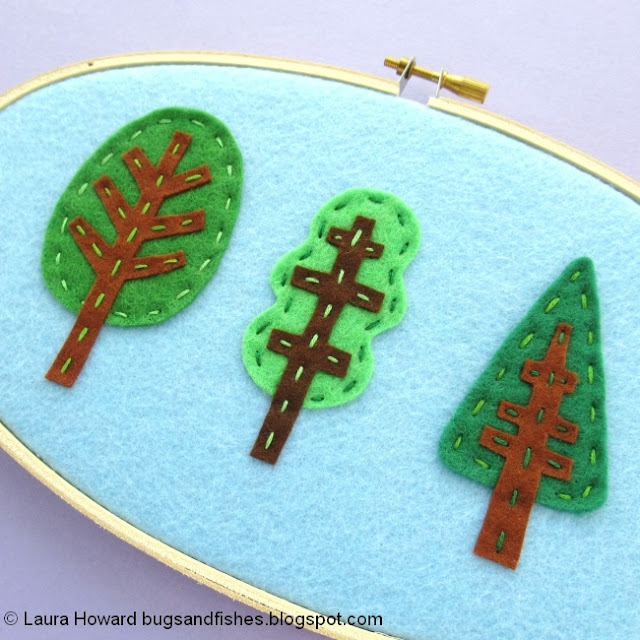
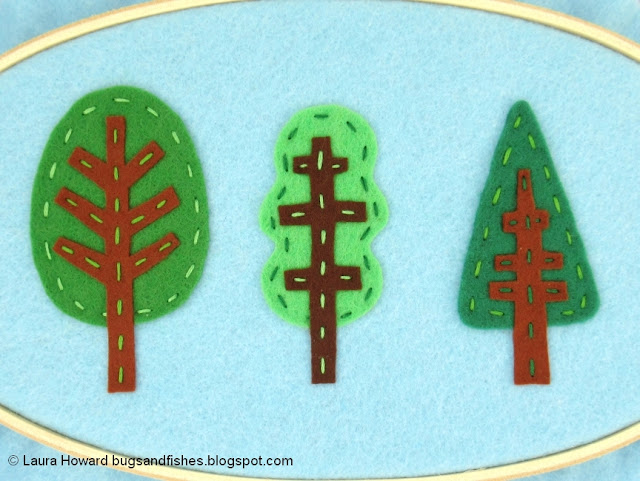
I drew these trees a couple of years ago, as part of a tutorial for making some autumn tree and leaf cards (which would also look fab in spring greens, by the way!). At the time I thought "ooh, these would look awesome in felt"... and now I've finally got around to trying that out.

https://bugsandfishes.blogspot.com/2018/09/diy-autumn-trees-leaves-cards-tutorial.html

I framed my trio of little trees in an oval embroidery hoop, but they'd also look great in a round hoop with some text added to fill the extra space (or maybe some simple felt flowers?). You could also use the shapes as a felt applique, adding a tree (or three!) to other sewing projects.

   
You will need:

- The tree templates from this tutorial
- Green and brown felt (three shades of green, plus two or three shades of brown)
- Green embroidery thread/floss (to match the green felt)
- Felt or fabric for the background
- A large embroidery hoop (you can resize the tree templates to fit if you need to)
- Sewing scissors (embroidery scissors are great for cutting out small felt shapes!)
- A sewing needle and some pins
- Sewing thread (any colour)


To make the hoop art:

1. Stretch your chosen backing felt/fabric in your embroidery hoop.

2. Use the templates to cut out one of each of the tree and trunk/branch shapes. Arrange the pieces on your hoop until you're happy with them. If I was sewing this again I'd definitely put the oval tree in the centre, as I did in the card tutorial, but this way is cute too!


3. Set aside the trunks/branches. Use sewing thread and large tacking stitches to hold the tree shapes in place on the backing felt/fabric.


4. With your chosen embroidery threads/floss (using three of the six strands in the skein), sew a line of running stitch around the inside of each tree shape. Try to keep your stitches neat and even to create a nice decorative effect.

I used darker thread on the lighter felt, and vice versa, so the stitches stood out clearly against the felt. Lie all your threads out on the felt pieces to test how they'll look and go with what looks best to you.


5. Remove the tacking stitches then, one by one, add the trunk/branch shapes and sew them in position. Use more embroidery thread/floss (using three strands again), this time using the green that matches the tree you're adding the trunk/branches to.


I recommend sewing a stitch at the very top and very bottom of the brown felt shapes to help hold them in position before filling in the rest of the stitching.


6. Trim any excess felt/fabric from around your embroidery hoop, leaving a few centimetres (about an inch) remaining. Then use a double thickness of sewing thread and running stitches to gather the felt/fabric together and pull it tight. Sew it securely then your hoop art will be ready to display.


This tutorial is for non commercial use only: you can use it to stitch as many trees as you want for yourself or as gifts, but please don't make any for sale. You may borrow a couple of photos if you want to blog about this project, but remember to credit me and link back to this page on my blog, and do not reproduce my entire  post or share my pattern on your site. Thanks!

Enjoyed this free tutorial? Buy me a "coffee" and help support my blog!

Buy Me a Coffee at ko-fi.com

P.S. Subscribe to my newsletter for a monthly free pattern and visit my crafty tutorial archive for lots more free projects.

Visit my shop to buy my printable PDF sewing patterns: