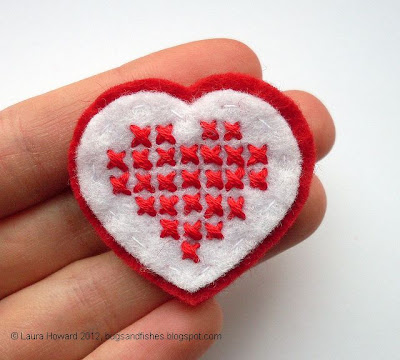
Today's tutorial is for a cute felt heart brooch decorated with little cross stitches.
These brooches are quite a quick sewing project, and would make sweet Valentine's day gifts for friends (especially ones who like to sew!), or favours for your bridesmaids or flowergirls... or a cute way to say "I love you" to your mum on Mother's day (my mum has already snaffled this one to wear on her jacket).
To make your heart brooch you will need...
White felt and red felt (I used the "ruby red" wool blend felt I sell in my shops)
Matching red and white sewing thread
Red embroidery thread / floss
A brooch clasp (or a safety pin and an extra small rectangle of red felt)
An embroidery hoop
Optional: a piece of greaseproof/baking paper
1) Stretch a piece of white felt in an embroidery hoop to give you a nice flat surface to stitch onto.
2) Use red embroidery thread / floss to stitch the simple design of Xs as pictured. I stitched mine freehand, making small neat crosses and stitching row by row to keep the design as even as possible. The smaller/larger your Xs, the smaller/larger your finished brooch will be. I used the large heart motif from my Will & Kate sampler, but for a different look you could stitch the smaller heart if you prefer.
If you're not confident about stitching freehand, you can draw the heart design neatly onto a piece of semi-transparent baking/greaseproof paper, tack the paper in place on the white felt with large stitches, then follow your drawing as you stitch (stitching through the paper and the felt). When you've finished stitching, remove the tacking threads then carefully tear away the paper, using a pin to remove any small or fiddly pieces.
Make sure that all your Xs are sewn the same way - e.g. on my brooch, the top stitch of each X is the line going from the top left to the bottom right.
3) Remove the white felt from the hoop, then cut around your stitched heart leaving a border of white felt around the Xs:
4) Place the white heart onto a piece of red felt, and sew it in position using running stitch and white thread. Then trim away the excess red felt to create a red border around the white heart.
5) Use the red heart as a template to cut another matching piece of red felt - this will be the back of your brooch. Turn the backing piece over and sew a brooch clasp or safety pin onto it (or a hairclip if you prefer) using a double thickness of red sewing thread. Visit this tutorial on making felt brooches for tips on how to secure your safety pin neatly.
6) Place the front and back of the brooch together, and sew around the edge with running stitch in more red thread. Sew as flush to the white heart as you can, and then finish your stitching neatly at the back.
I stitched my brooch in "classic" red and white, but I think it would also look very cute in pretty shades of pink and purple, or with a bright colour (maybe turquoise?) instead of the white felt.
This tutorial is for non commercial use only: you can use it to make as many brooches as you like to give as gifts, but please don't make any for sale. You may borrow 1 or 2 photos if you want to blog about this project, but remember to credit me and link back to the original source, and do not reproduce my tutorial on your site. Thanks!
Enjoyed this free tutorial? Buy me a "coffee" and help support my blog!

Subscribe to my newsletter for a monthly free pattern and visit my crafty tutorial archive for lots more free projects.
Visit my shop to buy my printable PDF sewing patterns:


12 comments:
I think I'll try, maybe I'll manage:))
thanks for the tutorial:)
hugs from Poland, Lili
wow...that's lovely
I like the idea of cross stitch on felt, I've never tried that. It looks really good :)
Great idea! Just shared it on our Facebook and Twitter pages :)
This is so pretty! The cross stitch gives a really elegant look.
Simple and sweet..a perfect sentiment for a Valentine. Love it.
so sweet!1 I (heart) this :o)
Vilken enkel fin idé. Jag tror jag skall ta med mig idén till jobbet i mitt jobb på förskolan. Våra barn har inte prövat att sy innan. Men då tänkte jag hoppa över korsstygnen så dem får sy runt hjärtanet med vit och röd filt.
I would like to personalize the heart with a name. Any suggestions on how to do that?
Thanks,
Kimberly
Hey, I just wanted to let you know I linked to your post in a Valentine's Day post on my blog.
http://ceejayrose.blogspot.com/2012/02/valentines-day-oh-ideas.html
Oh, that's adorable..! Lovely cross stitch.
Thanks for the comments everyone - and thanks to everyone who has shared this on their blogs etc too :)
Kimberly - the brooch is pretty small so I'm not sure how you'd manage to get a name on there as well as the cross stitching. You could try an initial perhaps? If you made a larger heart, you could sew the initial in a contrasting colour in Xs in the centre of the cross stitch heart?
If you get a sheet of graph paper and draw your design on it in pencil, you can then plan which Xs you need to sew to make it work :)
Post a Comment