Thursday, 31 January 2019

Creating Patchwork Cross Stitch from Leftover Embroidery Threads

Look what I finished!!

Scrappy Patchwork Cross Stitch Textile Art

I started this patchwork cross stitch project way back in 2014, as a way to make use of those scrappy bits of leftover embroidery thread (floss) which aren't quite big enough to be worth keeping and winding back on the bobbin but which still have a few stitches left in them.

I saved up the threads in a compartment in my embroidery thread storage box, then would sit and do a whole batch of stitching in one evening - slowly building up the patchwork design in blocks of colour. It was a super relaxing process!

Scrappy Leftover Embroidery Threads
 Scrappy Patchwork Cross Stitch Textile Art

As I wrote when I blogged about this project last year, "I guess I could add a block at a time, each time I have a piece of leftover thread, but I quite like spending a few relaxing hours working on this from time to time. Plus, adding a bunch of colours at once helps me make the randomness of this project more of a controlled randomness - I can spread out the colours more easily, and get a more pleasing mix of tones and shapes than I think I would end up with if I added a block each time I had a scrap of thread to use up.

I like the randomness of this project and how the colour palette (and the speed at which it's growing) is entirely dictated by what other projects I'm working on, and the luck of what size thread scraps I'm left with... but I also want it to be something I love the look of when it's finished!"


To read more about how this piece has developed, click here to read all about how the project has progressed over the years and see lots of in-progress photos.

I'm really pleased with how the finished piece has turned out - someone pointed out that it looks like a tiny quilt, and it totally does! It's about 6 inches (15 cm) square and absolutely jam-packed with colour. Loads of happy hours of stitching have gone into it, but it also represents even more hours of stitching as, of course, these are all just the leftovers from other projects!

Scrappy Patchwork Cross Stitch Textile Art
Geometric Cross Stitch Textile Art

And - to think! - all those threads would otherwise have just gone to waste. It's going to be really hard breaking the habit of keeping my scrappy bits of thread now... maybe I'm going to need to start another leftovers-themed project? Hmm...

Want to make your own patchwork design from leftover threads? Simple! Just start keeping your own leftover threads, stitch them in blocks and just keep on going until you've slooooowly filled up a whole square with colour.

A patchwork design like this is also a great way to use up a whole bunch of embroidery threads from your stash, you don't specifically need to be using leftover threads. Just have fun playing around with colour combinations and shapes!

Last year several people asked me for the pattern for this design, which isn't really something I can properly share as I've used to many random colours making this piece. BUT, I have drawn out a chart of how my design ended up, in case you like how the arrangement of blocks look and fancy replicating it. You can use my photos as guide when picking colours and/or use felt tips or coloured pencils to colour in your printed chart to help guide your stitching.

Click here to view the chart in a new window or tab, make sure you're viewing it full size then print.

Patchwork Cross Stitch Chart

P.S. For even more scrappy goodness, check out my Patchwork Mini Squares blanket, knitted from yarn left over from many years worth of knitting projects.

Subscribe to my newsletter for a monthly free pattern and visit my crafty tutorial archive for lots more free projects.

Visit my shop to buy my printable PDF sewing patterns:


Tuesday, 29 January 2019

Design Dilemmas and the Magic of Social Media Feedback

What do you do with designs that go nowhere?

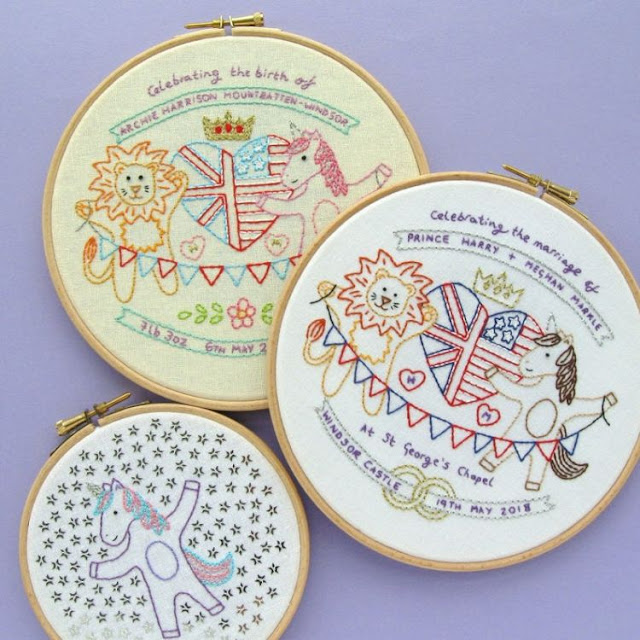
Last spring I started work on a bunch of ideas for possible projects to celebrate the Royal Wedding. I stitched and shared a simple cross stitch sampler pattern and put lots of work into this design for a cute embroidery pattern...

sketch for an embroidery pattern celebrating the Royal Wedding


... but then I ran out of time and it never got made and now I'm not sure what to do with it.

Over the years I've worked on a LOT of sketches, doodles, prototypes and project ideas that never turned into anything. This is just part of the creative process! I usually squirrel them away for the future because you never know what might end up being useful as source material for another project, or what might end up working after all when you revisit it with fresh eyes in the future.

This particular design, however, was so specific that I was convinced that it wouldn't possibly ever be remotely reusable. But I also really liked how it had turned out thus far and didn't want to just chuck it away (and have, as a result, wasted all that work).

So, after finding the pattern in a pile of paperwork this weekend, I posted this pic on Instagram and Facebook and asked everyone: "what the heck could I or should I do with this??? "Should I take the time to neaten it up a bit and share it on my blog in case there are some Harry & Meghan fans out there who'd like to (very belatedly) stitch themselves a wedding souvenir? Or just recycle it??"

And, thank goodness for the magic of getting feedback via social media, because everyone immediately had such great ideas.

Some people suggested sharing it to celebrate their upcoming anniversary, and lots of people suggested updating the pattern slightly so it could celebrate Meghan and Harry's baby, which is due this spring (I had totally forgotten that they're expecting a baby!). This could totally work for the royal baby!

Other people suggested doing something just with the lion and unicorn on their own (maybe even adapting the whole design to be a customisable nursery sampler)... which I had somehow not thought of as a possibility??? I do love those little guys, though, they're just so cheerful and sweet and the unicorn took me absolutely ages to draw (because I am the world's worst person at drawing horses). I'm picturing the lion holding birthday balloons, maybe? Or the unicorn standing next to an awesome rainbow birthday cake? Something happy and fun and colourful, anyway.

What do you guys think? I'd love to hear which of these suggestions you like, and if you have any more ideas for ways I could revisit this design and (finally) turn it into a finished project. 

UPDATE: this embroidery pattern is now finished and available in my shop and my Patreon pattern library.

Subscribe for a small monthly fee and you'll get access to a growing library of PDF patterns and tutorials, with an email whenever I add a new project. You can cancel any time.      

Click here to check out my Patreon page and sign up!

Royal Celebrations Embroidery Pattern
 Royal Celebrations Embroidery Pattern
 Royal Celebrations Embroidery Pattern
 Royal Celebrations Embroidery Pattern
 

Thursday, 24 January 2019

My Favourite Pens (and Pencils)

Do you have a favourite pen? I do!

The black Uniball Eye is officially my favourite - I adore writing with them, they're just soooo wonderfully smoooooth.

Uniball Eye fine black pens

The only downsides to these pens is the price (not super expensive but much pricier than a standard biro, and I write a lot so I get through quite a lot of pens) and they're actually so smooth that if I'm not careful sometimes my already slightly wild and loop-filled handwriting gets a bit out of control! Overall though they're an absolute pleasure to write with and I love how my handwriting looks with the lovely solid ink line these create.

I used to use the "fine" Uniball Eye pens for drawing the templates and patterns for all my tutorials, but I recently switched to the thinner "micro" version and don't know why I didn't switch sooner, because the thinner line is perfect. The clear ink lines scan beautifully and I find these pens help me draw really nice smooth curves when I'm inking over my pencil lines. 

Uniball Eye micro black pens

I'm also a big fan of the classic Cristal Bic biro! Usually a blue one, but sometimes only a black one will do - especially when writing on coloured paper.

Bic Cristal Biros and Staedtler Noris Pencil

I use these for everyday notetaking, writing all my To Do lists, updating my planner,* writing postcards, and so on. (*People are always raving to me about their digital calendars and planning apps but I cannot function without a proper paper diary to scribble in).

As for pencils? Well, I used to never have to buy pencils. There were always loads in my stationery stash after years of buying cute pencils as a kid or picking up free ones at conferences and other events in my teens and twenties. I just kept on aquiring random pencils but hardly used them until I started designing stuff for a living. These days I do a lot of sketching, and I've been slooooowly using up all the random pencils in my house... and now there are no more random pencils left and I have to buy pencils on a regular basis.

My favourite pencils are definitely the classic yellow Staedtler Noris (HB/2, without an eraser on the end). They're really nice to both write and draw with, they sharpen easily, and I'm a sucker for a bright colour.

I use them for sketching, of course, but also pencilling things into my planner and sometimes drafting bits of writing because (weirdly) I find that writing in pencil can help ease any pressure I'm putting on myself to write something "perfect". Even though it's just a messy handwritten draft and I'm going to cross bits out and scribble all over it anyway as I edit, knowing I can erase every word if I want to somehow helps free up my brain when it's feeling a bit creatively blocked.

Honestly, though, I will sketch with anything I can lay my hands on when inspiration strikes. Oh, and I also have a pack of plain "stage pencils" in my craft supplies stash which are super cheap and nasty to actually use (they sharpen terribly) but look great as props in photos.

When I shared these pics on my social media they prompted lots of strong pen-related feelings. So, do you love these, too, or loathe them? Tell me your faves!

Tuesday, 22 January 2019

Send Happy Snail Mail With Vintage Stamps & DIY Envelopes!

One of my New Year's Resolutions for 2019 is to make time to send more snail mail to my friends and penpals. Maybe that's something you'd like to do more of, too? In this post you'll find two fun and easy ways of making the snail mail you send extra special...

Did you know you can use old-but-not-used Royal Mail postage stamps for sending your post here in the UK? I recently bought a big bundle of old mint stamps for my letters, and using them is proving to be an absolute joy!

colourful envelopes decorated with vintage postage stamps

I bought a big bundle of stamps, giving me lots of different designs and values to choose from when making up the correct postage value and saving me money, too (always a good thing when you send a lot of post - snail mail is wonderful but stamps are rather pricey these days!). I bought my stamps from here.

Sorting through the bundle when it arrived was a huge amount of nerdy fun. So many lovely old stamps! And so many possibilities for getting creative with my letters!

lots of vintage postage stamps

Even if you just selected any old stamps to make up the correct postage the result would be pretty cool: a handful of quirky old stamps (some with ha'penny values!) are always going to be more exciting than just a single modern one. But of course (OF COURSE) I've been playing with colour and themes when putting together the stamp selections for my mail.

Carefully selecting the stamps can be rather a time suck but totally worth it, I think! I described this as "a bit of a waste of time" to a friend recently but, as he immediately pointed out, actually it's not a waste of time at all: I've been enjoying it as a relaxing task while watching TV in the evenings, and the end results can be rather wonderful.

This week I've been playing with colour, matching stamps to a set of fabulous notecards I got for Christmas.

 colourful notecards and coordinating rainbow postage stamps

In case you're admiring the notecards (and why wouldn't you be?), they're the "Pen to Paper Notecards" set by Present & Correct for Chronicle Books. Mine were bought from Waterstones here in the UK, but those of you in the US can buy them direct from Chronicle Books.

Here's a closer look at the cards and the stamps I've used:

colourful notecards and coordinating postage stamps
colourful envelopes and coordinating postage stamps

All that lovely colour makes me very happy indeed.

The second thing I've been doing recently to jazz up my post is making my own handmade envelopes. I've made some from coloured paper, but I've also been making lots from a book of maps and a gorgeous book of British wildflowers.

making DIY envelopes from old books

When you use book pages to make envelopes the end results are so pretty, and totally unique! Oh, and the books only cost me about a quid each at my local charity shop so they're a bargain, too.

If you've never made an envelope before, don't worry: they're so easy to make that you'll wonder why you never tried it before.

Just unfold an envelope that's the size you need (or download and print a free template from the internet - there are loads available), stick it to a bit of card and trace the shape onto the back of whatever nice paper you want to use. Then cut, fold and stick (with glue or double-sided tape) the envelope together and add a plain label for the address when you're ready to send it. Remember to position your template so the paper will be the right way up on the front of the envelope!

Cheap second hand books are perfect for making envelopes, though you may need to use different size envelope templates depending on the size of the pages. If you need to make envelopes of a specific size, simply take the template with you when you go browsing for books to use.

I also love making envelopes from leftover gift wrap and colourful magazine pages. Sometimes my stamps used to fall off my letters en route when I sent "magelopes" as a teen, but with modern postage stamps being like stickers it's much easier to use shiny paper for making your envelopes without worrying about the stamps going AWOL.

I won't be combining these two happy post ideas and using a selection of vintage stamps with my book envelopes - I think the effect would be a little visually cluttered and I'd hate to cover up those lovely flowers and maps! Instead I'll be keeping my eye out for some suitably lovely Special Stamps, or using some of the pictorial definitives, either of which are much prettier options than standard 1st/2nd class stamps, if you care about that sort of thing (which, as you've probably gathered by now, I totally do).