So, it turned out that the temptation to spend another day doing crafty things was just too hard to resist :)
I've got a whole heap of things made and photographed ready for some mammoth photo-editing and tutorial-writing sessions over the next few weeks...
As you can probably see from the photo, I've got a few Christmas tutorials planned. Most of these were actually on my "Crafty Christmas" to do list last year but got put on hold due to my sudden move. It feels really great to finally be getting them out of my sketchbooks and into reality. I'm pretty pleased with how they've turned out & I hope you'll like them too.
The only downside is that my studio looks like something exploded! Luckily, one of the perks of having a dedicated studio space is that you can close the door on all the mess and go put your feet up without having to worry about it (well, until the next day anyway).
Showing posts with label a very crafty christmas. Show all posts
Friday, 14 September 2012
Friday, 23 September 2011
How To: Vintage Felt Baubles
UPDATE: this tutorial is now available as a PDF pattern in my shop!
----
Time for a bit of Christmas crafting, with a tutorial for felt ornaments inspired by vintage glass baubles.
Friday, 16 September 2011
How To: Felt Candy Cane Ornaments
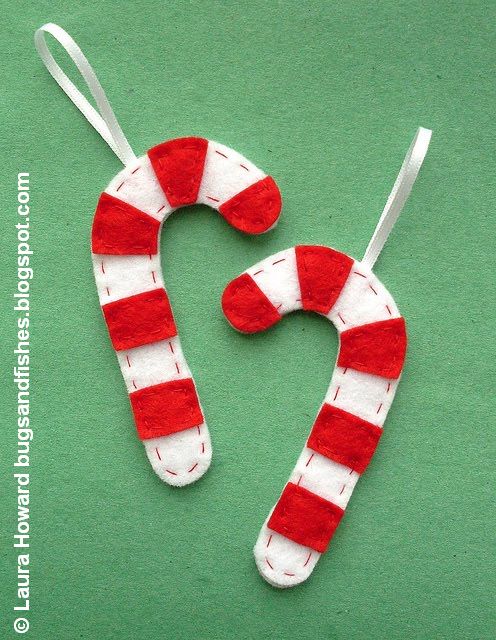
As promised, here's the first festive project for my Crafty Christmas series: sweet and simple felt candy cane ornaments.
These are a quick and easy sewing project - perfect for people just learning to sew, or for when you want a little "extra" to tie onto a gift or slip into a Christmas card.
To make the candy canes you will need:
- the template sheet at the bottom of this post
- scissors to cut out the templates
- sharp sewing scissors or embroidery scissors
- white felt
- red felt (I used "ruby red" from the felt range I sell in my shops)
- red sewing thread
- a needle and pins
- narrow red or white ribbon
1) Use the templates provided to cut out all the pieces, pinning or holding the templates against the felt as you cut round them. You will need two white candy cane shapes, and 5 red shapes A-E for each candy cane you want to make. The templates provided are for a candy cane facing to the right - to make candy canes facing left, just flip the templates over.
2) Starting with piece A, sew the red felt shapes onto one of the white candy cane shapes making sure to space them evenly. Use red sewing thread and sew a couple of small stitches along each of the "inside" straight edges as pictured. Finish your stitching at the back.
3) Turn the decorated candy cane over. Now cut a length of red or white ribbon, approx 4 or 5 inches (10 or 12 cms). Fold the ribbon over to form a loop and sew it onto the top of the candy cane.
If you can do this without sewing through the felt completely (i.e. without your stitches sewing through at the front of the ornament) then it's okay to use red thread, but if you prefer to stitch right the way through the felt use white thread and make sure to position the ribbon behind of the white stripes.
4) Place the remaining remaining plain white candy cane shape on the back of the ornament, and pin or hold the pieces together. Sew around the edge of the ornament using red thread and running stitch, sewing both layers of the ornament together and creating a decorative line around the edge. Finish your stitching as neatly as possible at the back.
The back of your candy canes will look like this:
To print the templates - right click on the image and select to view it in another window or tab, then click again (if necessary) to view full size and print at 100%. I've added a scale so you can check if your templates have printed out correctly, but you can make them larger or smaller than mine if you prefer :)

This tutorial is for non commercial use only: you can use it for as many ornaments as you like for yourself or as gifts for friends but please don't make any for sale. Please feel free to borrow photos if you want to blog about this project, but remember to credit me and link back to the original source, and do not reproduce my tutorial on your site. Thanks!
Enjoyed this free tutorial? Buy me a "coffee" and help support my blog!
Subscribe to my newsletter for a monthly free pattern and visit my crafty tutorial archive for lots more free projects.
Visit my shop to buy my printable PDF sewing patterns:
These are a quick and easy sewing project - perfect for people just learning to sew, or for when you want a little "extra" to tie onto a gift or slip into a Christmas card.
To make the candy canes you will need:
- the template sheet at the bottom of this post
- scissors to cut out the templates
- sharp sewing scissors or embroidery scissors
- white felt
- red felt (I used "ruby red" from the felt range I sell in my shops)
- red sewing thread
- a needle and pins
- narrow red or white ribbon
1) Use the templates provided to cut out all the pieces, pinning or holding the templates against the felt as you cut round them. You will need two white candy cane shapes, and 5 red shapes A-E for each candy cane you want to make. The templates provided are for a candy cane facing to the right - to make candy canes facing left, just flip the templates over.
2) Starting with piece A, sew the red felt shapes onto one of the white candy cane shapes making sure to space them evenly. Use red sewing thread and sew a couple of small stitches along each of the "inside" straight edges as pictured. Finish your stitching at the back.
3) Turn the decorated candy cane over. Now cut a length of red or white ribbon, approx 4 or 5 inches (10 or 12 cms). Fold the ribbon over to form a loop and sew it onto the top of the candy cane.
If you can do this without sewing through the felt completely (i.e. without your stitches sewing through at the front of the ornament) then it's okay to use red thread, but if you prefer to stitch right the way through the felt use white thread and make sure to position the ribbon behind of the white stripes.
4) Place the remaining remaining plain white candy cane shape on the back of the ornament, and pin or hold the pieces together. Sew around the edge of the ornament using red thread and running stitch, sewing both layers of the ornament together and creating a decorative line around the edge. Finish your stitching as neatly as possible at the back.
The back of your candy canes will look like this:
If you prefer, you can use red felt instead of white for the backing so your stitching and finishing will be hidden.
To print the templates - right click on the image and select to view it in another window or tab, then click again (if necessary) to view full size and print at 100%. I've added a scale so you can check if your templates have printed out correctly, but you can make them larger or smaller than mine if you prefer :)

This tutorial is for non commercial use only: you can use it for as many ornaments as you like for yourself or as gifts for friends but please don't make any for sale. Please feel free to borrow photos if you want to blog about this project, but remember to credit me and link back to the original source, and do not reproduce my tutorial on your site. Thanks!
Enjoyed this free tutorial? Buy me a "coffee" and help support my blog!
Subscribe to my newsletter for a monthly free pattern and visit my crafty tutorial archive for lots more free projects.
Visit my shop to buy my printable PDF sewing patterns:
Labels:
a very crafty christmas,
christmas,
christmas ornaments,
felt,
felt crafting,
free tutorial,
how to,
tutorial
Thursday, 15 September 2011
A Very Crafty Christmas
Apparently, there's now 100 days left until Christmas - eek!
My Christmas crafting has already begun... I'm going to be posting a tutorial on my blog every Friday for the next 10 weeks, to help inspire your festive projects. There will be some felt ornament tutorials, some gift wrap & decorating ideas, and probably a couple of little gifts to make as well.
I wanted to start posting them nice and early to give people a chance to get things made in time for the holiday season. Apologies if you hate thinking about Christmas before December, please just ignore the posts on Fridays and bookmark them to come back to later in the year ;)
The first project will be posted tomorrow!
UPDATE: my Crafty Christmas project has unfortunately had to be put on hold, but you can check out lots of fun free projects on my tutorials pages: crafty tutorials, Christmas tutorials and gift wrapping ideas.
Subscribe to:
Posts (Atom)