Monday, 17 October 2016

Christmas Ornament Tutorial: Sew a Felt Reindeer Bauble

UPDATE: this felt reindeer ornament tutorial is now available as a PDF pattern in my shop.

-------

My series of Christmas ornament tutorials continues! Today, how to sew a reindeer ornament:

felt reindeer ornament

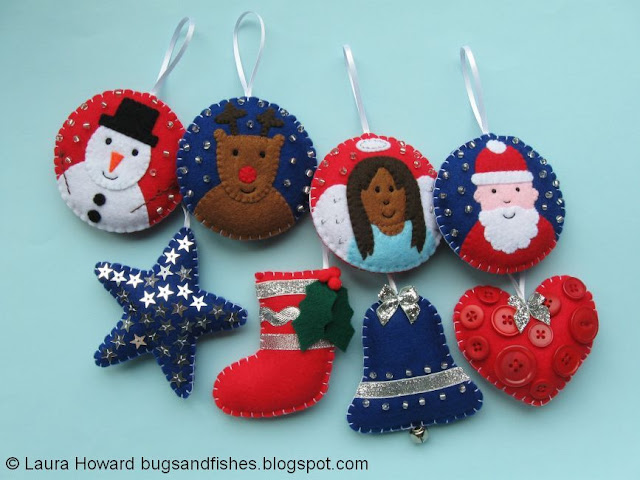
This reindeer bauble is part of a set of cute felt Christmas ornaments I designed for docrafts Creativity magazine last year.

I've already shared tutorials for the snowman bauble and the stripey stocking... the rest will be popping up on my blog over the next couple of weeks. 

felt Christmas ornaments
 felt Christmas ornaments
felt reindeer ornament

 
felt reindeer ornament

 
felt reindeer ornament

Subscribe to my newsletter for a creative updates and visit my crafty tutorial archive for lots of free projects.

Visit my shop to buy my printable PDF sewing patterns:


Friday, 14 October 2016

Upcoming Class: Make Felt Christmas Ornaments

UPDATE: a free tutorial for making these retro felt Christmas baubles is now available here on my blog! You'll also find the tutorial for the autumn wreath here and the weather mobile tutorial is coming soon. 
  
--- 

On Sunday 27th November, I'll be teaching a festive sewing class at the Village Haberdashery in London: making vintage-inspired felt Christmas ornaments!

https://www.thevillagehaberdashery.co.uk/classes-and-workshops/classes/make-vintage-style-felt-christmas-ornaments-with-laura-howard

These ornaments are so much fun to sew - there are so many different possibilities when it comes to decorating them! You can also choose to stuff them for a 3D look, or leave them flat. 

https://www.thevillagehaberdashery.co.uk/classes-and-workshops/classes/make-vintage-style-felt-christmas-ornaments-with-laura-howard

You'll receive the materials and patterns you need to make the baubles, choosing from a traditional red and green colour-scheme...

https://www.thevillagehaberdashery.co.uk/classes-and-workshops/classes/make-vintage-style-felt-christmas-ornaments-with-laura-howard

... and a modern pink, blue and turquoise colour combo.

https://www.thevillagehaberdashery.co.uk/classes-and-workshops/classes/make-vintage-style-felt-christmas-ornaments-with-laura-howard

Then I'll teach you how to make the baubles, decorating them with ribbons, sequins, beads and simple embroidery.

As well as your finished ornaments, you'll get a copy of the pattern to take home so you can make as many as you like for your Christmas tree or as gifts for friends.

Click here for the full details of the Christmas ornament class and to sign up.

I'm also teaching two other classes at the Village Haberdashery, later this month - follow the links for more info!

Weather-themed Felt Baby Mobile class, Saturday 29th October.

https://www.thevillagehaberdashery.co.uk/classes-and-workshops/classes/make-a-baby-mobile-out-of-felt-with-laura-howard

Felt Autumn Wreath class, Sunday 30th October.

https://www.thevillagehaberdashery.co.uk/classes-and-workshops/classes/make-an-autumn-wreath-out-of-felt-with-laura-howard

Wednesday, 12 October 2016

Inside: Artists and Writers in Reading Prison

One of last month's Nice Days Out was a bit different... I visited a prison!


Well, an art exhibition in a prison to be precise.

HM Prison Reading closed in 2013 but is currently open to the public (for the first time ever) for a very special art exhibition. Inside: Artists and Writers in Reading Prison sees artists, writers and performers respond to the story of Oscar Wilde, Reading Prison's most famous inmate.

I've passed Reading Prison so many times over the years, I couldn't resist the opportunity to see inside the building.


The space has changed a lot, of course, since the Victorian building opened as Reading Gaol in the mid 1800s. The mix of the Victorian architecture and the more modern fixtures and fittings is a very interesting one, and there are still lots of traces of the everyday life of the prisoners here - notices pasted on walls, graffiti in the cells. 


Oscar Wilde was imprisoned in cell C.3.3. He wrote De Profundis here, and after his release he went on to write The Ballad of Reading Gaol - a poem which he published under his cell number instead of his name.

This is how cell C.3.3 looks today:


During the exhibition, there have been readings of De Profundis in the prison chapel - from a stage the same size as Oscar Wilde's cell, and in front of the cell's original door. 


There's all kinds of different art and pieces of writing dotted throughout the building, in the corridors and in the cells. Paintings, video art, installations, letters ... all sorts of interesting stuff responding to the space, to Oscar Wilde's life and to themes of imprisonment.

I especially liked Waterfall by Robert Gober (a jacket hanging on the wall with a rather surreal and magical waterfall inside/behind it)....


... and these paintings of a glass of water by Peter Dreher (who has painted the same single glass of water on the same table repeatedly, over several decades).


It was also fascinating to read about the history of the building (and the ghastly Victorian separate system) and to see photos of some of the discharged prisoners.

There's no photo of Oscar Wilde, as they only photographed prisoners who were thought likely to re-offend. I wonder what all these people were imprisoned for?


This is an exhibition unlike any other.

Architecture and history and art and literature... plus the raw emotion of standing in one of those tiny cells and imagining living there day after day. It's a lot to take in!


Inside runs until 30th October - click here for more info and to book tickets. UPDATE: the exhibition has now been extended to December 4th!

P.S. As this is normally a family-friendly blog, I ought to mention that there are some adult / NSFW artworks in this exhibition so bear that in mind if you want to find out more :)

Monday, 10 October 2016

Christmas Ornament Tutorial: Sew a Stripey Felt Stocking

PLEASE NOTE: this project will be removed from my blog at the end of November, after which it will be available as part of a printable pattern from my shops. Please make a copy of the instructions and templates if you'd like to save a free copy before then! :)

Time for another Christmas tutorial! Today I'm sharing how to make this felt stocking ornament:

felt stocking ornament

This stripey stocking ornament is part of a set of cute felt Christmas decorations I designed for docrafts Creativity magazine last year. I've already shared the tutorial for making the snowman bauble, and I'll be posting the rest of the projects over the coming weeks. 

felt Christmas ornaments
felt stocking ornament

To make the stocking ornament, you will need:

- templates (see the bottom of this post)

- red felt
- dark green felt
- red sewing thread
- white embroidery thread (floss)
- assorted festive ribbons (I used silver ribbons from the docrafts Create Christmas range)
- three red mini pompoms
- white narrow ribbon
- toy stuffing
- sewing scissors (I recommend using embroidery scissors to cut out the small felt shapes)
- sewing needles and pins

To make the stripey stocking:

1. Use the templates provided to cut out the felt pieces: two red stockings and two dark green holly leaves. 

2. Cut ribbon pieces a few cm wider than the stocking - I cut pieces of three different silver trims. Sew on with tiny white whip stitches (or line of running stitch at edge) folding over ends. When fold ends over, sew at back with small whip stitches sewing into the felt not through it.

3. Position two holly leaves as pictured and sew in corner with a few small stitches of red sewing thread. Add three mini red pompoms sewing each with a stitch or two. 

4. Cut a 15cm (6 inch) length of narrow white ribbon. Fold the ribbon into a loop and sew the ends to the top right corner of the undecorated stocking shape. Use whip stitch and red sewing thread, sewing into the felt not through it.

5. Place the front and back stocking pieces together so the ends of the ribbon are sandwiched between the two layers and the loop sticks out the top of the ornament.

Hold or pin the two stocking pieces together and blanket stitch around the edge, using half strands of white embroidery thread. Start at the top right corner of the stocking, stitch most of the way round and leave a gap for stuffing.

6. Add small pieces of stuffing to gradually fill the star, stuffing it lightly so it's evenly filled but still very squishy. Then sew up the gap with more blanket stitches and finish your stitching neatly at the back. 

felt stocking ornament

This tutorial is for personal use only: you can use it to stitch as many felt ornaments as you want for yourself or as gifts, but please don't make any for sale. You may borrow a photo or two if you want to blog about this project, but remember to credit me and link back to the original source, and do not reproduce my entire post or share the pattern itself on your site. Thanks!

Enjoyed this free tutorial? Buy me a "coffee" and help support my blog!

Buy Me a Coffee at ko-fi.com

Subscribe to my newsletter for a monthly free pattern and visit my crafty tutorial archive for lots more free projects.

Visit my shop to buy my printable PDF sewing patterns:

Click here to view the template sheet, make sure you're viewing it full size then print it at 100%.


felt stocking ornament tutorial