Two of my projects have ended up in very different places recently...
First, my sky pompom gift-wrapping packs made an appearance in this month's issue of Glamour magazine (December 2016).
There are my pompoms, sitting atop some gorgeous Liberty gift wrap which happens to be my very favourite Liberty print (what a lovely coincidence, huh?).
If you want to add some pompom goodness to your own parcels, I've still got a couple of packs in stock in my Etsy shop - remember to use the discount code HURRAH50 to get 50% off any/all items purchased from my shop until the end of November.
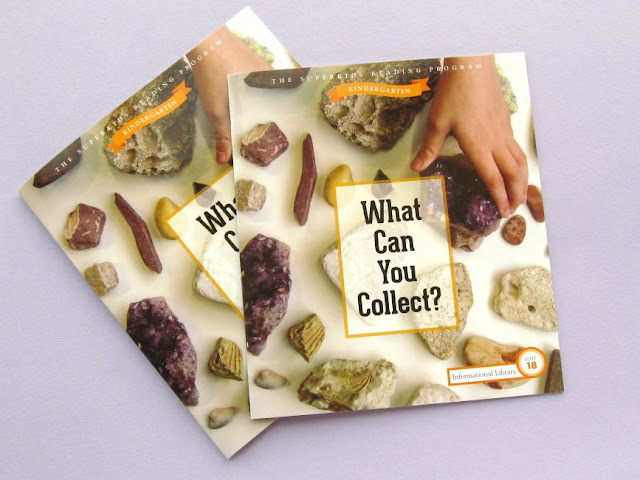
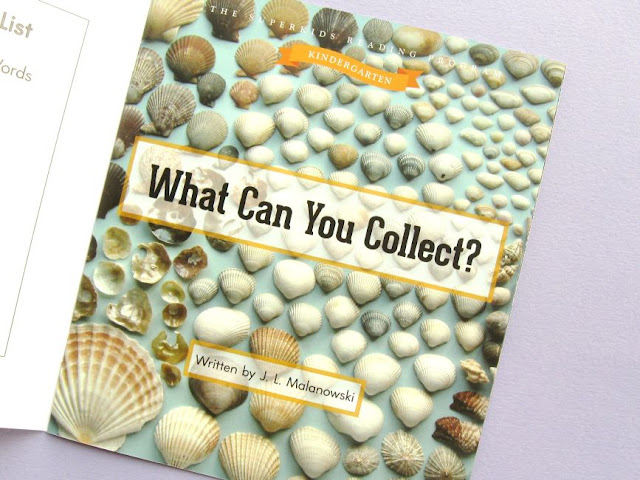
And second - for something completely different - two of my photos have been included in What Can You Collect?, a fab little book from the Superkids Reading Program.
Look! There's my shell collection...
... and there's my eraser collection!
I cannot tell you how delighted I am that photos of my childhood collections are featured in a book for kids about the joys of
collecting stuff. My heart, it bursts with happiness.
Wednesday, 9 November 2016
Monday, 7 November 2016
Christmas Ornament Tutorial: Sew a Button Heart
PLEASE NOTE: this project will be removed from my blog at the end of
November, after which it will be available as part of a printable
pattern
from my shops. Please make a copy of the instructions and templates if
you'd like to save a free copy before then! :)
Time for another Christmas tutorial! Today, learn how to make a felt heart ornament covered in buttons.
This button heart ornament is part of a set of cute felt Christmas decorations I designed for docrafts Creativity magazine last year.
I'm sharing all the tutorials so you can sew a whole set of ornaments, or mix and match your faves. So far I've shared the snowman bauble, the stripey stocking, the reindeer bauble, the sparkly star and the angel bauble. The final two projects will be popping up on my blog in the next couple of weeks.
To make the button heart, you will need:
- templates (see the bottom of this post)
- red felt
- red sewing thread
- assorted red buttons
- a mini ribbon bow and matching sewing thread (I used a fabulously sparkly glitter bow from the docrafts Create Christmas range and white thread)
- white embroidery thread (floss)
- white narrow ribbon
- toy stuffing
- sewing scissors
- sewing needles and pins
To make the button heart:
1. Use the templates provided to cut out two heart shapes from red felt.
2. Arrange buttons. Lay out on one heart then sew onto other. Leave space at edges for sewing together and adding bow. Smaller, lighter buttons = best for this. Sew buttons on securely with several stitches of double thickness red thread.
3. Add mini bow with a few stitches in centre - to attach the silver bow I used white thread.
4. Cut a 15cm (6 inch) length of narrow white ribbon. Fold the ribbon into a loop and sew the ends to the top of the undecorated heart shape. Use whip stitch and red sewing thread, sewing into the felt not through it.
5. Place the front and back heart pieces together so the ends of the ribbon are sandwiched between the two layers and the loop sticks out the top above the bow.
Hold or pin the two heart pieces together and blanket stitch around the edge, using half strands of white embroidery thread. Stitch most of the way round - folding the bow forward as you sew behind it - and leave a gap for stuffing.
Tip: start your stitching at one side, so the gap for stuffing is along a straight edge.
6. Add small pieces of stuffing to gradually fill the heart, stuffing it lightly so it's evenly filled but still very squishy. Then sew up the gap with more blanket stitches and finish your stitching neatly at the back.
This tutorial is for personal use only: you can use it to stitch as many felt ornaments as you want for yourself or as gifts, but please don't make any for sale. You may borrow a photo or two if you want to blog about this project, but remember to credit me and link back to the original source, and do not reproduce my entire post or share the pattern itself on your site. Thanks!
Enjoyed this free tutorial? Buy me a "coffee" and help support my blog!
Subscribe to my newsletter for a monthly free pattern and visit my crafty tutorial archive for lots more free projects.
Visit my shop to buy my printable PDF sewing patterns:
Click here to view the template sheet, make sure you're viewing it full size then print it at 100%.
Time for another Christmas tutorial! Today, learn how to make a felt heart ornament covered in buttons.
This button heart ornament is part of a set of cute felt Christmas decorations I designed for docrafts Creativity magazine last year.
I'm sharing all the tutorials so you can sew a whole set of ornaments, or mix and match your faves. So far I've shared the snowman bauble, the stripey stocking, the reindeer bauble, the sparkly star and the angel bauble. The final two projects will be popping up on my blog in the next couple of weeks.
To make the button heart, you will need:
- templates (see the bottom of this post)
- red felt
- red sewing thread
- assorted red buttons
- a mini ribbon bow and matching sewing thread (I used a fabulously sparkly glitter bow from the docrafts Create Christmas range and white thread)
- white embroidery thread (floss)
- white narrow ribbon
- toy stuffing
- sewing scissors
- sewing needles and pins
To make the button heart:
1. Use the templates provided to cut out two heart shapes from red felt.
2. Arrange buttons. Lay out on one heart then sew onto other. Leave space at edges for sewing together and adding bow. Smaller, lighter buttons = best for this. Sew buttons on securely with several stitches of double thickness red thread.
3. Add mini bow with a few stitches in centre - to attach the silver bow I used white thread.
4. Cut a 15cm (6 inch) length of narrow white ribbon. Fold the ribbon into a loop and sew the ends to the top of the undecorated heart shape. Use whip stitch and red sewing thread, sewing into the felt not through it.
5. Place the front and back heart pieces together so the ends of the ribbon are sandwiched between the two layers and the loop sticks out the top above the bow.
Hold or pin the two heart pieces together and blanket stitch around the edge, using half strands of white embroidery thread. Stitch most of the way round - folding the bow forward as you sew behind it - and leave a gap for stuffing.
Tip: start your stitching at one side, so the gap for stuffing is along a straight edge.
6. Add small pieces of stuffing to gradually fill the heart, stuffing it lightly so it's evenly filled but still very squishy. Then sew up the gap with more blanket stitches and finish your stitching neatly at the back.
This tutorial is for personal use only: you can use it to stitch as many felt ornaments as you want for yourself or as gifts, but please don't make any for sale. You may borrow a photo or two if you want to blog about this project, but remember to credit me and link back to the original source, and do not reproduce my entire post or share the pattern itself on your site. Thanks!
Enjoyed this free tutorial? Buy me a "coffee" and help support my blog!
Subscribe to my newsletter for a monthly free pattern and visit my crafty tutorial archive for lots more free projects.
Visit my shop to buy my printable PDF sewing patterns:
Labels:
buttons,
christmas ornaments,
felt,
felt ornaments,
free tutorials,
heart,
how to,
sewing tutorials
Friday, 4 November 2016
Special offer: 50% off in my Etsy shop!
Use the coupon code HURRAH50 to get a massive 50% anything in my Etsy shop until the end of the month.
There are a few brooches and other handmade items left in my sample sale, a few pieces of pretty fabric in my crafty destash sale, plus some bargain pompom packs which are perfect for adding some fluffiness to your gift-wrappping:
You can also get 50% off the listed price on the remaining items in my Instasale, where you'll find yarn and fabric and felt and colouring books and other crafty stuff!
I'm happy to combine postage if you want something from my Etsy shop and something I've got listed over on Instagram. Just let me know and I'll get things sorted for you as soon as possible.
Oh, and all parcels this month will include a free gift! Hurrah!
Please note: the 50% discount excludes shipping/postage, and this offer will end at midnight UK time on November 30th 2016.
There are a few brooches and other handmade items left in my sample sale, a few pieces of pretty fabric in my crafty destash sale, plus some bargain pompom packs which are perfect for adding some fluffiness to your gift-wrappping:
You can also get 50% off the listed price on the remaining items in my Instasale, where you'll find yarn and fabric and felt and colouring books and other crafty stuff!
I'm happy to combine postage if you want something from my Etsy shop and something I've got listed over on Instagram. Just let me know and I'll get things sorted for you as soon as possible.
Oh, and all parcels this month will include a free gift! Hurrah!
Please note: the 50% discount excludes shipping/postage, and this offer will end at midnight UK time on November 30th 2016.
Wednesday, 2 November 2016
October in Pictures: Terrific Tiles, Seasonal Stitching and Lovely Leaves
The clocks have gone back, the days are misty and the nights are drawing in... helloooooo November! I've got lots of crafty goodness planned for this month, but in the meantime let's look back at my Instagram photos from last month.
October started rather brilliantly as I spent the day on a photowalk with friends, exploring the southern end of the Northern Line and taking lots and lots and lots of photos. You can read more about the photowalk and the places we visited over on Kate's blog (I'm sure I'll get round to blogging about it eventually!)
Two of my favourite photos from the day involved tiles. Gorgeous black and green tiles in one of the Art Deco Northern Line stations we visited...
... and some equally fabulous tiles in a south London doorway.
It was so much fun walking round London in a little group looking for things to photograph - it's amazing the details you spot when you take the time to really look, and really interesting seeing how everyone's photos turned out.
Later that week I headed to the Knitting and Stitching show at Alexandra Palace, helping out on the Interlace stand for a couple of hours (aren't their bowls amazing?) then spending the rest of the afternoon checking out all the other stalls and soaking up some textile inspiration.
I also made use of my Network Railcard and my Art Pass and went to Brighton for the day. I'd been meaning to visit Brighton for about five years, and I'm really glad I finally did! I spent the morning walking along the beach and the pier, then went to the Royal Pavilion for lunch and a long look round (oohing over the fabulous decor and discovering the building's fascinating history).
With Halloween approaching, I shared photos of a couple of spooky projects: the felt vampire I designed for Felt-o-ween (which includes 40 scary-cute projects to make from felt)...
... and the cute bat ornaments I designed for the "celebrations" section of my first book, Super-Cute Felt.
I also shared photos of the kitsch stocking I designed for October's issue of Mollie Makes magazine (it's always such a pleasure having my work in this mag!).
Dreaming of autumn leaves while I was stuck indoors working, I dug out a couple of my fave photos from last autumn - a splash of gold at Kew Gardens...
... and the Thames looking kind of amazing during an autumn walk this time last year.
I also looked back at a few Nice Days Out here on my blog - visits to an art exhibition in Reading Prison, Kirkgate Market in Leeds and a walk through Bristol. Three very different places, all filled with interesting architectural details!
I simply had to Instagram these beautiful church floor tiles I spotted on my Bristol walk.
When I wasn't busy reminiscing about past travels, I was working behind the scenes on some new things.
I couldn't resist sharing a sneak peek of one of the patterns I'm working on. These auricula brooches are one of the design variations I'll be including in my Primroses & Auriculas pattern.
I've also been prepping for my November class at the Village Haberdashery in London (we'll be making these vintage-inspired felt Christmas onaments!)...
... and sharing lots of festive felt ornament tutorials here on my blog.
In my spare time my craftiness continues to revolve around the Christmas quilt I'm making for my sister.
I hit the halfway mark with the quilting (woohoo!) then did so much quilting that I got totally sick of it and had to take a break to stop myself going a bit bananas. I've got to get back to it soon though or I'll run out of time to have it finished in time for Christmas!
That wooden hoop is a massive 16 inches (about 40cm) wide - you use it to keep a section of the quilt flat as you stitch. I'm using red thread and hand stitching a grid of lines across the quilt, sewing one line either side of each seam.
Each line takes at least an hour and a half to stitch: I've got 30 lines sewn and 14 still to go! Then of course there's the binding, but I'll cross that bridge when I come to it.
Finally, we were lucky to get some sunshine at the end of the month and I got to enjoy all the autumn colour on my walks to the Post Office and my days off (hurrah!). Autumn sunshine and bright autumn leaves are a great combo.
I'll share another Instagram round-up next month :)
I'm lauralupinhoward on Instagram - click here to visit my page and follow me. You'll also find me on Facebook and Twitter.
October started rather brilliantly as I spent the day on a photowalk with friends, exploring the southern end of the Northern Line and taking lots and lots and lots of photos. You can read more about the photowalk and the places we visited over on Kate's blog (I'm sure I'll get round to blogging about it eventually!)
Two of my favourite photos from the day involved tiles. Gorgeous black and green tiles in one of the Art Deco Northern Line stations we visited...
... and some equally fabulous tiles in a south London doorway.
It was so much fun walking round London in a little group looking for things to photograph - it's amazing the details you spot when you take the time to really look, and really interesting seeing how everyone's photos turned out.
Later that week I headed to the Knitting and Stitching show at Alexandra Palace, helping out on the Interlace stand for a couple of hours (aren't their bowls amazing?) then spending the rest of the afternoon checking out all the other stalls and soaking up some textile inspiration.
I also made use of my Network Railcard and my Art Pass and went to Brighton for the day. I'd been meaning to visit Brighton for about five years, and I'm really glad I finally did! I spent the morning walking along the beach and the pier, then went to the Royal Pavilion for lunch and a long look round (oohing over the fabulous decor and discovering the building's fascinating history).
With Halloween approaching, I shared photos of a couple of spooky projects: the felt vampire I designed for Felt-o-ween (which includes 40 scary-cute projects to make from felt)...
... and the cute bat ornaments I designed for the "celebrations" section of my first book, Super-Cute Felt.
I also shared photos of the kitsch stocking I designed for October's issue of Mollie Makes magazine (it's always such a pleasure having my work in this mag!).
Dreaming of autumn leaves while I was stuck indoors working, I dug out a couple of my fave photos from last autumn - a splash of gold at Kew Gardens...
... and the Thames looking kind of amazing during an autumn walk this time last year.
I also looked back at a few Nice Days Out here on my blog - visits to an art exhibition in Reading Prison, Kirkgate Market in Leeds and a walk through Bristol. Three very different places, all filled with interesting architectural details!
I simply had to Instagram these beautiful church floor tiles I spotted on my Bristol walk.
When I wasn't busy reminiscing about past travels, I was working behind the scenes on some new things.
I couldn't resist sharing a sneak peek of one of the patterns I'm working on. These auricula brooches are one of the design variations I'll be including in my Primroses & Auriculas pattern.
I've also been prepping for my November class at the Village Haberdashery in London (we'll be making these vintage-inspired felt Christmas onaments!)...
... and sharing lots of festive felt ornament tutorials here on my blog.
In my spare time my craftiness continues to revolve around the Christmas quilt I'm making for my sister.
I hit the halfway mark with the quilting (woohoo!) then did so much quilting that I got totally sick of it and had to take a break to stop myself going a bit bananas. I've got to get back to it soon though or I'll run out of time to have it finished in time for Christmas!
That wooden hoop is a massive 16 inches (about 40cm) wide - you use it to keep a section of the quilt flat as you stitch. I'm using red thread and hand stitching a grid of lines across the quilt, sewing one line either side of each seam.
Each line takes at least an hour and a half to stitch: I've got 30 lines sewn and 14 still to go! Then of course there's the binding, but I'll cross that bridge when I come to it.
Finally, we were lucky to get some sunshine at the end of the month and I got to enjoy all the autumn colour on my walks to the Post Office and my days off (hurrah!). Autumn sunshine and bright autumn leaves are a great combo.
Every year that yellow tree drops a whole carpet of yellow leaves and a few float over the road and onto these yellow lines. All that yellow makes me so happy!
I'll share another Instagram round-up next month :)
I'm lauralupinhoward on Instagram - click here to visit my page and follow me. You'll also find me on Facebook and Twitter.
Labels:
autumn,
felt ornaments,
felt-o-ween,
halloween,
instagram,
knitting and stitching show,
leaves,
mollie makes,
month in pictures,
october,
quilt,
super-cute felt,
tiles
Subscribe to:
Posts (Atom)