Wednesday, 24 October 2018

Easy 3D Letter Cards Tutorial: OMG! Wow! Yay!

Today I'm sharing a tutorial for making fun 3D letter cards:


This tutorial is sponsored by Bostik - it's the third in a series of crafty projects I'm sharing using their range of adhesives (I've also made a giant floral hula hoop wreath and some autumn leaf cards).

This time round I'm using Bostik's foam pads to create a quick and easy 3D effect. 


I've drawn templates for three different card designs - WOW! OMG! and YAY! - all of which are perfect for those exciting ALL CAPS life moments.

"WOW you got that awesome job, I'm so proud of you"...


... "YAY! It's your birthday"...



... "OMG you're having a baby?!??"...


... there are so many different situations when these cards would come in handy. 

I've designed the templates to fit A6 cards (made from a sheet of A5 card folded in half), but you can easily shrink or enlarge them to fit different card sizes.


You will need:

- the templates provided at the bottom of this post
- card in at least two contrasting colours (I chose bright, zingy colours to make my cards really pop but you could use any colours you fancy)
- Bostik foam pads
- craft scissors
- a craft knife and cutting mat, or a pin and a pair of small scissors (e.g. embroidery scissors)
- a pencil

To make a 3D card:

1. Draw the letters and an exclamation mark onto your chosen card, drawing carefully around each letter with a sharp pencil.

Make sure you flip the templates over first, so any pencil marks will be hidden at the back of the letters when you stick them to your card.


2. Cut out the card letters. To cut out the holes inside the O and the A, you can use a craft knife and cutting mat.

Alternatively, use a pin to carefully poke a few "starter" holes into the card then cut out the small inside shape with narrow-bladed scissors like embroidery scissors.


3. Turn the letters over so they're the right way round, then arrange them on your card.


4. Now it's time to stick the letters in place! I used Bostik's foam pads to attach the letters - they're really easy to use and create an instant 3D effect as whatever you're sticking is slightly raised from the surface you're sticking it to.

 
Because the card letters are quite narrow, I cut the foam pads into halves (and some into quarters) so they'd fit. Make sure you do this before you peel the pads from the backing paper!

Peel a foam pad (or the section you're using) off the backing sheet and carefully press it onto the back of the letter. Once you've added a few pads to evenly cover the shape, peel off the paper from the top of each pad so they're all ready to stick. 


 Lift up the letter, turn it over and carefully press it into position on the card.


Use more of the foam pads to attach the remaining letters and the exclamation mark.


Your finished cards will look something like this:


DISCLOSURE: this post is sponsored by Bostik, who also provided the Foam Pads I used to make the cards. 

Click here to open the template sheet in a new window, make sure you're viewing it full size then print it at 100%.


Monday, 22 October 2018

Christmas Ornaments in Progress

I thought you guys might like to see how I'm getting on with the final four felt ornaments I'm making from Alicia Paulson's lovely patterns...


If you're a regular reader of my blog you'll know that I've had some of Alicia's Christmas ornament kits for years and am finally making an effort to get them all stitched and ready for Christmas.

I finished the first seven this summer...

http://bugsandfishes.blogspot.com/2018/08/sewing-felt-christmas-ornaments.html

... then finished another four a few weeks ago:

http://bugsandfishes.blogspot.com/2018/09/more-felt-christmas-ornaments-finished.html

They're large, double-sided ornaments, with lots of pieces and details to stitch but I'm getting there slowly!

I've almost finished the Gingerbread Girl; I just need to embroider her face, add the ric rac hanging loop and stitch the front and back together.


I'm waiting for a day when I'm feeling particularly focused, as I don't want to mess up the little details of her face!

I also need to add the face to the Notevena Mouse...


... and give him some feet, of course!

I've been deliberately leaving the fiddliest bits of these ornaments until last, skipping ahead of Alicia's instructions to do so (tsk tsk). For example, I should have stitched the little candle in the Lighted Window already, but there's been no harm done by leaving it until later.


If you're ever going to skip ahead with a tutorial, you should - of course! - read the instructions all the way through to make sure you're not going to cause yourself any problems later on. Sometimes the order things get stitched in is just a matter of personal preference, but sometimes there's an important reason why you need to stitch X before Y and if you stitch Y before X you'll end up in a pickle.

Really, you ought to read the instructions all the way through before you start stitching at all and definitely before you start cutting anything out. I foolishly didn't do this when I first began work on these patterns. I just went ahead and cut out all the pieces based on the colours and quantities marked on the template sheet.... and now I am, as you might expect, in a bit of a pickle.

I shouldn't have cut out the Whistling Tea Kettle shapes before embroidering the design, so my tea kettle is now going to end up with some extra layers of felt or fabric in the middle as I'll need to tack the shapes to some material so I can place them in embroidery hoops and stitch the flowers.

Not ideal, but hopefully it'll work out okay and I'll have a lovely finished tea kettle ornament to show you guys soon!

Click here to find all these lovely patterns on Alicia's website.

Click here to find lots more Christmas crafting ideas in my tutorial archive.

Friday, 19 October 2018

Happy Fir Trees: Felt Christmas Ornament Tutorial

Make some happy little felt fir trees to hang on your Christmas tree this year!

 
These cute felt tree ornaments are a variation on the Halloween candy corn ornament tutorial I shared a few years ago...

http://bugsandfishes.blogspot.com/2014/10/how-to-felt-candy-corn-ornaments.html

... just in fir tree colours, and with brown trunks added to complete the tree shape.

These ornaments are really fun and easy to sew, and would make a great addition to your decor this Christmas. For less cute ornaments, you could leave off the smiley faces and just make plain trees. You could also add seed beads or embroidery to make your fir trees into decorated Christmas trees.


You will need:

- Felt in three shades of green
- Brown felt
- Black seed beads
- Sewing thread to match all the felt colours
- Black sewing thread
- Narrow ribbon
- Toy stuffing
- A needle and pins
- Sewing scissors
- A ruler and pencil
- The template sheet from the candy corn ornament tutorial

To make a fir tree ornament:

A. Follow steps 1-5 of the candy corn instructions, using three shades of green felt (darkest at the bottom, lightest at the top) instead of yellow, orange and white felt.


B. Cut two rectangles of brown felt (each measuring 1.5 cm x 2 cm) for the tree's trunk. Place these on top of each other and sew them together along three sides with whip stitch or blanket stitch and matching brown sewing thread, leaving one of the short sides unstitched.


C. Stuff the trunk with a tiny piece of toy stuffing, then sew it to the bottom of one of the tree pieces. Use whip stitch and green sewing thread, sewing into but not through the green felt. Also add a ribbon loop to the tree, as in step 6 of the candy corn ornament tutorial.


D. Join the front and back of the tree ornament together then stuff it lightly with toy stuffing, as in steps 7 and 8 of the candy corn ornament tutorial. Start your sewing at the side of the tree ornament, not the bottom, so you can sew past / through the trunk before you begin stuffing the ornament. Turn the ornament back and forth as you sew past the trunk to help keep your stitching neat on both sides.

Your finished ornament(s) will look something like this:


These trees would also make cute brooches: just add a brooch clasp instead of a ribbon loop!


Enjoyed this free tutorial? Buy me a "coffee" and help support my blog!

Buy Me a Coffee at ko-fi.com

Subscribe to my newsletter for a monthly free pattern and visit my crafty tutorial archive for lots more free projects.

Visit my shop to buy my printable PDF sewing patterns:

This tutorial is for non commercial use only: you can use it to make as many felt ornaments as you want for yourself or as gifts, but please don't make any for sale. You may borrow a couple of photos if you want to blog about this project, but remember to credit me and link back to this page on my blog, and do not reproduce my entire tutorial / share my templates on your site. Thanks!

Wednesday, 17 October 2018

Weston-super-Mare in Pictures: July, August, & September 2018

Blimey, this year is going fast!

With nine whole months of 2018 finished already, it's time to look back at my seaside snaps from summer and early autumn....

This summer was kind of amazing. So much heat! So much sunshine! I've eaten a lot of ice-cream when out on my walks... and I've got accidentally suburned a few times, too (oops).

The main stretch of Weston's seafront has been totally packed with people,but there were still quiet spots to enjoy further along the beach...


... and up in the local nature reserve.


I've also really enjoyed getting to know some more of Weston's residential streets this summer, walking up and down and around in different areas looking at all the lovely houses. I particularly loved this house with its cheerful blue shutters...


... and this lavender-filled garden squeezed in between two roads.


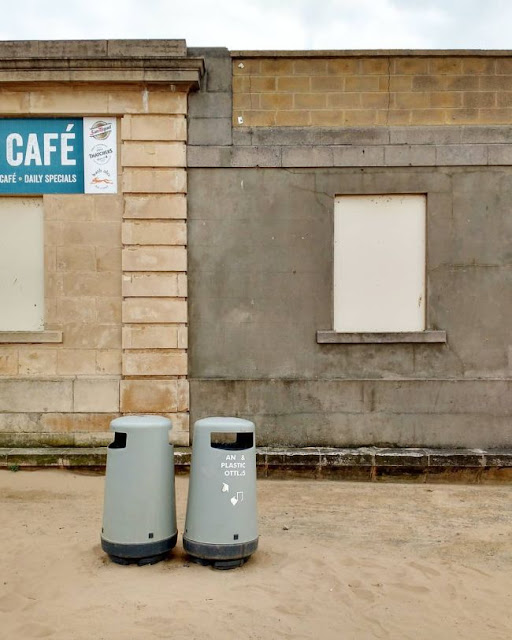
As well as pretty houses and gardens, my camera roll has (as ever) ended up full of things like bins. I know photos like this are absolutely not everyone's cup of tea, but I love them! The different textures, shapes and colours of those walls, the way those bins look like two quirky little robots. So good.


Up the other end of the seafront, the old Victorian pier has been looking as moody as ever...


... and the old fort looking wonderfully overgrown.


Walking to the old fort up in Weston Woods, I passed this amazing door which I think is now my favourite door in Weston. Isn't it fabulous?


Now the heat of summer has passed and autumn is beginning to creep in. This track leading to the golf course was one of the first places to look properly autumnal...


... while summer was doing its best to cling on down at the beach!


On a recent walk to the village of Uphill, I photographed another fabulous door (or is it a gate?)...


... made some new friends up on the hill...


... and absolutely did not sit on this nettle-backed bench!


It continues to be a joy seeing how these familiar, much-visited places change and surprise me with the passing of the seasons, but I'm also trying to walk slightly different routes in search of new details and not-yet-noticed corners.

Most recently, I walked a different way past some sheds near the seafront and was completely smitten by these crumbling edges (and that glorious colour!).


I'm looking forward to seeing what the rest of the year has in store...

Click here for my earlier seaside photo round-ups, and here to follow along on Instagram!