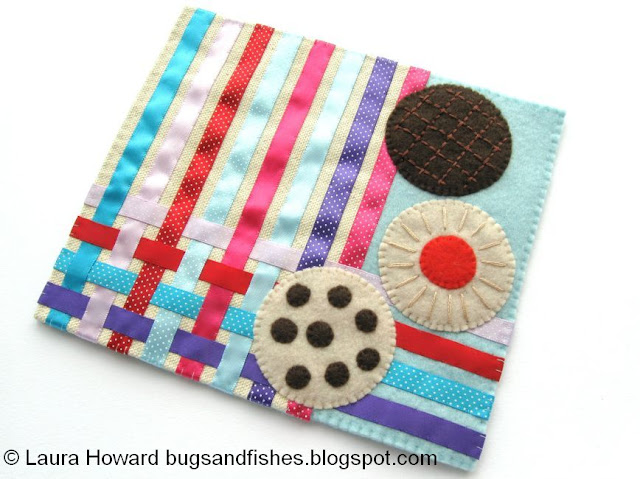
If you saw this project in the magazine, or remember me blogging about it you might remember that the final version had fewer ribbons. I rather like this super-stripey version but if you'd prefer something simpler, just leave off some of the ribbons :)
You could also stitch the felt biscuits to other things, or just add a circle of plain felt and a brooch clasp to the back to make biscuit brooches!
You will need:
- the templates provided
- light brown, dark brown and red felt (for the biscuits)
- pale blue felt
- canvas or other cream fabric
- assorted coordinating ribbons
- a ruler
- a pencil
- sewing thread to match all the felt, fabric and ribbons
- a sewing needle and pins
- sewing scissors
To make the mug mat:
1. Use a ruler and pencil to mark a rectangle in the centre of a piece of canvas (or other fabric) measuring 11.5 x 16cm. Trim the fabric to leave a 2 or 3 cm seam allowance around the rectangle then fold and press the fabric to the size of the rectangle. Pin the edges then sew them with small running stitches and matching cream thread. Remove the pins.
2. Cut a piece of pale blue felt measuring 7 x 16cm. Place the felt and the canvas together, right sides facing, and join them together with a line of small whip stitches along one edge. Take care not to sew your stitches too tight! Then carefully press the seam open with your fingers so you now have a single flat rectangle, part fabric and part felt.
Tip: if you'd like to make the whole mat from felt, just cut a rectangle of felt measuring 11.5 x 16 cm in step one and attach this to the blue felt in step two.
3. Cut up to 12 pieces of ribbon in a selection of colours – each approximately 22 cm long. To create the mat pictured use Anita's ribbons in deep purple, fuchsia, soothing blue, lilac mist, radiant red and turquoise. Plan the arrangement you'd like, laying the ribbons out on the mat.
The mat pictured has four horizontal and eight vertical ribbons, but you might want to use more or fewer ribbons depending on how wide they are and how busy you'd like your finished design to be.
4. Pin then tack the ribbons in position on the mat, as pictured. If you're covering the whole of the fabric with ribbons (as pictured), start with the far right vertical ribbon which covers the join between the canvas and felt.
Space the ribbons evenly, weaving them together in an over/under pattern where they cross. Once all the ribbons are tacked in place, remove the pins.
5. Use matching threads and tiny whip stitches (or small running stitches) to sew the ribbons in place. Sew along both edges of the ribbons, removing the large tacking stitches gradually as they’re no longer needed.
6. Make the felt biscuits using the templates provided and following steps A, B and C, below. Pin the three biscuits in place as pictured, then sew them to the mat with whip stitch and matching threads.
7. Cut a piece of pale blue felt measuring 16 x 18.5cm. Pin the felt to the back of the mat and trim any excess felt if necessary. Sew the edges together with pale blue thread and whip stitch, removing the pins as you sew.
To make the felt biscuits:
A. To make the choc chip cookie: Cut a pale brown biscuit shape then cut some dark brown felt “chips” freehand. Sew the chips onto the cookie at random using whip stitch and dark brown thread.
B. To make the jam sandwich: Cut a pale brown biscuit shape and a red jam shape. Sew the “jam” in the centre with matching whip stitches. Then decorate the biscuit with a pattern of long stitches in light brown embroidery thread.
C. To make the chocolate biscuit: Cut a dark brown biscuit shape. Decorate with lines of lighter brown embroidery thread, sewing lines of backstitch to create a lattice pattern.
Tip: for easy-to-sew embroidery thread, just use half the strands! Take care not to pull your stitches too tight and pucker the felt.
Click here to view the template sheet, make sure you're viewing it full size then print it at 100%.
This tutorial is for personal use only: you can use it to stitch as many felt biscuits or mug mats as you want for yourself or as gifts, but please don't make any for sale. You may borrow a photo or two if you want to blog about this project, but remember to credit me and link back to the original source, and do not reproduce my entire post or share the pattern itself on your site. Thanks!
Enjoyed this free tutorial? Buy me a "coffee" and help support my blog!

Subscribe to my newsletter for a monthly free pattern and visit my crafty tutorial archive for lots more free projects.
Visit my shop to buy my printable PDF sewing patterns:


2 comments:
This is really a fun project, especially when you can stitch everything together by hand (unless you're an expert seamstress) :)
Thanks! :)
Post a Comment