Tuesday, 22 December 2020

Stack of Books Embroidery Pattern

Today in "PDF patterns that I'm randomly adding to my shops in the week before Christmas"... an embroidery pattern for book lovers!

This design would make a lovely gift for your book-devouring bestie - you can stitch it as it is, or customise it by adding the titles or authors of beloved books to the spines.

The pattern includes two versions of the embroidery pattern: one with the book page lines added and one without in case you'd prefer to stitch those freehand.


Click here to buy my Stack of Books Embroidery Pattern from my Etsy shop (the file will be available to download immediately after purchase).

Sunday, 20 December 2020

Christmas Houses, Festive Embroidery Patterns

UPDATE: customisable versions of these patterns are now available in my Patreon pattern library, so you can add the current year or your own choice of text.

Subscribe for a small monthly fee and you'll get access to a growing library of PDF patterns and tutorials, with an email whenever I add a new project. You can cancel any time. 

Click here to check out my Patreon page and sign up!

 ---

I've been drawing more houses!


A pair of Christmas house embroidery patterns! There's a detailed pattern, which fits in a 7 inch embroidery hoop...


... and a simpler design which will be much quicker to stitch and fits in a 6 inch embroidery hoop. 


As you may have guessed, I've adapted these from my Stay Home embroidery pattern. I was filing that pattern away and looked at the little flowers/stars on the sides and thought "ooh, those could totally be SNOWFLAKES" and the new patterns evolved from there!

I'm really looking forward to sewing these patterns over the holidays. If you stitch one (or even both?!?) I hope curling up with some soothing stitching brings you some peace and solace during this difficult Christmas.

Saturday, 19 December 2020

Felt Peony Brooches PDF Pattern

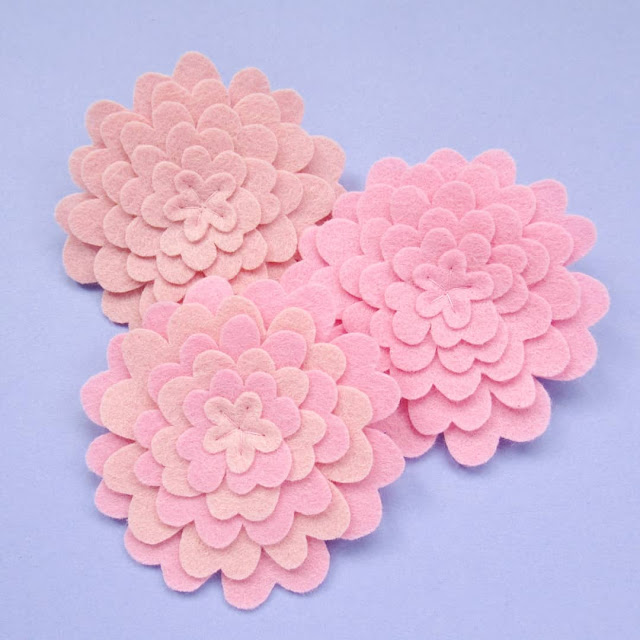
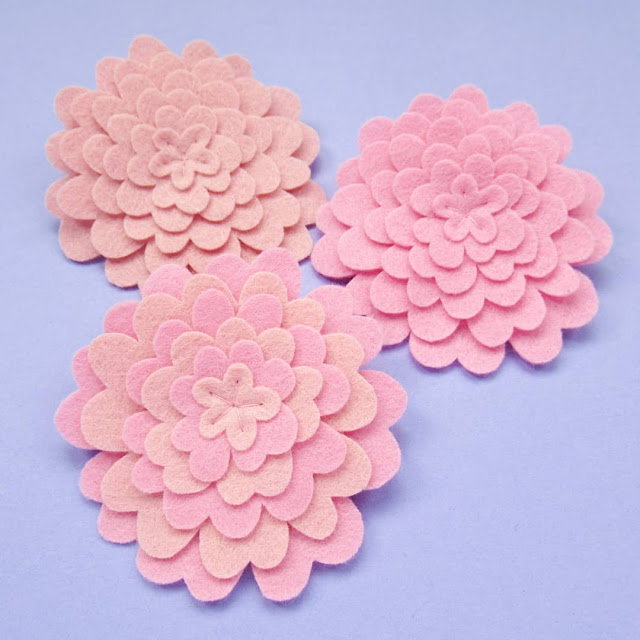
I've added another printable PDF pattern to my shops this week: a tutorial for sewing pretty felt peony brooches.

http://eepurl.com/dvfYO1


Is it a sensible business strategy to be adding summer flower patterns to my shops in the middle of winter? Probably not, but never mind!

I wanted some simple sit-on-the-sofa-with-my-feet-up tasks to do after packing and posting the last of my pre-Christmas orders... aaaaand so I've ended up launching a bunch of entirely un-seasonal PDFs :)

http://eepurl.com/dvfYO1
 http://eepurl.com/dvfYO1

The peonies are easy to sew but they do involve cutting lots of layers of petals. Don't worry if you think your cutting skills need a bit of improvement though, peony petals are a bit wobbly in real life after all, and cutting all these layers will give you lots of practice.

I always recommend investing in a pair of embroidery scissors to help you with cutting small or fiddly felt shapes - the small, narrow blades make it so much easier than using standard sewing scissors.

http://eepurl.com/dvfYO1

Click here to buy my Peonies PDF Pattern from my Etsy shop (the file will be available to download immediately after purchase).

Friday, 18 December 2020

How To: Sew an Embroidered Felt Gingerbread House Ornament

A little house embroidery pattern + some ginger coloured felt = a sweet little gingerbread house to hang on your Christmas tree!

I shared a set of five free house embroidery patterns this spring, which I realised would be perfect for making little embroidered Christmas ornaments. They'd be sweet for any Christmas, but they feel particularly appropriate for this year of staying home!

To sew my ornament, I stretched a piece of ginger coloured felt in an embroidery hoop. I traced the house pattern onto a piece of white tissue paper with a ballpoint pen, adding 2020 to the roof and the house number 10 to the door to personalise the ornament (it's gonna be a gift for someone who doesn't read my blog!). I attached the tissue paper to the felt with large tacking stitches of sewing thread, then followed the lines to stitch the design.

I used white embroidery thread (floss) to represent lines of icing, using three of the six strands. I stitched most of the design in backstitch then added French knot berries to the little tree. 

I then removed the tacking stitches and carefully tore away the tissue paper, revealing the embroidered design. I carefully cut around the house leaving a border of felt around the edge. I then used the house shape to cut a second backing shape of felt, added a loop of narrow ribbon, and joined the layers together with blanket stitch. 

I lightly stuffed my ornament but flat houses also look great and would be ideal for popping inside a card to a friend this holiday season!


These patterns are for non commercial use only: you can use them to embroider as many houses as you want for yourself or as gifts, but please don't make any for sale. You may borrow a couple of photos if you want to blog about this project, but remember to credit me and link back to this page on my blog, and do not reproduce my entire  post or share my pattern on your site. Thanks!

Enjoyed these free patterns? Buy me a "coffee" and help support my blog!

Buy Me a Coffee at ko-fi.com

P.S. Subscribe to my newsletter for a monthly free pattern and visit my crafty tutorial archive for lots more free projects.

Visit my shop to buy my printable PDF sewing patterns:


Wednesday, 16 December 2020

Little Felt Robins PDF Pattern

Psst - there's a new PDF pattern in my shops!


You can use this tutorial to sew sweet little felt robin brooches or Christmas ornament... with or without sequins! 

The printable PDF file includes step by step photos and instructions, plus three easy-to-print sizes of the templates. 


As with all the PDF patterns I sell, once you've bought my little robins pattern you have my permission to use it to make items for sale at craft fairs or in your own online shops.


Click here to buy my Little Robins PDF Pattern from my Etsy shop (the file will be available to download immediately after purchase).

Sunday, 13 December 2020

Winter Reindeer: Christmas Embroidery Pattern

The festive crafting continues!


A couple of years ago I made some reindeer Christmas cards (super fun!) and thought "ooh, this design would look lovely embroidered"... and I was totally right. I'm delighted with how this little guy turned out!

The deer pattern fits nicely inside a 7 inch embroidery hoop.


I stitched my reindeer on royal blue felt. I traced the pattern onto white tissue paper with a ballpoint pen and roughly cut around it (leaving at least 1cm of paper around the deer). I then tacked the tissue paper to the felt with some long stitches of sewing thread and embroidered the design. 

I used white embroidery thread (floss), sewing with three of the six strands in the thread. I used French knots for his eyes and sewed the rest of the pattern with backstitch, sewing small stitches to create smooth curves. I used backstitch for the deer's nose but you could use satin stitch instead. 

For added fun, why not sew the nose in red thread?

After I'd finished stitching the deer I removed the tacking stitches and carefully tore away the tissue paper to reveal the design.

Then it was time to add the details!

I added an inner line of backstitch to the reindeer's blanket, then stitched a zig-zag line of single stitches and a scattering of French knot dots. If you were stitching several of these as gifts you could sew a different pattern on each blanket, making each gift unique. 

Then I sewed the wobbly line of the ground with backstitch, and filled in the space above it with snowflakes sewn from three overlapping stitches. I started my snowflake stitching around the deer then worked outwards, sewing different size snowflakes to create a natural look.

You'll find the Winter Reindeer pattern over on my Patreon!

Subscribe for a small monthly fee and you'll get access to a growing library of PDF patterns and tutorials, with an email whenever I add a new project. You can cancel any time.    

Click here to check out my Patreon page and sign up!

Saturday, 12 December 2020

Last Chance to Order Before Christmas!

Tomorrow (Sunday 13th December) is the last day to order from my shops - lauralupinhoward.com and lupin.etsy.com - and have your items posted before Christmas!

The Royal Mail are so overwhelmed with parcels this year (for obvious reasons!), people have been experiencing lots of delays in receiving their mail and it's making me worried about my customers not getting their orders.

Please note that even items purchased this weekend are not guaranteed to arrive by Christmas - I'm posting stuff as soon as possible but please remember I have no control over what happens to your parcel once I've handed it over to the Post Office! Bear with me and the hard-working posties :)

My shops will be stocked with digital items only from Monday 14th December, then I'll fully re-open on Saturday 26th December and start posting parcels again from 29th December when the Post Office re-opens after Christmas.

Friday, 11 December 2020

Felt Dove Ornaments Sewing Pattern & Peace on Earth Embroidery Pattern

Sew lots of doves this Christmas with my latest PDF pattern!


The printable PDF pattern includes a step-by-step guide to sewing the ornaments, and templates for two sizes of the birds... plus a Peace on Earth embroidery pattern!

I've included instructions for adding embroidery, sequins, and beads to your doves. You can copy my doves, or get creative and add your own embellishments.


These look so pretty against the dark green of a Christmas tree, and make lovely gifts. 

As with all the PDF patterns I sell, once you've bought the doves pattern you have my permission to use it to make items for sale at craft fairs or in your own online shops.


Click here to buy my Doves pattern from my Etsy shop (the file will be available to download immediately after purchase).

Thursday, 10 December 2020

Sew a 2020 Christmas Ornament: Masked Gingerbread Man Tutorial

Yesterday I shared a tutorial for making fun felt Santa-in-a-Facemask ornaments and today I'm sharing how to make another very 2020 decoration... cute little gingerbread men wearing facemasks!


I based this ornament on the gingerbread man tutorial I posted a couple of Christmases ago - click here for the template and tutorial.  


To make the masked 2020 version, follow steps one, two, and four (skip step three!).

Then cut a rectangle of pale blue felt for the mask (white would also work if you don't have any pale blue!), approx 16 x 11 mm. 

Position it on the gingerbread man and sew it in place with lines of backstitch in matching sewing thread. Sew along the outside edges first, then sew two more horizontal lines to represent the folds of the mask.


For the Father Christmas ornament, I made the mask curved at the top and bottom to create a 3D effect but gingerbread men are flat so their masks would stay looking like a rectangle!

(It's very important to make your mask-wearing gingerbread men look realistic, hahaha).

Adding the elastic straps/loops is a little fiddly so take your time: sew a stitch of white embroidery thread out from one corner of the mask and over the edge of the gingerbread shape. Secure it with a few stitches on the back. Then repeat this process to add three more lines of "elastic".

Because these ornaments are smaller than the Santas, I used fewer strands of embroidery thread (three of the six strands in my thread). 

Then follow five and six of the original tutorial to add the ribbon loop and finish the ornament. 

And, ta-da! One cute ornament for Christmas 2020!

This tutorial is for non commercial use only: you can use it to stitch as many ornaments as you want for yourself or as gifts, but please don't make any for sale. You may borrow a couple of photos if you want to blog about this project, but remember to credit me and link back to this page on my blog, and do not reproduce my entire  post on your site. Thanks!

Enjoyed this free tutorial? Buy me a "coffee" and help support my blog!

Buy Me a Coffee at ko-fi.com

P.S. Subscribe to my newsletter for a monthly free pattern and visit my crafty tutorial archive for lots more free projects.

Visit my shops to buy colourful craft supplies, plus my printable PDF sewing patterns:

Wednesday, 9 December 2020

Sew a 2020 Christmas Ornament: Santa in a Facemask Tutorial

Sew a silly felt ornament to commemorate this deeply weird year!

I made my masked Father Christmas decorations using my Santa Bauble pattern, but you could easily adapt other festive felt ornament tutorials to make 2020 versions!


To make the masked Santa, follow steps one and two to cut out and assemble all the felt pieces.

Then cut a face mask shape from pale blue felt. You can use the template included at the bottom of the post or just measure a rectangle of felt large enough to cover where Santa's nose and mouth would be, then cut the top and bottom edges to be curved to give a 3D effect.

Position the mask and sew along the straight edges with backstitch and matching pale blue sewing thread.

Then sew along the curved edges with more backstitch.

Add two more curved lines of backstitch to represent the folds of the mask - aim for curves similar to those pictured but don't worry if you end up with uneven spacing or unbalanced curves, the mask will still look like a mask!

For the elastic straps of the mask, sew one stitch with white embroidery thread (floss) coming from each of the four corners. 

I used the whole thickness of my embroidery thread but it's easier to sew with fewer strands! I positioned my stitches so it looks like Santas has the elastic loops tucked behind his ears. 

If the character you're adding a felt mask to doesn't have ears (or, in the case of an animal, maybe has ears on the top of its head) positon your stitches so it looks like the elastic is stretching around the back of the head.


Then give your Santa some eyes! I used black seed beads for my 2020 baubles but you could use black embroidery thread instead (sew a large French knot or just sew a few very small stitches on top of each other to create the eye). 

For the background you could sew on some seed beads (see step four of the original tutorial), or add embroidery. I've been making baubles that say XMAS 2020 or 2020 2020 but you could add any short text you fancy! You'll find the templates I used at the bottom of this post.

When I'm adding a bit of embroidery to felt, I like to use a bit of tissue paper. Write the text you want to stitch onto the tissue paper, tack the paper to the felt with a few stitches of sewing thread, embroider the design with backstitch (I used half the strands of my white embroidery thread), then remove the tacking stitches and carefully tear away the paper to reveal the stitching. 

You can see photos of this technique in my pocket hugs tutorial. 

Finish your bauble by following steps five, six, and seven in the Santa bauble tutorial (I skipped the stuffing for my 2020 baubles to make them easier to post!).

Want to buy one of these ornaments instead of making one? You'll find them in my Etsy shop. 

After I'd sewn some Santas, I couldn't resist making a masked gingerbread man as well! Come back tomorrow for the templates and how to...

 
This tutorial is for non commercial use only: you can use it to stitch as many ornaments as you want for yourself or as gifts, but please don't make any for sale. You may borrow a couple of photos if you want to blog about this project, but remember to credit me and link back to this page on my blog, and do not reproduce my entire  post on your site. Thanks!

Enjoyed this free tutorial? Buy me a "coffee" and help support my blog!

Buy Me a Coffee at ko-fi.com

P.S. Subscribe to my newsletter for a monthly free pattern and visit my crafty tutorial archive for lots more free projects.

Visit my shops to buy colourful craft supplies, plus my printable PDF sewing patterns:

Click here to open the template sheet in a new window, make sure you're viewing it full size then print it at 100%.